Continue to Site

Welcome to EDAboard.com

Welcome to our site! EDAboard.com is an international Electronics Discussion Forum focused on EDA software, circuits, schematics, books, theory, papers, asic, pld, 8051, DSP, Network, RF, Analog Design, PCB, Service Manuals... and a whole lot more! To participate you need to register. Registration is free. Click here to register now.

7 segment display connections

Status
Not open for further replies.

pgr2002

Member level 5
Joined
Aug 1, 2013
Messages
87
Helped
0
Reputation
0
Reaction score
0
Trophy points
1,286
Location
Hyderabad, India
Activity points
2,015
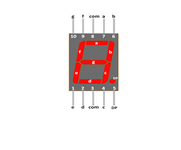
I am attaching one circuit diagram of ESR digital meter using ICL7107. Here in this circuit the 7 segment display, 10th position is shown as "f", but actually the 10th position is "g". Which is correct. (7 segment display is common anode). Will anyone clarify regarding this and which one is correct.
Pin "9" is also interchanged in circuit diagram and the rest of the pins match.
 

Attachments

  • Circuit Diagram.png
    Circuit Diagram.png
    785.3 KB · Views: 214
  • 7 seg display pins.png
    7 seg display pins.png
    23.5 KB · Views: 216

Hi,

First, quick self-correction: make ground leads as short as possible.

Your question, let's do the calculation:
20,000 ohms/ideal 360° adjustment range = 55.55 ohms per degree. That's 3x 18 ohms and I certainly wouldn't hope to have to try to adjust a single-turn pot by 1/3 of a degree 😉.

Usual advice is use potentiometers sized to preferably keep the wiper far away from either end to avoid passing too much current through wiper, that or putting a fixed resistor in series with the wiper.

Coarse and fine tuning: say one 47k pot at 42% (20k) followed by a 10k pot at 50% (5k) gets the 25k total and gives ample room for manoeuvre/adjustments. However, to accurately aim for 18 ohms, a 33 ohm or a 47 ohm pot would be much more suitable choices: 47R/300° = 0.156R per degree!
 

Hi pgr2002,

Suggestion with through-hole pcbs:
1) Draw/print the layout for the circuit the right way up.
2) Draw/print a mirror image version of it upside-down and with the pins and passive components labelled.
3) Print a spare version of 2).
4) Draw all wiring connections and solder points on 2) with a light, different-coloured ink.
5) Later, each time you solder a few connections, draw over what has been soldered/completed in a darker ink.

Mistakes are easy to make.

If you're familiar with the 7107, think of what you can check (buffered by a reasonable quality op amp) like is osc frequency correct, is Vref correct, and so on. Klaus might remember some other useful trouble-shooting steps with that kind of ADC, he's far more knowledgeable than I'll ever be.

If you're not yet very familiar with the 7106/7107 ADC, there are several application notes about it (I'll upload a couple in a day or so, when I next can) and assorted datasheets and circuit designs based around it that you might not have read but should.

Discard or not? Depends on money-willingless, effort-worthiness, certainty version 1 has multiple issues, willingness to de-solder (and prematurely age them with three waves of heat in total or have to replace) assorted components. You may want to troubleshoot version 1 a bit (i.e. poke around a bit with a buffered DMM and a buffered oscilloscope probe) just in case it provides useful insight about mistakes not to repeat and things that are right that should be repeated, and then do a new version 2.

Not sure if it fits a capacitor esr circuit, but preferable is four-wire measurement system if it can, surely?, and certainly subtracting lead and connector resistance, as mentioned above.

Use a star ground on through-hole circuits, and fussy people might make all ground leads the same length.

My most humble and well-intentioned and friendly opinion, learnt from experiences (plural!), to measure requires removing the minefield of obstacles that will produce more or less inaccurate results; an ADC is a fussy, prissy circuit, your design looks done nicely with effort, but due to normal and habitual inexperience, it looks like it misses that nuance of ADC, etc., circuits - what look like single-turn potentiometers (calculate what e.g. a 10% turn means in voltage or resistance and if that is accurate enough for it's purpose in-circuit) and electrolytic capacitors, the way of measuring the DUT tell me an awful lot...

Also, even with 7-segment display datasheets, check each segment first (before soldering anything) with a suitable resistor to be certain where A is, all the way to G.

You might find you can salvage that circuit by reading up on the 7107 and forum threads about it not working - only because you might recognize similar symptoms to your circuit (or not, but it wouldn't hurt), as well as doing your own trouble-shooting measurements (plan that in advance: a little table with a column for expected results, and a column of your actual measured results for three or four different resistances or capacitors, so as to compare in a calm, ordered, methodical fashion) and hopefully limit 'confusion, anger, frustration' (abundantly free in electronics, as most know) and the 'de-solder, re-solder' to a couple of parts.

Thanks a lot for all the replies I got from all. My only doubt is : there are 2 variable resistors in the circuit, values of which are 1K and 25K. I could not get a preset / pot for 25k. I used 20k preset instead of 25k. Will this VR of 20K make a difference in not zeroing the display and also not adjusting to 18 ohms.

I checked all the parts connections and voltages across the different terminals and found them to be reasonable. The parts connections were checked two to three times and made necessary corrections and this was the final stage now without any missing connections or parts. There are two variable resistors of 1k and 25k. In the circuit 1k is for adjusting zeroing when two leads are connected. The 25k is for adjusting to 18 ohms in the display when two leads are connected to 18 ohms resistor. I don't have 25 k VR's and used 20k preset which was readily available with me. In the local stores also I couldn't get 25k VR and also searched in the online stores in our country but not available. In amazon 25k pot for guitar is available which is wire wound but bulky. Is this the reason why it is not adjusting by using 20k VR.
 

Hi,

Okay, I misunderstood - I thought you were trying to get an accurate 18R out of a 20k potentiometer, my mistake, sorry.

Couldn't say with any certainty, it would be guessing. You said the 20k can't show 18 for an 18R resistor - is that despite your turning it from 0% to 100%? - If so, it might just fall short of the resistance needed, but that's only 'might'. I guess you've also tried with e.g. 47R and 100R to be sure it isn't a problem of the ADC not being able to sense that value.

Is the 7107 ADC set for the 200mV or for the 2V input range?

What voltage does the 18 ohm resistor theoretically generate for '18' to appear on 3.5 digit display? Is it driven by a current source (i.e. 100uA x 18 ohms = 1.8mV, or 1mA x 18 ohms = 18mV, etc.)?

I remember 710x ADCs count from 0 to 2,000, so a 2V range is 1mV = 1 count, 200mV range is 1mV = 10 counts. I mention this as your circuit may be correct but the selected range may be inappropriate, just a thought as no doubt the issue is other and potentially, as you say, the 20k not quite having the range it needs.

You could look for a 33k pot, or 47k, but not 22k (too small). Forget focussing on 25k, that's a not-standard value. Anything that is a multiple of 1, 2.2, 3.3, or 4.7, should be cheap and easily available (e.g. 10R, 100R, 1k, 10k, 100k, 1M, 10M, etc.).
 

Hi again,

Attached are Intersil application notes about dual slope ADCs like the 710x, plus two datasheets - added because reading different datasheets can sometimes mean the difference between disaster and finally understanding a point that is poorly explained or just missing in one datasheet but not another.

I think worrying about the specific value of the 25k pot may not be what to focus on but instead to be certain of the ref hi voltages, for 200mV range ref hi should be 100mV, for 2V range it should be 1V.

Also, TEST pin - have you checked that trouble-shooting option, if design permits, that all LED segments light up when it goes high?

Another, you could maybe read 'Overcoming Common Mode Range Issues When Using Intersil Integrating Converters an9609' first - in case there is something about the COMMON and IN LO set-up with regard to the input signal and what it thinks 'ground' (common) is.

Not sure what else to suggest at present.
 

Attachments

  • Building an Auto-Ranging DMM an028 Intersil.pdf
    149.5 KB · Views: 146
  • Do’s and Don’ts of Applying AD Converters an018 Intersil.pdf
    31.4 KB · Views: 169
  • Grebene Slope Converters.pdf
    928.9 KB · Views: 140
  • Overcoming Common Mode Range Issues When Using Intersil Integrating Converters an9609.pdf
    102.6 KB · Views: 139
  • Principles of Data Acquisition and Conversion an002 Intersil.pdf
    257 KB · Views: 158
  • Tips for Using Single Chip 3-1-2 Digit ADCs an052 Intersil.pdf
    201.9 KB · Views: 141
  • ADC icl7106-07-07s Intersil.pdf
    604.2 KB · Views: 139
  • Analog-to-Digital Converter 3 and a half Digit TC7106A TC7107A Microchip.pdf
    482.7 KB · Views: 141

Hi,

Can you measure the voltage between R25 wiper and ref lo pin, and between R25 wiper and its connection to R24?

That might tell you (if either voltage = ~0, that's probably not good/desirable and where the potentiometer ran out of further adjustment space) on which side to add a small fixed resistor or even to to fit in a 10k potentiometer set at 50% before installing to extend the range enough.

As you have said you got >53 ohms, then later measured the 18R as x4.83, if you also have 10R and 1R, measure them and the 18R and write down the results - you might see a pattern in the error that sheds light on the problem. Or if you have several 18R, use two parallelled (9R), then three paralleled (6R) in the test fixture, instead of 10 and 1R, in same way.

I don't know how the circuit works, despite reading the instructions pdf you uploaded, not sure if even your problem might not be back in 555 and chain of OAs section, to be open-minded about another possible why of strange display readings, but I do remember that trying to measure resistances that are connected to capacitors can be a bouncy, random and meaningless measurement, as I guess maybe a tiny leakage current from the DMM probes partially charges and discharge the attached capacitor or suchlike, so it would be nice to understand the theory of circuit operation beyond what the pdf says.


Thanks for the suggestions. I tried all the possibilities but in vain. The same display continues with numbers flashing when nothing is connected. I used ceramic capacitors in the circuit. Should I change these with myler / polystrene / tantalum capacitors. Because the author's images show these type of capacitors being soldered to the board. Though I do not have any of these I will have to get it from local store or online shop.
 

Thanks for the suggestions. I tried all the possibilities but in vain. The same display continues with numbers flashing when nothing is connected. I used ceramic capacitors in the circuit. Should I change these with myler / polystrene / tantalum capacitors. Because the author's images show these type of capacitors being soldered to the board. Though I do not have any of these I will have to get it from local store or online shop.

Hi,

No, I don't. Changing capacitors is unlikely to solve the problem. I would guess they used polystyrene, and to a lesser degree, mylar and tantalum for reasons of performance across a wide temperature range. An NP0 (C0G) ceramic capacitor would be a good choice, X7R and worse dielectrics wouldn't. MKT/PET are not so good for frequency or timing applications, usable but not as good as NP0.

There is an evident lack of fact-based numbers in all your replies. A lot of vaguery. Unclear as to why. (sic) "voltages are reasonable" is worse than meaningless and makes it hard to attempt to diagnose root of problem. If you don't have a DMM or an oscilloscope, your money would be better spent on a $5 to preferably $20 DMM than on capacitors.

If you don't have a breadboard, I also recommend getting one, even in the age of 'the invasion of the evaluation board and module people', breadboards are still a necessity - most normal circuits work well enough on them. I have breadboarded several 7106 and 7107 circuits before putting them on a pcb after I am sure they are working correctly.

"Numbers flashing" how? Are they the same numbers over and over again or different, random numbers? How fast do they flash?

You could try putting a jumper wire from 'in lo' to 'com' briefly, in case that is the cause of the problem.

And, a part of me wonders what would happen if 'reset' on the 555 were connected to ground (0V) with no DUT capacitor nor - 18R resistor in the test connector. What would the ADC output read - 00.00?

There are quite a few purported 'capacitor esr meter circuits' that also use a 555 to generate a square wave, if you search for that term and read them, some seem as (sometimes, dubiously) complicated as the one you copied and some seem more rational in their simplicity for what it is realistic to expect to get out of them with regard to meaningful - or just approximations to - esr values.

Thanks for the reply

1. I checked the voltages with DMM especially on 7107 and were reading 2.83 on almost all pins that went to segment displays.
2. The flashing numbers were random from 4:?? to even 10:?? per second.
3. A jumper wire from 'in lo' to 'com' stopped flashing and stood still at 0:00 but that also momentarily when connected
4. The pin 4 of 555 (reset pin) was connected to +ve 5v as per diagram. I removed and connected to ground (0v) with leads open. The display stood still at 0:00 but it did not allow the calibration when leads were shorted and a 18E resistor was connected. If I adjust R21 (1k) for 0:00 then it does not allow for 18E with adjusting R25 (20k or 47k or 100k even). If I adjust R25 then display varies when leads are open or shorted.
5. Since this circuit is complicated with lot more connections I did not use breadboard but proceeded directly with veroboard.
6. I did several circuits like transistor tester, power supply, etc first with breadboard then put on the veroboard.
7. I did the ESR tester by Lee Davison, wherein the circuit used a transformer and output to microammeter. Here I used 1ma meter which was readily available with me. Though the FSD could be noticed in the meter but in almost all cases it showed FSD when capacitors were connected. Hence I went with this present circuit.
8. I will once again check the voltages at different points in all the IC's and post it.
 

Hi,

1. You need to refer to 7107 datasheet to know what expected voltages you are checking for, make a table for the results, and then check the voltages on the important pins such as V+, V-, ref hi, ref lo, in hi, in lo, com - with no load connected and then with a load such as that 18R, and write the results down so you can think about what they mean or might mean. And, if possible, measure the 7107's frequency of oscillation to check it is more or less as calculated and not doing strange things. Otherwise, it's all a bit of a waste of your time.
2. How fast is your 7107 circuit supposed to refresh the display? You might want to slow it down, or unlikely - speed it up. Three times a second is normal, from what I remember. Who knows, once a second or ten times a second might be needed.
3. I don't understand. It puts the display to '00.00' when you jumper COM to IN LO, okay. But what does 'momentarily' mean: you jumpered it momentarily and it showed 00.00 - or with the jumper in place, you added a load and it still read 00.00?
4. The idea of resetting the 555 was only to see what the display read with no input. Clearly, the 555 has to be oscillating (on) for a voltage to develop across the 18R.
5 and 6. Well, that's what you get for making an unknown circuit without any testing first. Quite unbelievable logic you use: the more complicated something is, the more I would want to breadboard it and learn how it works or how my version differs from the schematic provided with regard to component values.
7. And did you consider inserting a voltage divider or suchlike to an appropriate part of the Lee Davison circuit to see if everything gave FSD because the input signals to the meter were too large for it? Sounds like 'over range', possibly.

Why are you making this complex version? It seems to me most of the esr meters I've been reading about are typical 'over-enthusiastic, ill-informed, a beginners' fan club aspiration for self-styled experts - who are not experts - promulgating their "hey wow, look at me" botch-job circuits they themselves understand little about in depth, little more than exercises in blogging narcissism, not serious circuits that are worth wasting time on' things.

It seems none of them are accurate and must be analog GIGO processors.
_____________________________________-_-

What I've been trying to learn a very little about this week:

Each capacitor (dielectric, voltage rating, package, package size) has its own SRF - throwing 100kHz at them as a one size fits all is wrong (the one you made is inexplicably around 56kHz, hint hint). 100kHz is a rule-of-thumb frequency that is presumably only/mainly good for aluminium capacitors - whose esr may be a typical 6 ohms, or may possibly reach tens of ohms. Also, SRF - the esr also rises again after the SRF point (where AC impedance and esr are at their lowest).

A meaningful - as in the results obtained - esr circuit would, I imagine, need an MCU to do some of the work and to interpret the results: first a frequency sweep to sense lowest esr point, then the measurement, then calculations to produce anything useful as a result/reading. Even then, that's still 'useless' info - esr should be defined in expected circuit operating conditions (applied voltage, frequency, temperature).

The simpler circuits all seem to imply that only aluminium capacitors will be measured, and mainly for troubleshooting bad capacitors in-circuit. I gather that for that, it's a low voltage (250mV) sine wave at about 100kHz that charges the capacitor (DUT) a little bit with a known current and the voltage across the capacitor is the unknown esr multiplied by the known current, which value the designer needs to scale up or down to the ADC input range.

It's noteworthy that not one major semiconductor manufacturer appeared in the various search results about esr meters with a design note for an esr meter - if it were so easy, there would be many professional esr meter design notes as it helps them sell more components. I wonder if it's an area ('esr' meters) so full of BS and GIGO that they don't want to sully their reputations nor waste their time with such 'beginner's delight' nonsense.

So, my conclusion, if a blurry snapshot of a capacitor's esr at one frequency, voltage and temperature is all that is of interest, and you can live with all the accumulated errors along the signal chain (frequency % initial accuracy and assorted drifts, non-ideal sine wave form, current source % initial accuracy and assorted drifts, op amp offset voltages, diode Vf shifts with applied voltage and current and yet again temperature effects, ADC intrinsic errors, wire and connector errors) the KISS rule applied to using Ohm's Law is a better place to start than copying this stuff. Or thinking of your own, like who knows what..., forcing an AC current through a known resistor connected to the DUT capacitor and subtracting Vresistor + Vcapacitor from Vresistor to gauge approximate esr (at frequency x, etc.) using an oscillator, a current source, three difference amplifiers, and a suitable voltmeter to display the results (probably doesn't work, btw). But I wouldn't take many of these 'esr' meters being used as useful test and measurement devices very seriously, if I were you.

Thank you for all the info shared

I could not make out the voltages as stated under. Kindly guide me what next.

1. TLC274CN pins
1-2.70
2-2.71
3-2.68
4-14.15
5-2.68
6-2.71
7-2.71
8-2.64
9-2.71
10-2.70
11-0
12-2.70
13-2.73
14-3.56

2. 555 pins
1-0
2-2.77
3-2.75
4-5.38
5-3.58
6-2.78
7-(-0.03)
8-5.38

3. CD4049 pins
1-5.38
2-2.98
3-2.42
4-2.36
5-2.98
6-2.36
7-2.98
8-0
9-2.98
10-2.36
11-2.98
12-2.36
13-0
14-2.98
15-2.36
16-(-0.64)

4. ICL7107 pins
1-5.39 29-0.54 to 2.89
2 to 18 - 3.77 30-2.72
19-3.40 31-3.10
20-3.78 32-2.15
21-0 33-1.13 to 1.73
22-3.83 34-1.27 to 1.94
23-3.83 35-2.16
24-3.78 36-2.16
25-3.81 37-0
26-(-3.38) 38-2.44
27-0.79 to 1.49 (not stable) 39-2.94
28-1.93 to 2.70 40-2.74
--- Updated ---

Thank you for all the info shared

I could not make out the voltages as stated under. Kindly guide me what next.

1. TLC274CN pins
1-2.70
2-2.71
3-2.68
4-14.15
5-2.68
6-2.71
7-2.71
8-2.64
9-2.71
10-2.70
11-0
12-2.70
13-2.73
14-3.56

2. 555 pins
1-0
2-2.77
3-2.75
4-5.38
5-3.58
6-2.78
7-(-0.03)
8-5.38

3. CD4049 pins
1-5.38
2-2.98
3-2.42
4-2.36
5-2.98
6-2.36
7-2.98
8-0
9-2.98
10-2.36
11-2.98
12-2.36
13-0
14-2.98
15-2.36
16-(-0.64)

4. ICL7107 pins
1-5.39 29-0.54 to 2.89
2 to 18 - 3.77 30-2.72
19-3.40 31-3.10
20-3.78 32-2.15
21-0 33-1.13 to 1.73
22-3.83 34-1.27 to 1.94
23-3.83 35-2.16
24-3.78 36-2.16
25-3.81 37-0
26-(-3.38) 38-2.44
27-0.79 to 1.49 (not stable) 39-2.94
28-1.93 to 2.70 40-2.74


TLC274CN PIN 4 IS 12.05
 

Hi,

Right, superrr, ... Are those numbers from:
- OPEN CIRCUIT conditions
- a capacitor in the test position
- the 18 Ohm resistor in the test position
- OTHER
???

I'm not sure, but looking at e.g. the CD4049 input/output voltages you just posted, you might be measuring a variety of AC signals on the multimeter DC settings (so you get erroneous results). The 4049 should be output LOW = 0.05V, output HIGH = 4.95V, 2.36V and 2.98V are very approximately the average of (0V + 5V)/2.
If it keeps changing significantly over time, it is AC (e.g. the 4049 ring oscillator changes voltage level abruptly so it is an AC measurement, or the 7107 LED segments that constantly switch on and off); if it is always the same or changes by a small amount very,very slowly, it is DC (the voltage reference is DC measurement, a signal that changes from 1.0V to 1.1V over ten seconds or over ten hours is a DC measurement)

I think by now you have plenty of 7107 related documents, especially the datasheet, to read yourself and understand yourself to compare if the voltages you measured match the expected values stated in the datasheet and application notes.

To troubleshoot the circuit, if I were going to bother, a place I'd start (not without effort and hassle) is to disconnect the ADC inputs from the op amp circuit section. Next (with the help of a breadboard), after adding the 1M series resistor and 10 nF parallel capacitor typical input components to the ADC In+ and In- (check datasheet and app notes for schematics), use a potentiometer and the 5.38V power supply to see if the 7107 works correctly as a voltmeter/displays the different voltages from the potentiometer correctly. If it displays the right numbers from minimum voltage through to maximum voltage within the input range on the seven-segment displays correctly, the problem lies between the 555 and/or the op amp section. If it doesn't, the problem is either human error or the 7107 set-up (and connecting COM to IN LO is something I still think should be tried properly: set potentiometer output to 0.75V as input to ADC, see what display says - if weird numbers, jumper COM to IN LO and AT THE SAME TIME, NOT BEFORE, NOT AFTER, see if display reads correctly or not).
 

Status
Not open for further replies.

Part and Inventory Search

Welcome to EDABoard.com

Sponsor

Back
Top