Continue to Site

Welcome to EDAboard.com

Welcome to our site! EDAboard.com is an international Electronics Discussion Forum focused on EDA software, circuits, schematics, books, theory, papers, asic, pld, 8051, DSP, Network, RF, Analog Design, PCB, Service Manuals... and a whole lot more! To participate you need to register. Registration is free. Click here to register now.

[SOLVED] PIC16F84 + HD44780 4-bit Driver programming in C

Status
Not open for further replies.

T3STY

Full Member level 4
Full Member level 4
Joined
Apr 17, 2012
Messages
239
Helped
24
Reputation
48
Reaction score
24
Trophy points
1,308
Activity points
3,715
Hello everybody!
I'm new here and I hope we'll go on well :)

I've come here because I'm working on a project with a PIC 16F84 which I'd like to use to control a 2x16 chars LCD display (Hitachi HD44780 driver). I'm programming in C as I have already programmed in this language and I know most of it. But this is my first time in PIC programming and I need some help...
What I need to know for now it's how to proceed in initializing the display for 4-bit data transfer and how to write chars on the display.
On the PIC I'd like to use PORT_A pins to drive the LCD. I see that the LCD uses E (enable), RS (register select) and R/W (Read/Write) pins. Is there any way I can pre-set them to not waste pins on the PIC? I've been thinking I could set E=VDD and R/W=GND (always enabled and writing), so I could use RA1-RA4 as LCD data and RA0 as RS. I don't need to read from LCD so it's ok to not be able to read from.

For testing I have MPLAB with Hi-Tech C Compiler and Proteus ISIS for hardware simulation; both have been tested and are working fine.

I hope you can help me, and thanks :)
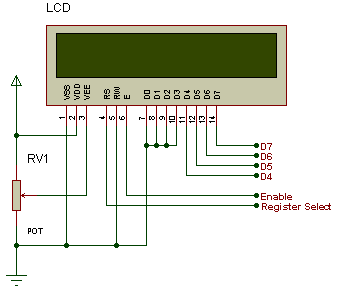
This will give you idea. Change for pic16F84
lcd.png


In this whole 4-bit tutorial LCD is connected to
;controller in following way...
;D4 - P3.0
;D5 - P3.1
;D6 - P3.2
;D7 - P3.3
;EN - P3.7
;RS - P3.5

Code C - [expand]
1
2
3
4
5
6
7
8
9
10
11
12
13
14
15
16
17
18
19
20
21
22
23
24
25
26
27
28
29
30
31
32
33
34
35
36
37
38
39
40
41
42
43
44
45
46
47
48
49
50
51
52
53
54
55
56
#define lcd_port    P3
 
//LCD Registers addresses
#define LCD_EN      0x80
#define LCD_RS      0x20
 
void lcd_reset()
{
        lcd_port = 0xFF;
        delayms(20);
        lcd_port = 0x03+LCD_EN;
        lcd_port = 0x03;
        delayms(10);
        lcd_port = 0x03+LCD_EN;
        lcd_port = 0x03;
        delayms(1);
        lcd_port = 0x03+LCD_EN;
        lcd_port = 0x03;
        delayms(1);
        lcd_port = 0x02+LCD_EN;
        lcd_port = 0x02;
        delayms(1);
}
 
void lcd_init ()
{
        lcd_reset();         // Call LCD reset
        lcd_cmd(0x28);       // 4-bit mode - 2 line - 5x7 font. 
        lcd_cmd(0x0C);       // Display no cursor - no blink.
        lcd_cmd(0x06);       // Automatic Increment - No Display shift.
        lcd_cmd(0x80);       // Address DDRAM with 0 offset 80h.
 }
 
void lcd_cmd (char cmd)
{
        lcd_port = ((cmd >> 4) & 0x0F)|LCD_EN;
        lcd_port = ((cmd >> 4) & 0x0F);
 
        lcd_port = (cmd & 0x0F)|LCD_EN;
        lcd_port = (cmd & 0x0F);
 
        delayus(200);
        delayus(200);
}
 
void lcd_data (unsigned char dat)
{
        lcd_port = (((dat >> 4) & 0x0F)|LCD_EN|LCD_RS);
        lcd_port = (((dat >> 4) & 0x0F)|LCD_RS);
       
        lcd_port = ((dat & 0x0F)|LCD_EN|LCD_RS);
        lcd_port = ((dat & 0x0F)|LCD_RS);
 
        delayus(200);
        delayus(200);
}


see https://www.8051projects.net/lcd-interfacing/lcd-4-bit.php


Also LCD 4 bit library files for PIC microcontroller attached
 

Attachments

  • 4bitlcd.ZIP
    1.5 KB · Views: 142
Last edited:

Sorry mate, but it didn't really help. I couldn't use the code at all. I'm getting a lot of 'only lvalues may be assigned to or modified' errors on different lines (while compiling), and also, I'm not sure how to modify the code for matching my PIC. Could you please give me some hints?
 

As written on the first line, the given code is for getting the idea. It was written for 8051 not for PIC.

For use with PIC, open the attached zip file. It contains two files - lcd.c and lcd.h. They are tested with PIC micro.

For Hitech compiler, place them under "HI-TECH Software\PICC\9.83\include" folder. And include them in your c code by writing #include<lcd.c> at the first line.
By default it is configured as :-
* PORTB bits 0-3 are connected to the LCD data bits 4-7 (high nibble)
* PORTA bit 0 is connected to the LCD RS input (register select)
* PORTA bit 1 is connected to the LCD EN bit (enable)
* PORTA bit 2 is connected to LCD RW bit
If you want to change this, open lcd.c and change the following line at the start:-
#define LCD_RS RA0
#define LCD_RW RA2
#define LCD_EN RA1
#define LCD_DATA PORTB

Read lcd.c with notepad. There is a "readme" at the start.
 
Last edited:
  • Like
Reactions: T3STY

    T3STY

    Points: 2
    Helpful Answer Positive Rating
T3STY said:
I've been thinking I could set E=VDD and R/W=GND (always enabled and writing)
Well about R/W you are right, keep it grounded if you need write only. About E you cannot do something similar, you need a dedicated I/O pin. It is not exactly "enable" as you imagine it, please take a look at the LCD data and command timing diagrams in the lcd datasheet and you will understand what I'm talking about.


T3STY said:
What I need to know for now it's how to proceed in initializing the display for 4-bit data transfer and how to write chars on the display.
The below code will help you to get an idea about initialization.

Code:
void lcd_init (void)
{  
  Delay_ms(50);
  LCD_cmd(0x30);
  Delay_ms(10);
  LCD_cmd(0x30);
  Delay_ms(10);
  LCD_cmd(0x30);
  Delay_ms(10);
  LCD_cmd(0x20);  //4 bits bus
  Delay_ms(10);
  LCD_cmd(0x28);
  Delay_ms(10);
  LCD_cmd(0x08);
  Delay_ms(10);
  LCD_cmd(0x01);
  Delay_ms(10);
  LCD_cmd(0x06);
  Delay_ms(10);
  LCD_cmd(0x0C);  //blink off
  Delay_ms(50);
}


Hope it helps,
Alexandros
 
  • Like
Reactions: T3STY

    T3STY

    Points: 2
    Helpful Answer Positive Rating
Thank you for good replies, now I got it working!
I'm simulating the hardware on ISIS but something strange happens, probably there's something I'm missing. In my main() function I have put only lcd_init() and lcd_puts("test string"). The string is being written correctly, but the LCD keeps reinitializing and writing the string in a loop.
What should I do to get a permanent string?

EDIT
Another strange thing is that I'm only able to write on line 1. I have found how to set the LCD for 2 lines using lcd_write(0xA) but strings are always written on the first line using the first 16 chars of it. How do I switch to line 2 ?
 
Last edited:

If you don't have a loop in main() yourself, then I guess that Isis is restarting the program when your code finishes. Put a

Code:
while(1);

after the last line in your code (before the last '}' in main) so that the program keeps running, doing nothing.

For the writing lines, the HD44780 is very simple and designed for two lines of 40 characters. So, to move the cursor to the second line, send the command to go to character position 40. Send 0xC0 as an instruction. (0x80 is goto, and you just add the position to it.) Then try writing then for the second line. If you are using a code library, then you can probably just do LCD_goto(1,2) or similar.

If you use a 4 line display, then you have to move to position 40 for the start of line 2, position 20 for line 3, and position 60 for line 4 :roll:

There's some useful info on it here: **broken link removed**
 
Last edited:

Thank you very much! I got it working with lcd_goto(0x40) for writing on line 2 and using while (1) {} to keep a stady message in ISIS. I guess, the real PIC won't keep on looping the main(), right?
 

Thanks for testing, I don't own a real PIC yet so I was worried about.
I found a bug, if I can call it so, of the LCD driver posted above. When it uses #define LCD_DATA PORTA (or PORTB) it uses all the pins of the specified port. If I want to use PORTA for data bus -4 pins- I will not be able to use the 5th pin (RA4) because when sending bits on PORTA it'll always put RA4 to NULL (which standard C says it's equal to false or 0), overriding my setting. Worst happens with PORTB which if it's set to be LCD_DATA you'll not be able to use last 4 pins (RB4-RB7) for the same reason. I'm not sure if this is another issue of ISIS or not. Could someone test it for me on a real PIC, please?
Anyhow, I'm now working at writing an LCD driver similar to the one above, but which uses independent pins. Not a good result for now, but I'm close to the solution :)
 

Yes, that's the problem of using full port access, and why I rarely do. There's always something on the port that I want and I end up with my spare pins (for the LCD) all over the place.

The driver I use has individual pins defined and sets them individually, so any six pins (R/W tied low) can be used. There's no point giving you mine because it is specific to my CCS compiler. There are plenty of examples (according to my friend Google) that work exactly the same way though and you could use with MPLAB.
 

Yeah, I just found some code on the web, but there's nothing better than self-made code ;)
 

After asking, asking and asking again, it's time I give you something. I've been working on this driver for more than two months (in my spare time) to make sure it's almost perfect but also usable on most PICs and (I hope) without any headache.

The work is posted on my blog:
https://www.edaboard.com/blog/1817/

Let me know what you think about it ;)
 
Last edited:

Status
Not open for further replies.

Similar threads

Part and Inventory Search

Welcome to EDABoard.com

Sponsor

Back
Top