Continue to Site

Welcome to EDAboard.com

Welcome to our site! EDAboard.com is an international Electronics Discussion Forum focused on EDA software, circuits, schematics, books, theory, papers, asic, pld, 8051, DSP, Network, RF, Analog Design, PCB, Service Manuals... and a whole lot more! To participate you need to register. Registration is free. Click here to register now.

[SOLVED] PT100 Interface using Controller

Status
Not open for further replies.

gauravkothari23

Advanced Member level 2
Joined
Mar 21, 2015
Messages
640
Helped
5
Reputation
10
Reaction score
4
Trophy points
1,298
Activity points
6,922
Hi All..
I am trying to interface PT100 2 Pin with Controller. I am using NUVOTON NUC029LAN Controller.
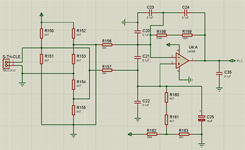
Circuit diagram has also being attached for PT100 Interface. I am using Internal ADC of controller.
My Question is how should i calibrate PT100 with Controller. currently i am using POT to calibrate it with multimeter connected. when i connect the POT and measure the resistance at multimeter of 117.77 Ohms which is 45 Degree C, and connect it to the circuit, the resistance Increases to 175 Ohms and voltage at ADC PIN is Approx 4.10V, as soon as i disconnect the Multimeter, the voltage drops to 1.42V. so which is the correct value, and how should i interface it.
I am new in interfacing PT100 with controller.
 

Attachments

  • PT100.png
    PT100.png
    81.5 KB · Views: 1,015

Hi,

I personally don´t use pot/s or any other analog calibration when I use a microcontroller.
I do all the calibration with software. Most microcontrollers come with EEPROM to store calibration data.
--> no thermal drift, no aging, no accidental mis-adjustment (at customer), lowest part count, lowest cost, enables automatic calibration....

I really don´t know when I used pot / EPot the last time, must be decades ago...

Klaus
 

how can i do the calibration without pot.
can you provide me some idea.
i have eeprom 24C16 also interfaced with controller
--- Updated ---

When i dont know, what is the output voltage at some specific resistance, what data's have to be stored in EEPROM.
 
Last edited:

Hi,

You may calibrate gain and offset...both can be done with a pot or with the given formula.

Klaus
 

but where can i get the raw value, offset or gain.
--- Updated ---

Hi,

You may calibrate gain and offset...both can be done with a pot or with the given formula.

Klaus
how can i do it using a POT, as it does not work well, POT value changes as connected in circuit.
 

Hi,

You said you use a controller, so how do you get the pt100 measured value into the controller?
If you don't say we have to guess. I guess you use an ADC.
If so then raw_value is the value from the ADC.
Offset is identicsl to an offset pot: you have to adjust it...manually,
...maybe you can calculate it, maybe automatically find..then store it in the EEPROM.

Gain: same as offset.

Klaus
 

Hi,

but where can i get the raw value, offset or gain.

therefore you are performing two measurements under known/controlled conditions. Usually the gain is determined by a known voltage or current, resulting in an ADC reading close to your full scale range. The offset is typically determined by appyling 0 V (shorting the input to GND or keep it floating, depends on circuitry).

For your setup, a two point calibration using two fix resistor values, which are close to the boundaries of your investigated temperature range would be a solution.
Or using a 100 \[\Omega\] resistor as this is your nominal PT100 resistor value, and a second one close to the upper (plus) range. This document might be useful [1].

But as Klaus already mentioned, you have to store this values somewhere to be used to calculate the actual value.

[1] https://www.cypress.com/sites/defau...iles/Calibrating Amplifiers and ADCs - v3.pdf

BR
 

hello,

what is the impedance of your voltmeter ?
1Mohm, 10 MOhms or 20Kohms/v ?
on your schematic :
Pt100 is linked to the ground => R154 & R155 are shorted

With Pt100 , use of constant current 1 or 2mA
is a better way to use it..
or you could use PT1000 ( easier with bigger delta R)
less sensible for the lenght of the 2 wires ( to connect the sensor)
 

Hi,

before I focussed on "calibration".

but now I see your schematic. Does it make sense? Where do you have it from?
There are many issues and questionable parts and values.
Loading an OPAMP output with almost pure 150nF usually is not a good idea.

Klaus
 

Hi,

before I focussed on "calibration".

but now I see your schematic. Does it make sense? Where do you have it from?
There are many issues and questionable parts and values.
Loading an OPAMP output with almost pure 150nF usually is not a good idea.

Klaus
i am NEW in interfacing PT100, i got the circuit from google, and stimulated in Proteus. where it was giving me a analog voltage at different temperatures. so i tried interfacing the circuit.
Please let me know, what correction have to be done in the circuit
 

Hi,

you are new to PT100??
--> 2019´ thread: https://www.edaboard.com/threads/pt100-interfacing-with-controller.386487/post-1661077

the first answer was:
You should try different approach for measuring with Pt-100
The circuit has not improved in the last years. So the answer are similar.

****
I recommend to start anew.
Decide and show us your requirments.

What do you want to measure? Temperature. Which range?
What resolution, what precision?
How often (per second, per hour) do you want a new measurement value?

Mind: the requirments so far have nothing to to with PT100 nor with the microcontroller.

Klaus
 

Yes, the same problem, but at that time my problem was not solved, so i dropped the project.
But again, i had a same enquiry for Temperature Measurement using PT100

What do you want to measure? Temperature. Which range?
What resolution, what precision?
How often (per second, per hour) do you want a new measurement value?

Mind: the requirments so far have nothing to to with PT100 nor with the microcontroller.

Klaus
I have a Requirement where i have to measure Air Temperature with range of 10 degree to 55 Degree C.
with Resolution of 0.1 Degree. Precision of 0.1 Degree.
Monitoring the Temperature every half a second.
 

Hi,

so far so good. This is just a range of 45°C with a resolution of 0.1°C .. makes a dynamic of 1:450 or 9 bits.

Why did you choose PT100? Is it a must? (Without saying it is good or bad)
Do you have a Vendor / exact part in mind? Link to datasheet..

Did you read how a PT100 works generally?
How the temperature-to-resistance behaves. (You need to know this to be able to decide a useful measurement circuit and software calculations)

Klaus
As we are designing a Pediatric Warmer, we have chosen PT100 because of Accuracy. so PT100 is the Must.
No i dont have any idea for PT100, as i only know, the resistance of PT100 Increases as the temperature rises.
 

PT100 is the Must.
Good, then we don´t need to look for other sensors.

No i dont have any idea for PT100, as i only know, the resistance of PT100 Increases as the temperature rises.
Then it´s high time to get familiar with PT100 working principle, temperature-to-resistance, formula, accuracy, precision.

I also recommend to go to a PT100 seller homepage and choose a sensor according your requirements.
Give a link to the datasheet.
Also check at the manufacturer´s internet site whether they give some application informations, recommended circuits, and so on...
Read through them.
***

A PT100 has a rather linear increase_of_resistance with temperature.
The measurement circuit should not destroy this linearity.
Now the input of an ADC usually is "voltage".
Thus the measurement circuit should do: (linear) resistance_to_voltage.

The mathematical formula should be: V = R x Const.

If you remember Ohms law: R = V / I --> V = R x I

Compare both formulas and see that: I = Const.
That´s the key requirement of the measurement circuit: Feed the PT100 with a constant current. (This is why other members recommended it before).

Klaus
 
Last edited:

PT100 is not the best sensor for a so short scale of measurement.
The main advantage on a Pt100 could be to get a calibrated sensor in classe A
but the cost is very high.

and wiring the sensor with 3 or 4 wires to obtain 0.1°C
if used in a wheastone bridge.
or acccurate fixed mA current and 4 wires..
2 wires to feed the PT100 sensor (1 to 5mA max))
2 wires to get the (mV) voltage on sensor..

The design of the PT100 must be considered if you need high speed time response..
Pt100 are mainly used in industrial environnement ,because easy to exchange the sensor, without recalibrating all the measure chain.

Did you see DS18B20 ( numerical output) sensor .. with high reolution.
 

Hi,

now guessing:
When a current goes through a resistor it will cause power to be dissipated. Dissipated as heat. Means: the sensor gets warm.
Obviously it´s not a good idea to make a "temperature sensor warm" ... because this meanse we lose accuracy.
So we have to try to keep the sensor cold - or better say: keep it as good as possible at ambient temperature.

This could be done with:
* using a suitable sensor with good heat spreading
* using the sensor in a heat spreading medium (maybe water instead of still air)
* using lwo measurement current
* powering the sensor as short as possible

... another method could be to find out how big the "temperature rise" will be .. and subtract this value from the measured value in software.

*****
values:
(now I´m using approximated values... please use the values given in the datasheet)
Determine the sensor current:
Let´s say the self heating is 70 K/W. Then to get a maximum of 0.1°C self heating the sensor power needs to be below 1/700 W or about 1.5mW.
Since P = I x I x R --> I = sqrt(P/R) = sqrt(1.5mW / 100R) = about 4mA.

sensor voltage range:
Just to be on the safe side let´s calculate with 2mA.
at 25°C we have 100 Ohms.
you want the lowest temperature to be 10°C, thus we meed to go 15°C down: with about 0.4 Ohms/°C this means 6 ohms less than 100 Ohms = 94 Ohms.
you want the highest temperature to be 55°C, thus we meed to go 30°C up: with about 0.4 Ohms/°C this means 12 ohms more than 100 Ohms = 112 Ohms.
So the measurement range is 94 Ohms ... 112 Ohms (with 9 bit resolution)
Multiplied with 2mA this gives a sensor voltage of 188mV ... 224mV. .. a range of 36mV
0.1°C resolution means 0.04 Ohms resolution or 0.08mV or 80uV resolution.
(An LM358 has a typ offset voltage of 2mV, this is 25 times the required accuracy error !!! It is absolutely unsuitable)
(although you said: 0.1°C precision - which is repeatability - I calculated for 0.1°C accuracy. Your real requirement may be relaxed)

Now we need to know the (decodable) ADC input voltage range and it´s precision.

****

Later:
Another thing to consider: maybe you want to validate the function of the sensor: Simple methods are just detect "short circuit" and "open circuit"...
or the more advanced method to check whether the temperature changes meaningful values when you change the "measurement current".

Klaus
i am confused.
from where will i get current of 2mA, as ADC gives only voltage. and how would i know what the reistance of the sensor is.
 

Status
Not open for further replies.

Similar threads

Part and Inventory Search

Welcome to EDABoard.com

Sponsor

Back
Top