Continue to Site

Welcome to EDAboard.com

Welcome to our site! EDAboard.com is an international Electronics Discussion Forum focused on EDA software, circuits, schematics, books, theory, papers, asic, pld, 8051, DSP, Network, RF, Analog Design, PCB, Service Manuals... and a whole lot more! To participate you need to register. Registration is free. Click here to register now.

[PIC] WTA 16f628a button trigger code

Status
Not open for further replies.

alpha91

Full Member level 3
Full Member level 3
Joined
Sep 23, 2011
Messages
168
Helped
1
Reputation
2
Reaction score
2
Trophy points
1,298
Visit site
Activity points
2,625
Hi all, i am using PIC 16f628a and testing with button trigger function. I wrote this code in C language but it didnt work as expected. My code is error free and i checked the input voltage of button and it has 5V supply.

Desired function is, when button is pressed, only one LED is blinking, when released, two LEDs should blinking.

void main() {
TRISA = 0b1111;
TRISB = 0b0000;

while (1)
{
if (PORTA.F0 = 1)
{
PORTB = 0b0001;
delay_ms(500);
PORTB = 0b0000;
delay_ms(500);
}
else {
PORTB = 0b1011;
delay_ms(500);
PORTB = 0b1000;
delay_ms(500);
}
}
}
 

Yo didn't say what doesn't work or what compiler you are using. The code is wrong anyway, the line "if(PORTA.F0 = 1)" is an assignment of '1' to PORTA, you need to change to "==" to make it test the state of PORTA.F0.

Brian.
 
  • Like
Reactions: alpha91

    V

    Points: 2
    Helpful Answer Positive Rating

    alpha91

    Points: 2
    Helpful Answer Positive Rating
Desired function is, when button is pressed, only one LED is blinking, when released, two LEDs should blinking.

Assuming that you fixed the error that Brian pointed out, and you connected the LEDs to pins 0 and 1 of PortB, the code above works exactly as you described.
 
  • Like
Reactions: alpha91

    V

    Points: 2
    Helpful Answer Positive Rating

    alpha91

    Points: 2
    Helpful Answer Positive Rating
It's true that I'm rusty with my pic14, but I think it's needed to turn off the analog comparator before using some pins of PORTA as inputs...
 
  • Like
Reactions: alpha91

    V

    Points: 2
    Helpful Answer Positive Rating

    alpha91

    Points: 2
    Helpful Answer Positive Rating
Yo didn't say what doesn't work or what compiler you are using. The code is wrong anyway, the line "if(PORTA.F0 = 1)" is an assignment of '1' to PORTA, you need to change to "==" to make it test the state of PORTA.F0.

Brian.

Assuming that you fixed the error that Brian pointed out, and you connected the LEDs to pins 0 and 1 of PortB, the code above works exactly as you described.

Hi, sorry that i missed it out. I am using MikroC compiler. The circuit just working with 2 LED blinking and the button is not detected while pressing.

I already corrected the code but the button still not working.

pin diagram.PNG

base on the pin diagram, PORTA F0 should be pin 17 right? i already checked the voltage on the button, it is 5V.


It's true that I'm rusty with my pic14, but I think it's needed to turn off the analog comparator before using some pins of PORTA as inputs...

Hi, do you mind to tell how to turn off the comparator?
 

See example 5.1 in the data sheet.
The easiest way is to add "CMCON = 0x07;" as the first line in main().

Also check:
1. you have MCLR pulled high to VDD through a suitable resistor (~10K)
2. you have a capacitor of ~100nF wired directly across the VSS and VDD pins
3. you have current limiting resistors (~330 Ohms) in series with each LED.
4. if your button connects pin 17 to ground, make sure you have a pull-up resistor from pin 17 to VDD (~10K) *OR* if the switch is wired between pin 17 and VDD, make sure you have a pull down resistor from pin 17 to ground.
5. make sure your clock oscillator is running!

Brian.
 
  • Like
Reactions: alpha91

    V

    Points: 2
    Helpful Answer Positive Rating

    alpha91

    Points: 2
    Helpful Answer Positive Rating
Hi,

Consider switch bouncing.

Klaus
 
  • Like
Reactions: alpha91

    V

    Points: 2
    Helpful Answer Positive Rating

    alpha91

    Points: 2
    Helpful Answer Positive Rating
See example 5.1 in the data sheet.
The easiest way is to add "CMCON = 0x07;" as the first line in main().

Also check:
1. you have MCLR pulled high to VDD through a suitable resistor (~10K)
2. you have a capacitor of ~100nF wired directly across the VSS and VDD pins
3. you have current limiting resistors (~330 Ohms) in series with each LED.
4. if your button connects pin 17 to ground, make sure you have a pull-up resistor from pin 17 to VDD (~10K) *OR* if the switch is wired between pin 17 and VDD, make sure you have a pull down resistor from pin 17 to ground.
5. make sure your clock oscillator is running!

Brian.

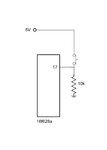
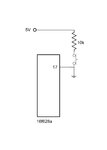
Hi, i am sure that my circuit works fine because both LED is blinking as it should. just that the button is unable to trigger the function that i want. i had tried both of these connection on pin 17 but it is still the same.
a.jpgb.jpg

Hi,

Consider switch bouncing.

Klaus

Hi, thanks. i will consider it :-D
 

The first circuit is wrong. Pin 17 is permanently grounded, regardless of the switch position. The second one is correct for detecting pin 17 high when the switch is closed ad low when it is open. If you want the opposite to happen, use the second circuit but swap the switch and resistor.

The bouncing Klaus refers to is a normal effect due to the mechanical action of a switch. As the spring action of the contacts closing is one hard surface against another, there tends to be some 'bounce' where for a short time (maybe 1/1000 second) the contacts may open and close rapidly. The PIC runs fast enough that it thinks you are opening and closing the switch several times so you may see it responding more than once. There are several ways to fix the problem, we call it 'de-bouncing', most work on the principle of waiting as soon as the first switch action is seen then checking again to confirm it after a short delay.

It isn't the ideal solution but if switch bounce is causing you problems, try fitting a capacitor of 100nF between pin 17 and ground and also add a resistor of 100 Ohms in series with the switch. It makes the rise and fall of the voltage take a little longer so the short pulses from the contact bounce are reduced in size.

Brian.

Hi, i already tested it and it still not working. Even i tried to connect the pin directly to my 5V supply through 10k resistor and it still wont execute the function that i mentioned. Anyway to troubleshooting ?
 

Please post your current code and schematic. You have made several changes to both so it would be useful to be updated on the current design.

Brian.

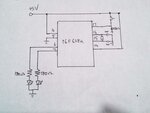
Hi, here is my circuit and my code.

button.jpg

Code:
void main() {
  TRISA = 0b1111;
  TRISB = 0b0000;

  while (1)
  {
   if (PORTA.F0 == 1)
   {
   PORTB = 0b0001;
   delay_ms(500);
   PORTB = 0b0000;
   delay_ms(500);
                    }
   else {
    PORTB = 0b1011;
   delay_ms(500);
   PORTB = 0b1000;
   delay_ms(500);
   }
}
}
I didnt add the debounce code because i worry it will make the situation even complicated.
Or the problem i actually facing is due to no debounce?
 
Last edited by a moderator:

It works for me. I have added debounce delay. The only problem was there was no debounce delay. I made a video and the compressed size is 130 KB but the forum is not allowing me to attach the video.
 

Attachments

  • LED Switch.rar
    24.2 KB · Views: 111
Alpha91, you need a capacitor (~100nF) with short wires connected across VSS and VDD, as close to the PIC as possible. Without it the PIC may not run at all or it may misbehave!

Also check you have the configuration bits set properly for XT or HS oscillator and both LVP and the watchdog timer disabled.

Brian.
 
I have used this circuit for testing. As you are using mikroC PRO PIC Compiler I have used the same Compiler.
 

Attachments

  • LED Switch.png
    LED Switch.png
    23.7 KB · Views: 151
It works for me. I have added debounce delay. The only problem was there was no debounce delay. I made a video and the compressed size is 130 KB but the forum is not allowing me to attach the video.
Hi, actually i think the main problem is I didnt switch off the comparator. which is CMCON 0x07.
anyway, thanks for your help :wink:
Alpha91, you need a capacitor (~100nF) with short wires connected across VSS and VDD, as close to the PIC as possible. Without it the PIC may not run at all or it may misbehave!

Also check you have the configuration bits set properly for XT or HS oscillator and both LVP and the watchdog timer disabled.

Brian.

Hi, thanks for your guide :-D. do you mind to explain why i need to add the capacitor? I am new in microcontroller design.
 

Think of it like this:

Current flowing through a resistance causes a voltage drop and to high frequencies, inductance looks like a resistance.

The PIC contains hundreds of thousands of little switches turning on and off at high speed, each changing the current it draws slightly. This means if there is any resistance in the supply to the PIC, it's supply voltage will go up and down in sympathy with those switches operating. The resistance will partly come from the copper in the connecting wires but mostly from the inductance of those wires. If the supply voltage changes it will have an adverse effect on the internal oscillator circuits (voltage changes shift the frequency slightly) and anything else needing a stable voltage to operate it.

The capacitor works like a reservoir, it is kept topped up by the incoming supply but being close to the PIC, it can provide instant power when needed, without the resistance/inductance being in-line. It 'evens out' the current, keeping the voltage far more stable. You can imagine it to be a rechargeable battery wired directly across VSS and VDD, giving power when the PIC demands it and recharging from the incoming supply during times of low demand.

Brian.

I see.. so it is use to stabilize the supply votlage, reduce the voltage ripple, am i right?
 

I see.. so it is use to stabilize the supply votlage, reduce the voltage ripple, am i right?

Yes.

Microcontrollers can be particularly susceptible to noise on their power supply rails.

The capacitor in question is commonly referred to as either a decoupling or bypass capacitor and it purpose is to essential filter out high frequency noise which may exist on the supply rail. In applications where noise is a particular issue, you will often see a parallel arrangement of several different values and types of capacitors, as each value and type are particular suited for filtering a noise frequency range or serve another purpose such as providing a reservoir of sorts for rapid changes in current.

Analog Devices - Decoupling Techniques

Application Manual for Power Supply Noise Suppression and Decoupling for Digital ICs


BigDog

I see... thank you very much for the info. :thumbsup:
 

Status
Not open for further replies.

Similar threads

Part and Inventory Search

Welcome to EDABoard.com

Sponsor

Back
Top