Continue to Site

Welcome to EDAboard.com

Welcome to our site! EDAboard.com is an international Electronics Discussion Forum focused on EDA software, circuits, schematics, books, theory, papers, asic, pld, 8051, DSP, Network, RF, Analog Design, PCB, Service Manuals... and a whole lot more! To participate you need to register. Registration is free. Click here to register now.

[PIC] Checking the state of an I/O pin

jerryd

Member level 2
Joined
Feb 4, 2013
Messages
48
Helped
0
Reputation
0
Reaction score
0
Trophy points
1,286
Activity points
1,709
edaboard,
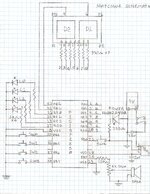
I know on pic18f2550 you can address the latch or the port. The manual says reading the port will return the actual voltage (high or low).

I'm using BTFSC PORTB,4,0 in the isr: function when I know that pin is at ground but the code doesn't work.

PORTB 4 is declared as an input.

jerryd
 
Hi,

As always: "does not work" is no error description.

Tell us
* your code
* your schematic
* how you test it
* what you expect
* what you see instead

Klaus
 
adeboard,
KlausST is right, no information, no answers.

MPLAB X IDE v 6.05, XC8 v2.41, pic18f2550
This project has a main.c and an asm.s.
There are dpst switches with one side wired to PORTB 4,5,6,7 and the other side wired to ground.

TRISB is 0b111100001
INTEDG0 is 0 // Falling edge interrupts
RPBU is 0 // PORTB pullups
The pullups are sufficient and the interrupts work consistently.

This is known good hardware since I have a C project doing the same functions.

The instruction that doesn't seem to work (btfss PORTB,4,0) is in the isr function. When it finishes _button is set to -1.

PSECT textISR,class=CODE,reloc=4
//interrupt function
isr:
//check for external interrupt on PORTB 0
btfsc INT0IE //is INTO enabled?
btfss INT0IF //it is, so check the flag
goto notINT0IF //not an external interrupt
bcf INT0IF //it is, so clear the INT0IF flag
movlw 1
movwf _button4, 0 //set the button4 variable
goto exitISR //now get out

notINT0IF:
//check for IOC on PORTB 4,5,6,7
btfsc RBIE //is RBIE enabled?
btfss RBIF //it is, so check the flag
goto exitISR //not an IOC interrupt
bcf RBIF //clear the RBIF flag

// check if it's the switch on PORTB.4
movlw 0
movwf _button,0 // store it in _button
btfss PORTB,4,0 // skip if PORTB.4 not low
retfie //return from interrupt

// check if it's the switch on PORTB.5
movlw 1
movwf _button,0 // store it in _button
btfss PORTB,5,0 // skip if PORTB.5 not low
retfie //return from interrupt

// check if it's the switch on PORTB.6
movlw 2
movwf _button,0 // store it in _button
btfss PORTB,6,0 // skip if PORTB.6 not low
retfie //return from interrupt

// check if it's the switch on PORTB.7
movlw 3
movwf _button,0
btfss PORTB,7,0 // skip if PORTB.7 not low
retfie //return from interrupt
movlw -1 // no switch
movwf _button,0

exitISR:
retfie //return from interrupt

jerryd
 
Hi,

The first that comes into my mind: no debouncing capacitors?
I find them more important on "interrupt" pins ... than on polled pins.

More later....

Klaus
 
Have you tried to step through the ISR with the debugger?
If that takes you though the correct code path then it could well be a switch bounce problem as Klaus mentions. If not then that is also useful information for you.
In general it is not a god idea to use interrupts on buttons and switches without some form of debounce.
Susan
 
edaboard,
Since I have this all working with C do you think it would be different in assembly?

I'm not able to debug it live. I use a PICkit to download the hex and then move the pic to the hardware.

jerryd
 
Repeat of post#7
Hi,

As always: "does not work" is no error description.

Tell us
* your code
* your schematic
* how you test it
* what you expect
* what you see instead

Klaus

Code: still not able to press the CODE button and copy and paste your code there?
Hand made method:
-----
your text
[ C O D E ] 'without spaces
your code
[ / C O D E ] 'without spaces
your text
-----

Schematic: minimalistic description. A schematic tells so much more than text can. There´s a good reason why one invented schematics.

How you test it: no information

What you expect: no information

What you see instead: no information

***********
Since I have this all working with C do you think it would be different in assembly?
Honestly, I think the the chance is small. But indeed a bouncing contact is a timing problem. And regarding timing there will be a timing difference between C and assembly code. So in worst case they correlate.
Did you read (verify against) the assembly code generated by the C compiler?

Klaus
 
KlausST,
Thanks, next time I post code I will use
Code:
tags.

The schematic and a photo of the hardware is attached. This is the same exact hardware used with a C and basic program. I don't see any switch bounce with my scope.

There are 4 leds related to the dpst switches. If the btfss PORTB,x,0 in the isr works correctly my code will will enable the corresponding led. If no switches are detected I set _button to -1 and all 4 leds are enabled. At this point all 4 leds are always enabled after the isr function executes.

I can force _button to a number 0-3 and my code will enable the correct led.

Don't know how to 'read (verify against) the assembly code generated by the C compiler'.

jerryd
 

Attachments

  • MatchMe0001.jpg
    MatchMe0001.jpg
    1.8 MB · Views: 64
  • P1010260.JPG
    P1010260.JPG
    813.5 KB · Views: 68
Last edited by a moderator:
A few comments on your schematic:
- I assume you are connecting the \MCLR\ to VDD although this is not shown
- Given the way you have connected the 4 DIP switches, you could make a couple of changes so that you can connect the PicKit to RB5, RB6 and RB7 (plus \MCLR\) to program the chip directly and also debug it. That would still leave RB4 as a push button to test.
I must admit that I find it hard to believe that the buttons are not producing contact bounce - I've yet to find one that doesn't. However you do ned to set the scope to trigger on the (in this case) falling edge of the pin and have the timebase set high enough that you get the next few mSec as that will be where the bouncing occurs.
As for the difference between assembler and C, in general (and unless you have very high levels of optimisation turned on) the C compiler will generate multiple instructions for each line of code. Further it will generate pre-amble and post-amble code for the ISR to save the internal state of the CPU which you don't have in your ISR. Therefore there will be timing differences when responding to your interrupt between the two coding approaches.
Also I assume that the code that is testing 'button' is C (given the use of the prepended '_') - in that case have you declared it to be volatile? If not and (again guessing here as I can't see the full code) you initialise it to '-1', then the C code may not be picking up the change from within the ISR.
Finally, to get the assembler output, look at Section 4.4 in https://ww1.microchip.com/downloads/en/DeviceDoc/50002737C XC8 C Compiler UG for PIC.pdf.
Susan
 
Aussie Susan,
You are quite thorough here.

I didn't have MCLR connected to VDD but it is now, no change.

I can trigger on the falling edge of the switch but don't see much in the way of bounce. I don't have a storage scope.

With just the weak internal pull ups it doesn't take much to pull the PORTB pins to ground. The way the code is I can hold the switch to ground during the isr function which should negate much of any bounce.

The main.c code doesn't do anything but define some variables, pick some random numbers and then call the _match function. All shared variables are volatile.

The best way, as you suggest, would be to hook the pickit up live. I only have a PICkit2 which doesn't show up as a tool in MPLAB 6.05.

I use the pickit app to download the hex program. Looking at the PICkit2 Users Guide there seems to be some isolation circuity needed for the MCLR pin. Do you find that circuity necessary? If I hook it up will the app still download the hex file and will the simulator play with it?

I read 4.4 in the XC8 Compiler User Guide and then looked at all the files that get produced until I realized I didn't know what to look for.

I did change the way I was enabling the interrupts so only the one I was expecting was enabled. Didn't fix the problem but is much more correct.

I guess the next step is to find out if I need the isolation circuity and then wire up the pickit to do some live debugging.

Sorry this email turned into a book.
jerryd
 
Hi,

Debugging:
Activate the COMMON of one 7-segement. Initialize all segments to be OFF.
In ISR set the first segment at the very bginning of the ISR. Set other segmants just before every ReturnFromInterrupt. Just to see that it enters correctly and where it leaves.

You may clear the segments in MAIN on press of a different key (not the ISR ones)

Next debugging method: SET a segment after each branch.

Reprot the debugging results.

And please: if the MAIN loop does nothing.. then it´s not top secret.
--> Show the complete code, including main and declaration initialisation and everything...
***

You don´t see the switch bouncing:
Likely. The signal path from your switch to the port maybe forma couple of picofarads stray capacitance. In combination with the pull up resisitor the cut off frequency may be way above 100kHz causing the bouncing to pass.
As soon as you connect the scope probe you add a lot of capacitance, lowering the cut off frequency and thus suppress the bouncing signal. So it might be that there is contact bouncing, but as soon as you connect the scope probe it is gone. This is a general problem of measuring HF signals with a (non HF) scope probe on high ohmic signal paths.
--> Simply verify: Is the behaviour the same with and without scope probe connected?

My comments to your schematic:
* the power inidicator is drawn wrongly, I guess.
* The common 7-segment lines on RB1, RB2 most probably draw more current from the port than allowed.
(both have nothing to do woth the discussed problem)

The wiring is nice and clean. But especially the power supply decoupling loop is way too long to be of any use.
You may improve it by an extra wire to keep this loop short:
* PIC_VSS->PIC_VCC->capacitor_VCC->capacitor_GND->PIC_VSS
This loop (read dataheet) should be as short as possible. Less than an inch overall. In your case I guess it´s more than 10 inches. These 10 inches form a loop enclosing a big area, thus it creates an antenna, not only sending out EMI, but also recieving HF signals. Also it creates an inductance that forms a resonance in combination with the decoupling capacitor. So WiFi, cellular phone or any other HF signal may cause your circuit to fail.
(although there is a small possibility, I guess it´s currently not causing the discussed problem)

Mind to never let a pin floating. Especially on battery operated systems. It just causes trouble and increased current consumption.

Klaus
 
Don't worry about how many emails it takes. In some ways the 'dumbing' of programming has taken away the need to understand what goes on under the hood but if you want to really understand how things work you still have to delve deeper. I'm from a generation that pre-dates compilers (the Intel 8008 era!) and in those days everything was done by entering binary op-codes with toggle switches, if you ask most computer users how to enter a program these days they will ask which version of Windows you are using. They have become so isolated from the inner workings of computers that they have forgotten than there are millions of tiny circuits doing the hard work and all they see are the end results. I have a friend given the same challenge as me to develop a remote temperature sensor and wireless sender to cover a rural area over a distance of about 100m. I did it with an 8-pin PIC, an LM35 and a tiny 433MHz radio transmitter, they did it with an Intel i7 based computer, Windows 10 and WiFi. Both worked equally well but mine was solar powered, free standing and in a tiny plastic box, theirs required mains power for the computer and monitor screen and a building to put it in. Oh, and theirs needed about 100W of power, mine needed on average less than 1mW, 100,000 times less!

Stay at it, learn the hard way, even if it takes a lot longer, you will realize the benefits later.

Brian.
 
they did it with an Intel i7 based computer,
I know these situations so well....

...and usually the "temperature to target (display, controller..) often is faster with the microcontroller.

***
I had to design a a controller for earthquakes on buildings (bridges), reducing resonsce with the use of semi active dampers.
They wanted the PC solution. My argument: mains power will be the fisrt to fail on heavy earthquakes.
They: Then let´s use an UPS.
Me: battery maintenance for years of no earthquake ..
Most probably the batteries are dead when the earthquake happens. It takes a dirt free room for the PC and it´s fans (also a part with high fail rate). Power consumption, space, climaticly critical...

I don´t understant it, too. Big, fancy looking screen, diagrams, continuous internet access, ... but losing the focus on it´s purpose: saving the building.

I - instead had the idea of using the power of the earthquake to power the electronics.
So the system could be sleeping many years - but it works when needed.

Klaus
 
If no DSO you could always tie a counter clock pin to same button pin and see if it
records any counts > 1. Or tie button pin to counter enable and use a high speed
clk into counter. Either will violate timing / logic levels on the counter but should
pick up something if bounce present. Sophisticated bench counters can do a gated
count as well. DSO still the best for this.


I have had switches bounce out to ~ 400 mS, truly crappy switches :).

Note there are processors out there that have onchip debounce capability in HW
on pins, for future reference.

Lastly when doing bounce code its a good idea to bounce in and out a button, then act
on button functionality. Or bounce in, set a flag, do functionality code, then bounce out
based on flag having been set.

Aussie Ssuan mentions the need to declare interrupt variable volatile, some ref material
on that topic might help :


Regards, Dana.
 
Last edited:
KlausST.
I was using a 9V battery when I drew the schematic. I now use a 110v to 10vdc converter. Yes I drew the power indicator led connected to ground instead of the 9v.

Haven't had any power problems due to the length of the wires. I used the suggested caps for the 7805. There wasn't much room to place everything on one of these proto boards, but you're right about the wire length. Everything worked okay with the C version of this project.

I will try your debug suggestions and post the results.

Here's the C module.

Code:
#include <stdio.h>
#include <xc.h>
#include "config.h"
#include <pic18f2550.h>

enum {MaxNumbers = 5};
volatile unsigned int numbers[MaxNumbers];
volatile unsigned int pause;
volatile unsigned int delay;
volatile unsigned int delay0;
volatile unsigned int delay1;
volatile unsigned int count;
volatile unsigned int maxnumbers = MaxNumbers;
volatile signed int button;
volatile unsigned int lsb;
volatile unsigned int msb;
volatile unsigned int n;
volatile unsigned int y;
volatile unsigned int z;

#define _XTAL_FREQ 1000000
extern void match(void);
void Link(void);

void Link(void)
{n = 0;}

void main(void) {
  
start_over:
 srand((unsigned)rand());
 // pick random numbers for the numbers array
 for (n = 0; n < MaxNumbers; n++)
 {
  numbers[n] = rand() & 0b00000011; // only need 0-3
 } // end for (n = 0; < MaxNumbers; n++)

 z = 0;
 match(); // call this function in the assembly module
 
 // wait until _match is done
 do
 {
  ;
 } while (z==0);
 goto start_over;
 
 return;
} // end main(void)

jerryd
--- Updated ---

betwixt,
When I started as an app engineer with pseudo assembly in Silicon Valley there were still a few computers around with lights and buttons on the front panel. The one I started had wire wound core memory, an upper case only keyboard and an 18 bit accumulator programmed in octal coded binary on paper tape. Glad those days are gone.

jerryd
 
Last edited:
eadboard,
My program waits for an interrupt by setting up a loop such as:
movlw 1
wait4:
CPFSEQ _button4, 0
goto wait4

It does stop and wait and then as soon as I hit a switch the isr is called. In the isr I set _button4 to a 1 and the program jumps out of the loop.

While setting up the debug suggested by KlausST I discovered that as soon as the interrupt takes place it will jump out of my loop even if _button4 isn't set to 1. I don't think any of the code in the isr is even executed. The program counter is pointing at the next instruction after my wait loop and that's where it automatically jumps to.

I must be missing something but everything I read on the internet is about interrupt functions for C or pure assembly.

Since the project isn't pure assembly it's compiled with XC8 not pic-as.

Any suggestions?
jerryd
 
Hi,

I asked you to report the debugging results .. because I wanted to help you...

I asked for the complete code .. because I wanted to help you ..

But now you come back with a new idea that no ISR code is processed at all. We can not verify this.

--> If you need help, please cooperate and do what we ask you for. Otherwise you will lose one helper after the other...


I'm not familiar with PIC ... do they automatically save the status register and other registers when entering the ISR ... and restoring them by leaving the ISR? Most microcontrollers I know needs this to be coded.

Klaus
 
KlausST,
I did post the C module but I think the overall program is too large to post. The isr function that was posted earlier hasn't changed. The rest of the code all works so the isr is the only problem.

I was in the act of trying the debug you suggested and when it wouldn't work at all I discovered that the code in the isr wasn't even being executed so I couldn't continue. At that point I posted that as the result of trying to debug.

I will supply any information that you need to help.
jerryd
 
Hi,

Sorry, blame it on my tablet, but it's rather inconvenient to scroll from one post to the other and back ... then scroll to the editor window to write my answer...then scroll back and up and down. Still we don't see the port setup and the periferals setup....

And for me the descriptions, assumptions ... are not consistent. I don't know what is hard truth and what is just guessing.
This all makes helping too time consuming for me ... and discouraging.
I don't get money, thus my motivation is to have fun ... by seeing some progress.

I'm not angry, I'm just telling why I leave this thread.

Good luck
Klaus
 
Not your ISR problem but you don't need the 'include <pic18f2550.h> - the correct processor-specific include will be brought in by the <xc.h> include.
Rather than use a label and a 'goto', the normal 'structured programming' approach is to use a 'while(1)' loop.
It is hard to see what is happening without seeing the 'match' function.
You don't need to declare a variable 'volatile' unless it will be changed in an ISR - in other words the variable can be set to a new value without the compiler generated code being aware of it. (I can explain why if you need me to.)
While you don't need to know all of the details of the code outside of the ISR, you DO need to make sure that any register you change in the ISR has been saved at the start and restored before you leave the ISR. you DO change the W register and so this needs to be saved at the start of the ISR and restored before you leave.
Therefore I suggest that you adopt the style you used after the 'INTIOF' test and use a 'goto' to a single exit point from the ISR. That way you can save the W register when you start the ISR and restore it (once!) before you leave. That also means you need to replace all of the 'retfie' instructions with a 'goto' except for the last one.
Susan
 

LaTeX Commands Quick-Menu:

Part and Inventory Search

Welcome to EDABoard.com

Sponsor

Back
Top