Continue to Site

Welcome to EDAboard.com

Welcome to our site! EDAboard.com is an international Electronics Discussion Forum focused on EDA software, circuits, schematics, books, theory, papers, asic, pld, 8051, DSP, Network, RF, Analog Design, PCB, Service Manuals... and a whole lot more! To participate you need to register. Registration is free. Click here to register now.

[SOLVED] PIC Design, State of Madness, Mayhem, Trauma

Status
Not open for further replies.
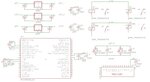
Thank you for the diagrams Bluelasers, it's difficult for me to draw them when I'm mobile most of the time.

As expalined, a capacitor HOLDS charge so except for the very short time when it is taking charge in, it draws very little current but it does have the ability to "fill-in" the dips in the supply voltage when something else pulls the voltage down. The reason for using an electrolytic capacitor and ceramic one in parallel is not to increase the value but to decrease their impedance. An electrolytic capacitor is good at providing a lot of storage in a small package but they are poor at releasing it very quickly (very = in a few nS) and ceramic capacitors are very good at releasing energy quickly but are physically big for their value. If you wire them across each other it gives the benefit of both types. As the interference on your supply lines is probably a mix of short and long signals, using both should always help.

So they are not 'shorts', they are more like little rechargeable batteries but placed where the demand for power is needed most.

Brian.
 
Final hardware:

1) Put 100nF (ceramic) paralleled with two 1uF (electrolytic )at both ends of the PIC
2) Put 0.1uF capacitor at the supply ends of each sensor
3) Put two 1uF capacitors, at input/output of each voltage regulator (electrolytic)
4) Wired all ground together: ground of first 9V, second 9V, third 12V
5) Wired the ground of the voltage regulator, both voltage regulators, at the ground of the PIC (the ground of each of 9V silver batteries, are only connected together)
6) Wired the ground of the sensors, on the PIC ground.

the PIC has stopped resetting, and taking random decision.
the only problem is the adc , even I had separated the supply of the sensors, but they make wrong entries, knowing that, the code is correct. Plus, when I expose big quantity of light, over the LDR for example, the temperature also elevates, and so the moisture. What the solution for this?

Is it necessary to branch capacitors at the end of the relays?


Please tell me, if there other steps that I must done? Before complete soldering, I want to finish this, if it remains anything, just tell me before I finalize execution, thanks.

- - - Updated - - -

guys the system is not stable at all!!!

When I've added the capacitors in parallel to the relay connections, block diagrams occured on the LCD, And voltage change happened!

It was working fine before adding capacitors to the open relay switch two terminals.

Why is my system is unstable?

I added the 100nf parallel with 2 1uF on the ground.
The ground of all regulators are grounded within PIC ground
all grounds of all batteries are grounded together.

Perhaps the capacitors, are saving voltage, so they add it to the supply voltage when turned on, and provoke greater than 5V, which is translated by blocks on the LCD?


Can someone please give a full brief explanations with solutions :(

- - - Updated - - -

why is the ADC process became so mutable?
is it hell here to produce 219C
lol
it was working more than fine yesterday
 

What is connected to each of the power sources?
 

Do not connect capacitors across the relay coils! It sounds like the diagnosis of suppy noise was correct though and adding the capacitors across the supplies has fixed that fault.

Whe you say "I expose big quantity of light, over the LDR for example, the temperature also elevates," do you mean the LDR itself is getting hot or the temperature reading from another sensor is increasing?

Usually, when ADC readings on different channels interact with each other it means you are not allowing enough time between selecting the channel and taking a reading from it. There is only one ADC in the PIC and the voltages from the analog inputs are connected to it one at a time through an analog switch, if you change channel and take a reading straight away, there will be residual voltage from the previous source at the ADC input. Try adding a small delay (1mS) between selecting the channel and starting to read the ADC.

Brian.
 
God bless you brian i will try that I hope you succeed in all of your projects man thank you and thanks to all and thanks to edaboard

- - - Updated - - -

What about connection of sensors with0.1 uF??
They're running, but with wrong values
I think it is a delay issue
Do you say to disconnect capacitors from sensors?


All grounds of voltage regulators are connected to pic ground
All sensors ground are connected to pic ground

Anything else than the delay must be added so the system is 100%?

Note that the ground of first 9v supply is only connected to the ground of second 9v supply (first for sensors second is for pic)


Any errors?

- - - Updated - - -

Please note, that from 10 trials, only once, the keypad on the "Choose type of plant menu" chooses automatically number 1.

Is this some sort of crash also? or delay problem?

for the PIC circuit, I added the 100nF ceramic with two 1uF electrolytic
 

All grounds need to be tied together. If you are powering the sensors from the batteries without the grounds connected then could have problems. Since this is DC you can tie all ground or 0V connections together. You need this as a common reference.
 

if you want to isolate the analog from the digital what you could do is the following. This will remove the noise from the ground plane.
+12V for all relays. ground to pic ground (VSS)
+5V_1 for lcd and PIC VDD. ground to Pic ground (VSS)
+5V_2 for sensors (analog only sensors, serial sensors go on the digital power pins VDD and VSS) and analog PIC VDD (PIN AVDD). ground to analog ground (PIN AVSS).

Use one 9v battery for each 5v regulator.

You will need to configure the ADC to use voltages on these pins as a reference and not the internal digital VDD and VSS.

Capacitors:
2 1uF and 2 100nF Capacitors near the relays between VDD and VSS.
1 100nF Capacitor for the lcd between VDD and VSS.
4 100nF Capacitors for PIC digital between VDD and VSS
1 100nF Capacitor for PIC analog between AVDD and AVSS
1 100nF Capacitor for each sensor between AVDD and AVSS

I have attached an example.

I do not know your exact PIC so the pin outs may be wrong. But Vref+/Vref- or AVDD/AVSS should be on there somewhere.

For the powers sources supplying to the regulators, their ground is connected to the ground of the regulator they supply only.
 

Attachments

  • Seperated Ground Planes Example.jpg
    Seperated Ground Planes Example.jpg
    215.4 KB · Views: 69
Last edited:

You are correctly talking about ground planes. Do you expect that the discussed bypass capacitors etc. will fix the reported problems for the test board setup shown in post #12 and #14?

I believe that well considered bypass capacitors will improve the noise immunity of the test board, but is it sufficient to withstand relay arcing with switching of mains power?
 

Whe you say "I expose big quantity of light, over the LDR for example, the temperature also elevates," do you mean the LDR itself is getting hot or the temperature reading from another sensor is increasing?


Brian.

The temperature readig from another sensor is increasing!
 

Please note the warnings other have given about construction techniques.

Two things can be making the wrong ADC reading change:

1. The LDR drops in resistance when light falls on it. It the fixed resistor you have wired in series with it is too low in value, it could be passing too much current and making the power supply drop. The batteries you are using are only rated at low current and if you are using standard 5V regulators there is little safety margin before they will be unable to keep the voltage constant. As you are not using an external ADC reference I assume you are using VDD so if VDD drops, the voltage you are measuring becomes higher relative to it and the reading will increase. Use a voltmeter across VSS and VDD and see if it changes at all when you illuminate the LDR.

2. As stated before, you have to leave a short time between selecting an ADC input and starting to read the voltage on it. There is only one ADC inside the PIC and you select which of the analog input pins is connected to it. So it can take a steady reading, there is also a 'sample and hold' circuit in the PIC and it takes a few uS to adapt to a new voltage arriving at it. If you change analog input and immediately take a voltage reading there is a risk that the sample and hold has not had time to adapt and you are measuring some residual voltage from the last input you selected. Try adding a short delay between selecting the input and starting the ADC conversion to see if it helps.

Brian.
 

Man the entire circuit is corrupted nothing is working fine o haven't change anything the system wont start up and the lcd has no brightness!!!

When i disconnect the ground of the regulator from the pic the buzzer keeps on and the light and fan start to work when the pic is turned off


????????????
 

Man the entire circuit is corrupted nothing is working fine o haven't change anything the system wont start up and the lcd has no brightness!!!

When i disconnect the ground of the regulator from the pic the buzzer keeps on and the light and fan start to work when the pic is turned off

My guess is that these are all connected to the relays. You have your relays wired as normal closed (or normally on), which means the PIC turns them off when it activates the relay.
 

Man the circuit is all ruined up nothing is working i think all components including lcd are bombed!!!!


What happened everything is messed up im very mad
It worked great at a point
 

Can you draw a schematic of what is connected to what exactly? Can you post your code also? Without that I cannot really help much anymore.
 

..... and NEVER disconnect the ground on a regulator - if you do it will almost certainly give more voltage out that it should and cause permanent damage.

Assuming the supply voltage didn't actually go high, it is very unlikely you have damaged anything. Without a detailed schematic and code it is very difficult to make a diagnosis over the internet, we don't even know which continent you are on.

Brian.
 

Ok,


When the sensors have long wiring from their power supply, and the output of them is fairly long, to arrive to the PIC.
This as cleared previously, will make a voltage drop and make inexact values.

Well, If I fix these sensors, at a constant distance, with a constant wire length, and monitor their output at different conditions and different states, temperatures, etc... and drive a formula for their output.

Is this a true or good act to be done? or this is not reasonable, since as long as a sensor have long wiring, from/to power source/PIC will be corrupted?

What is the solution to read from far sensors using far wires, having big voltage dip across?
 

I have a feeling if you separate the ground planes and use enough capacitors at the right place you will fix your problem. Length of the wire can cause problems, but more than likely you are experiencing a noisy ground plane or switching the ADC channel too soon.

What sensors are you using? What PIC are you using?

The length of the wire does matter to some degree, but i doubt it is the problem here. So wire is not a perfect conductor, therefore it is a resistor. So it has a very very small resistance too it depending on the diameter or width of the wire. The bigger the width the less resistance. However the longer the wire the higher the resistance. So if the 5v power wire has a resistance of 0.5 ohms and the sensors each pull 100mA, then the voltage will be 4.9V volts on the sensors side of the wire. Why because the wire will have a 0.1V drop across it. This means that the max signal the sensor can output is 4.9V.

I got this number by using ohms law. Voltage (VOLTS) equals current (AMPS) times resistance (OHMS). (V=IR)

Our current was 2 times 100mA (0.1A) which is 0.2A. The resistance is 0.5 ohms, so 0.2 times 0.5 is 0.1. So the voltage drop for the wire is 0.1V. To find the voltage on the sensor side of the wire we just subtract it from the input voltage (5V) giving us 4.9V.

I seriously doubt that the voltage drop is higher than 0.1 or even as high as 0.1. But that is the theory behind it.
 

what do you mean by separate the ground planes?

this cannot be done
You previsouly told me to ground all grounds together
 

In an earlier post I described how to isolate them.

It can be done, what you are doing is having two circuits instead of one. I wanted them connected them together to make the power sources stable. Since that fixed the PIC from resetting now it is time to fix the ADC ground noise. What we want is for the ground being used for the adc to only connect to analog devices and the adc's ground. To ensure this we need two 5V power sources.

What are the sensors and what PIC are you using?
 

Forget the concept of ground planes for now. They only apply when a substrate is used such as a PCB which can provide a wide and hence low impedance ground to all points on it. When using open wire construction there will never be a ground plane.

Yes, keeping all the wires the same length will help to improve accuracy but the difference will be insignificant at the currents your sensors are drawing. I would guess your sensors consume less than 1mA so you would only lose 1mV per Ohm of wire and it would be fairly constant so the drop would be predictable and could easily be compensated in software. The FAR bigger issue is the inductance of the wires and their capacitance to other wires and nearby objects. For sensors producing small voltage changes you should use screened wires and possibly filtering as well. Have you considered that all those wires are like antennas and are picking up electromagnetic (radio) signals that your ADC might be trying to make sense of?

I think the underlying problem you have is a lack of understanding of how signals travel along wires and the reasons why it is necessary to isolate the signals you want from the background noise. Much of this is down to construction practices, as you have observed, linking all the parts together may be correct topographically (according to the schematic) but still won't work in real life. Some signals we want, some we do not, when you use long wiring like your project, the signals we do not want tend to be bigger than the desired ones!

Brian.
 
  • Like
Reactions: FvM

    FvM

    Points: 2
    Helpful Answer Positive Rating
Status
Not open for further replies.

Similar threads

Part and Inventory Search

Welcome to EDABoard.com

Sponsor

Back
Top