Continue to Site

Welcome to EDAboard.com

Welcome to our site! EDAboard.com is an international Electronics Discussion Forum focused on EDA software, circuits, schematics, books, theory, papers, asic, pld, 8051, DSP, Network, RF, Analog Design, PCB, Service Manuals... and a whole lot more! To participate you need to register. Registration is free. Click here to register now.

Protecting FETs from CEMF spikes

Status
Not open for further replies.

Kerrowman

Member level 4
Joined
Oct 12, 2021
Messages
75
Helped
0
Reputation
0
Reaction score
2
Trophy points
8
Location
West Penwith
Activity points
578
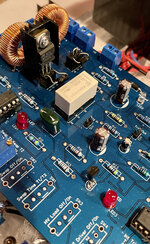
In my doing some research into the effects of HV CEMF pulses on batteries, I am finding that my MOSFETs understandably get easily damaged by these pulses, even when I have tried to isolate and protect them using a pair of chokes (see pic).

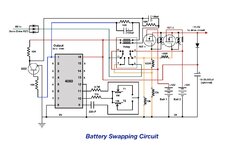
I also attach the relevant part of the circuit and wondered if anyone had any straightforward ideas as to how to block the CEMF pulses (~ 1,200V) from reaching the FETs? Maybe a fast diode between the Drain and Source of each one? However, the Source does not connect to Ground but supplies another part of the circuit.

Thanks

Chokes.jpg

FET Protection.jpeg
 

However I have noticed a tendency on various forums for contributors to extend their reach and thoughts beyond the originating questions.
This is a completely normal and fine thing to do when insufficient detail is given, in the interest of providing helpful feedback. I do so in most threads I reply to. Often there's a limit to how much can be shared due to business interests or IP. Nobody gets emotional about it.

With all do respect, the block diagram you posted before checks all the boxes for overunity device schemes (and I've seen my fair share):
1. Conversion of energy back and forth through strange arrangement of electromagnetic/mechanical/chemical devices (batteries, solenoids driving a flywheel, flywheel triggers coil drivers, coils provide pulses to batteries, do I have that right?)
2. Cycles power through a closed loop
3. No connections to external power sources
4. Diagrams made in mspaint, or hand drawn (though yours are actually well made, even if they lack the necessary detail)

Since then you've posted a couple proper schematics, that gives enough detail to offer detailed feedback. I'd also second a previous suggestion to switch the batteries on their negative terminals, that should make gate driving the gate much simpler, with much less concern for overvoltage. Also, the way you have the gates being driven right now, with the gate connected to the drain, means the FET is going to act more like a diode with a Vf of a few volts, rather than a switch with very low resistance. Though perhaps that doesn't matter if the pulses are >1kV....
 
Last edited:

What do you think those two batteries showing in the block diagram are??
I would call two batteries an external power source!

I have explained in previous posts the train of events. Your use of the term overunity is vague and imprecise. I’ve explained my meaning in depth.

From those I can connect to my load such as LED lights.

I start my designs on paper and then onto Mac Keynote before progressing onto a full circuit and PCB design system. The later can give one eye strain and is not as clear to see as the Keynote ones I can quickly update. Whatever works.
 
Last edited:

I wanted to share some data here on capacitor charging with HV transients based on some experiments during the design stage of the 'cap dump circuit'.

In the attached graphics you can see a graph showing the charging rate (dV/dt) of a 15,000uF capacitor when submitted to various PRFs from the timer-based trigger, and a result for the rotary based one (which can vary around 170-250Hz depending on mechanical factors)

You can see that the optimum frequency to deliver pulses to the capacitor is 100Hz. One might expect then that at 200Hz there would be twice the charge delivered but, I think the response of the dielectric reacting to pulses with a 10us rise time falls off with increasing frequency.

A few simple calculations will show that when using 3x15,000 uF caps in parallel (45,000 total), which at 100Hz gave a voltage rise of 4.2 V/s, then each pulse delivered 1.9mC of charge to the capacitors, that's 190mC/s.

So consider then what would happen if I turned the 555 clock pot a little bit to give a PRF of 10kHz instead of 100Hz? So in theory I now have a charge rate not of 190mC/s but of of 19C/s and all for the same current draw from the battery.

The trouble is it seems that even low ESR flash capacitors can't handle taking onboard charge at that rate and with such short rise times, but there might well be devices out there that can or are being developed.

This is a bit tangential to my main focus but what happens to the capacitors with the HV spikes has a direct bearing on the pulse properties (intensity and frequency) that will be delivered to the batteries from the cap dump circuit.

So my query here is does anyone have any thoughts about types of capacitors, or other devices, that can assimilate charge at these higher pulse frequencies?

Cap Charging Rate vs Pulse Frequency.jpeg

Cap Charging Rate vs Capacitance.jpeg
 

There are electro-chemical processes inside electrolytic capacitors but the main reason for their poor pulse response is their inductance. Unfortunately, your construction technique is making things far worse. Many of us here have experience in a similar situation where MOSFETs switch rapidly when we design switch mode power supplies and we know it is essential to keep current paths as short as possible and impedances as low as can be achieved. Assuming the capacitors in question are the three in parallel on the right of your photograph, the wires to them are FAR too long for it to work as you want. You need thicker wires and the lengths to be in millimetres not the 30cm or so you seem to have. Remember the current has to flow along that distance and back so the electrical length is twice the distance they are from the board.

The other thing that doesn't seem right is the voltages you are measuring. Going back to the MOSFET chopping the solenoid current, it is a 600V device with 700V avalanche rating, I'm suspicious of you measuring 1,175V across it. The avalanche should prevent it going much higher than 700V.

I see you also have two scope probes, one connected to the board and one to the capacitors. This will seriously mess up any readings in a pulse circuit, especially if you have the grounds connected at both probes because you will create ground loop currents through the scope itself.

Brian.
 

Thanks for the suggestions.

Firstly the HV pulse height is made using one probe attached to a voltage divider. I’ve checked it’s function against known voltages and it’s within 3%. I made some suggestions earlier as to why they do not damage the FETs. Anyway the voltage itself is not of real importance but how they charge the capacitors.

Re your other points, it’s quite hard to reduce the cable lengths to mm due to the physical size of the capacitors and where they will sit in relation to the cap dump PCB. The test set up shown is not how they will be when the circuit is built but I will certainly bear it in mind when assembling. The caps will be a couple of inches from the relevant PCB.

In the setup shown one probe is measuring the PRF from the board and the other the cap voltage. When the additional board is added there will be a dedicated PRF meter (frequency counter) so if I need to measure the cap voltage I will only need the one probe. Good to know about it though.

Do you think there other types of capacitors or devices that, with equal circuit inductances, can respond better to higher frequency pulses?
 

The other thing that doesn't seem right is the voltages you are measuring.
Interestingly, a little while back someone ran a simulation on my circuit which showed that I should be getting 16kV spikes instead of the little over 1kV I’m getting.

I’m unable to reconcile the difference.

8E7F3622-0052-42B9-8302-334CD3B1B046.jpeg

2E24E7AD-A001-46C8-8493-37B82A858258.jpeg
 

If the MOSFET was a perfect switch and the coils had zero resistance and the battery was a perfect source and there were no stay capacitances, the instantaneous voltage would be infinitely high. Of course none of those ever happen in real life and that's why the simulation, which takes some of those limitations into account, shows a lower peak voltage.

In your schematic the MOSFET you use is an avalanche type. It means it has a controlled breakdown condition when the drain-source voltage goes too high, in your case 700V. A non-avalanche part would probably be destroyed. Think of the diode that already exists across drain and source as being a Zener diode, it isn't quite right but the analogy works. It isn't normal to rely on the avalanche effect for circuit operation and the breakdown voltage isn't precisely controlled in manufacture.

Applying that to your circuit, you have a clamp across the solenoids of about 700V so spikes shouldn't exceed that. I suspect the measurements you have made using your resistor divider have not taken into account the capacitance of the divider resistors and the effect of the scope probe itself. I would anticipate it being much lower than the voltage you quoted.

Brian.
 

capacitance on the Mosfet D-S limits Vmax, as does the speed of turn off ( gate drive ) - in practice the mosfet will avalanche at about 120% - 150% of V-ds max, protecting with zeners is a good idea ...
 

The data sheet says 600V max D-S and 700V avalanche which agree with those figures but Kerrowman is saying the pulses measured on the drain are 1,175V which doesn't make sense to me. I suspect a problem with the measurement technique or the long wiring lengths is causing a false reading.

Brian.
 

Hi,

but keep in mind: avalanche of MOSFETS, Zeners, MOV and so on: All do dissipate the power as heat.
--> All degrade efficiency.

Klaus
 

I suspect the measurements you have made using your resistor divider have not taken into account the capacitance of the divider resistors and the effect of the scope probe itself.
Yes, you’re correct the HV was measured with a resistance only divider which will have, on reflection, introduced a systematic error bigger than the 3% random error I quoted.

I do in fact have a resistor/capacitor divider that I built for a 30kV ignition coil type power supply (see pic and circuit). It divides by about 945 so I would need to modify it to reduce that to a 10:1 unit. I have revised the circuit which I think would make a more useful device for better measurements.

The actual MOSFET in my drive circuit is not the one that was used in the simulation. Perhaps they couldn’t find the exact one for the sim but mine is an FCP260N60E. This one has max dv/dt of 100V/ns which might be enough to protect against the HV, whatever a more accurate value is.

Does the DSEI12 FRED diode across the Drain and Source offer no protection (not shown in Sim but in my circuit)?

I have now received some 12V bidirectional VTS diodes for use on my 'swapper' FETs. I see that these are basically Zeners back to back and I intend to use them with different FETs: the IRFIZ34GPBF which has a higher Vgs of 20V.


Potential Divider (1000-1).jpeg945 to 1 Divider.jpgPotential Divider (10-1).jpeg
 
Last edited:

Hi Brian,

I wanted to ask you something that is not for general consumption. Are you able to allow a PM for a short while?
 

While I wait for some components to rebuild a better voltage divider, for more accurate measurements of the HV spikes, I have been playing with replacement FETs for the two used in the battery swapper.

The aim here was to use one that has a higher value of Vgs so that the bidirectional VTS diode, placed across the Gate and Source, would work too close to the Vgs limit (16V) in protecting them from stray HV spikes, that may sometimes arrive from arcing in the relay at the moment of switchover.

The FET version I was using was the STP40NF03L and I have replaced those with a pair of IRFIZ34GPBFs but, surprisingly there is not enough juice getting through for the whole circuit to function normally - I just about get the swapper and trigger circuit LEDs to light.

To check that something else on the PCB had not gone wrong I removed the FETs from their mounts and inserted a wire link between D and S to effectively bypass them (see pics and a reminder of swapper circuit). Everything then works fine so clearly, these FETs are not the best choice for delivering power from the swapper to the rest of the driver and solenoid circuit.

So my query here is what electrical characteristics of the FETs are probably unsuited to this setup given that the relay is delivering around 12V to each of the Gates in turn?

In an earlier incarnation of the swapper, I had used TIP3055 BJTs but had assumed that a voltage-driven device would be more efficient.
 

Attachments

  • Bypassing FETs.jpg
    Bypassing FETs.jpg
    893.4 KB · Views: 71
  • Battery Swapper.jpeg
    Battery Swapper.jpeg
    199.6 KB · Views: 73

Hi,
So my query here is what electrical characteristics of the FETs are probably unsuited
Please undestand that this can not be answered generally.

It depends on what you expect and what you see instead, combined with the test conditions.
It may be a timing problem, a capacitive problem, a resistive problem a control signal problem ....

We don't know what you consider "good" or "bad". A sketch could clarify this, or a scope picture with some explanation.

Klaus
 

As previously mentioned, a weak point of the circuit is the source follower switch topology (see post #16, #17) resulting in an output voltage reduced by Vgs,th. Beside other properties, both devices are different in this regard, STP40NF03L is a low threshold MOSFET, IRFIZ34G isn't. Don't get confused by the linear versus log current scale, just compare Vgs at e.g. Id=10 A, about 2.5 and 5.5 V. I think that even 2.5 V voltage drop is a lot for a circuit somehow claiming energy harvesting.

An exact analysis would refer to the output characteristic with Vds = Vgs, but the difference to Vds = 25 V isn't that large.

Id vs. Vgs STP40NF03L
1644660977192.png


Id vs. Vgs IRFIZ34G
1644661114047.png
 

I’m not claiming anything yet till I’ve done my testing but I take your point. I need the swap fets to act like a simple switch, letting through the battery voltage when triggered by the relay. The typical current demand is about 2A max. Yes I loose 1-2 V but that’s not important here.

I note that Vgs (th) for one is 2.5V and the other 4V so my delivering 12V to the Gate should surely switch both on fully?
 
Last edited:

The threshold voltage you need to exceed, preferably by several volts, is between the gate and source pins. From your schematic there is 12V switched from the batteries to the gate but the source is at 11.5V. As FvM points out, a low threshold 'logic' level FET may work in that situation but one with higher threshold is less likely to do so.

Have you considered that the FET switches at the same time as the relay so in reality you could use the relay alone and leave the FET out altogether. Switching is speed is irrelevant, it can only operate at the relay's pace.

Brian.
 

Status
Not open for further replies.

Similar threads

Part and Inventory Search

Welcome to EDABoard.com

Sponsor

Back
Top