Continue to Site

Welcome to EDAboard.com

Welcome to our site! EDAboard.com is an international Electronics Discussion Forum focused on EDA software, circuits, schematics, books, theory, papers, asic, pld, 8051, DSP, Network, RF, Analog Design, PCB, Service Manuals... and a whole lot more! To participate you need to register. Registration is free. Click here to register now.

Need advice for my toroidal core dimensions

treemon

Member level 3
Joined
Nov 2, 2022
Messages
60
Helped
0
Reputation
0
Reaction score
4
Trophy points
8
Activity points
402
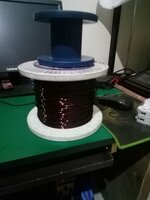
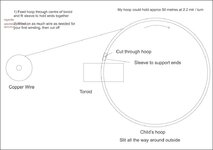
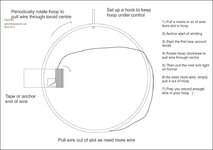
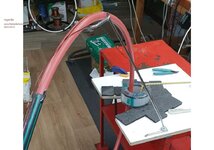
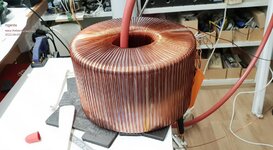
I am in need to build a 5kw inverter based on EGS002, for which I am first building a toroidal transformer, I got the toroidal core manufactured & delivered from a vendor.

Having no prior experience in doing this, I just used an android app called TransCalc to calculate core dimensions (and winding data), now I feel like core is bit awkward shape more like a ring.

My core dimensions are (mm)
OD=220
ID=150
Height=100

Weight 16kg
Material CRGO

I feel I had given too big ID, but I had to do because app told me to do so, large ID so large window area, which made core to transformer more power. According to calculation this can transfer almost 5kw..

Now I am little in dilemma whether to go ahead with this core, further put effort and also money on copper wires, already plenty of money is spent on core.

My main concern is, this look somewhat different from cores that companies are using in their inverter, should the core have a particular "form" for better efficiency, I mean the ratio of ID/OD/H must stick to some guideline?

I need suggestion from eda members, guide me whether if this core design is horribly wrong in that case I will not go ahead with this core, or if the core sizing s fine...please tell me.
 

Attachments

  • IMG-20230313-WA0002.jpg
    IMG-20230313-WA0002.jpg
    131 KB · Views: 170
because the inductance is measured at low power, it tends to be a squared function of turns

The real inductance changes radically as a function of V.sec (or magnetising current) - as - as the BH loop falls over at higher H, the Ur falls over too giving a change/reduction of Lmag and hence the peaky current waveforms near the volt zero crossing of the mains sine wave.
--- Updated ---

Magnetizing_And_Exciting_Currents_Waveshapes_In_Transformers_Figure_1.jpg

--- Updated ---

actually here is a far more accurate one:
images
 
The degree of peak voltage Vo over threshold, Vth of magnetic field saturation creates an exponential growth of the 3rd harmonic which appears in @Easy peasy ’s plot in red . It is about -12 dB at 3f down from 1f or 25% of fundamental.

Generally L is rated at a high flux level that is results in a 10% reduction from low voltage.

Some tolerance variations exist depending on thermal properties and supplier and thus magnetic materials used.

Inductive Current is essential for the high mutual coupling of prim./sec. Flux.

While saturation levels depend on flux levels relating to voltage Vp/Vth which degrades with rising temp.

Your idle magnetization current ought to be less than or = 10% of rated current. Although, I am not sure which is optimal.
 
Yes indeed, ten percent of full rated current would be HORRIFIC for an inverter.

Just imagine 500VA of continuous wasted idling power loss for a 5Kw rated inverter running 24 hours per day.
A more reasonable and readily achievable figure would be 10VA to 30VA for a home wound inverter transformer of this size, and 50Va to 80VA fairly typical for a similar sized (minimum cost) commercial inverter transformer.

Batteries are always the most expensive part of the system, and its always more economical to spend a lot more on copper and steel for the new home built transformer, than adding the required extra amp hours to the battery.

Its not commercially viable for the inverter manufacturers to do this, but we certainly can !
And end up having a much superior and more efficient inverter as a result.
 
" Inductive Current is essential for the high mutual coupling of prim./sec. Flux. "

This is in fact a misnomer - coupling is determined entirely by the proximity of the pri and sec wdgs, having them on either side of the toroid gives high leakage and poor coupling - even though the flux in the core would be the same.

Also, the Curie temp of transformer steel is > 700 deg C so variance of L with temp is very small indeed.
 
I wonder:
What is the inductance when idle current is 10% of rated current?
What is loss factor in W/kg of CRGOS used?
Were edges processed so as to prevent intralayer lamination shorts?


I guess first two parameters will be known later, I have painted using oil paint and some will stay between lamination layers
--- Updated ---

Yes indeed, ten percent of full rated current would be HORRIFIC for an inverter.

Just imagine 500VA of continuous wasted idling power loss for a 5Kw rated inverter running 24 hours per day.
A more reasonable and readily achievable figure would be 10VA to 30VA for a home wound inverter transformer of this size, and 50Va to 80VA fairly typical for a similar sized (minimum cost) commercial inverter transformer.

Batteries are always the most expensive part of the system, and its always more economical to spend a lot more on copper and steel for the new home built transformer, than adding the required extra amp hours to the battery.

Its not commercially viable for the inverter manufacturers to do this, but we certainly can !
And end up having a much superior and more efficient inverter as a result.
Right....!
 
I guess first two parameters will be known later, I have painted using oil paint and some will stay between lamination layers
--- Updated ---


Right....!
Inverters have high dV/dt and usually use ferrite. Transformers with CRGOS have far greater mu and lower BW thus are ideal for sinusoids. Using this for an inverter will create more eddy current losses than sine excitation transformer losses. Perhaps you want to specify your design expectations?
 
A sine wave inverter is a 230v 50Hz sinusoid, and there is no high dv/dt in the transformer. Only a very low residual of the original pwm frequency, which we are trying to filter out anyway.
The associated choke in series with the primary will have a very high series impedance at the pwm switching frequency, and a very low series impedance at 50Hz. That is its function.
 
A sine wave inverter is a 230v 50Hz sinusoid, and there is no high dv/dt in the transformer. Only a very low residual of the original pwm frequency, which we are trying to filter out anyway.
The associated choke in series with the primary will have a very high series impedance at the pwm switching frequency, and a very low series impedance at 50Hz. That is its function
Yes

Today I went to local market, and found right size wire in first attempt, it was very easy to get this 15 swg/1.8mm wire than what I was hoping for, I purchased 6kg total.

Now time to plan windings, like you said, I can do both wiring in one go or first 300 turn on top of that next 300. Later method will be easy, also do not have to worry over "equal spreadness" in first layer.... but will it have any side effect?
 

Attachments

  • 16806153506383245667325659224860.jpg
    16806153506383245667325659224860.jpg
    2 MB · Views: 91
Well done finding the wire !

First the suggested method of winding, so you can get yourself set up.....

Many other people have been through this exact same exercise, and the general consensus is, that the easiest way to do all this is to first construct a suitable winding "hoop". This can be an old bicycle rim (least suitable), a child's plastic hoop (best if you can find a hoop) or a length of split black plastic irrigation pipe (annoyingly floppy but possible).

The idea is that first the empty hoop is looped through the toroid, like two links in a chain. The toroid sits on the very edge of a work bench on a firm "V" extension, and the hoop hangs supported from a high hook.

Wire is first loaded onto the hoop, then can be progressively unwound from the hoop as each turn on the toroid is completed. The pictures below should make all this a bit more clear:
--- Updated ---

The above pictures were shamelessly stolen from a thread on The Back Shed Forum.
https://www.thebackshed.com/forum/ViewTopic.php?FID=4&TID=14639

If you are wondering what a "Warpverter" is, its a non PWM pure sine wave inverter of my own design, that uses four separate low frequency square wave inverters with the outputs combined in series to produce a very finely stepped 230v waveform that has less than 1% THD.

That thread has some pretty good practical information about winding large toroids, and inverter construction in general.
 

Attachments

  • hoop1.jpg
    hoop1.jpg
    52.3 KB · Views: 110
  • hoop2.jpg
    hoop2.jpg
    62.9 KB · Views: 110
  • hoop3.jpg
    hoop3.jpg
    87.8 KB · Views: 108
  • hoop4.jpg
    hoop4.jpg
    98 KB · Views: 111
Last edited:
Yes indeed, ten percent of full rated current would be HORRIFIC for an inverter.

Just imagine 500VA of continuous wasted idling power loss for a 5Kw rated inverter running 24 hours per day.
This is a false assumption.

The magnetization current to create the mutual coupling in a transformer is a reactive current and the real losses depend on the resistance. So the real idle losses are much lower.
 
This is a false assumption.

The magnetization current to create the mutual coupling in a transformer is a reactive current and the real losses depend on the resistance. So the real idle losses are much lower.
True, the losses will certainly be lower, but more difficult to measure directly at the initial testing stage where you only have a bare transformer and no pwm driver.
Just measuring magnetizing VA (at a known flux density) is still a useful high/low loss indicator with a totally unknown transformer core.
 
Well done finding the wire !

First the suggested method of winding, so you can get yourself set up.....

Many other people have been through this exact same exercise, and the general consensus is, that the easiest way to do all this is to first construct a suitable winding "hoop". This can be an old bicycle rim (least suitable), a child's plastic hoop (best if you can find a hoop) or a length of split black plastic irrigation pipe (annoyingly floppy but possible).

The idea is that first the empty hoop is looped through the toroid, like two links in a chain. The toroid sits on the very edge of a work bench on a firm "V" extension, and the hoop hangs supported from a high hook.

Wire is first loaded onto the hoop, then can be progressively unwound from the hoop as each turn on the toroid is completed. The pictures below should make all this a bit more clear:
--- Updated ---

The above pictures were shamelessly stolen from a thread on The Back Shed Forum.
https://www.thebackshed.com/forum/ViewTopic.php?FID=4&TID=14639

If you are wondering what a "Warpverter" is, its a non PWM pure sine wave inverter of my own design, that uses four separate low frequency square wave inverters with the outputs combined in series to produce a very finely stepped 230v waveform that has less than 1% THD.

That thread has some pretty good practical information about winding large toroids, and inverter construction in general.
I am having difficulty, fully grasping how the hoop and in general motorized winding machine works, I think this hoop is a manual way to do the same thing, it will enforce winding in radial direction. i am wondering if the hoop is dangling cuz its center is not arrested then how could it achieve that... there are few more items though ...in motorized machine it appears like the wire is sliding over ring during unwinding process, it can damage the wire.

I will take sometime for the picture to clear itself.
 
Last edited:
The hoop is not motor driven,
Yes I understand that.

So hoop is basically a replacement for spool which are large and wont go inside many cores with small hole.. Additionally it might help bit straighting the wire.

What I am saying is if the hoop is somehow fixed to allow only rotation, then we can use it to make a neat winding somewhat closer to machines.
 
The hoop is not fixed, a small hoop can be completely free.
A larger diameter hoop (recommended) usually hangs from a hook attached to the ceiling or a support pillar.
The wire is placed and tensioned completely by hand.
As you say, the hoop just replaces the large spool or bobbin the wire originally came on, for convenience and least damage to the wire.

Each turn on the toroid must be carefully placed radially, entirely by hand, the hoop plays no part in that.
Its a very long tiring fatiguing process, one turn at a time, and your fingers will quickly become very sore.
Just take your time. A bit each day.
When its all complete, it will be an achievement to look back upon, and be really proud of.

There are people on that other Forum that have designed and wound a great many of these large toroidal transformers and all by hand.
Your very first effort will not look as neat as theirs ! But it will definitely work just as well, and that is what matters.

Knowledge and experience has been shared, and the suggested method developed over time works, and has slowly been improved upon by multiple different people over many years.
 
Last edited:
convenience and least damage to the wire.
Yes
Knowledge and experience has been shared, and the suggested method developed over time works, and has slowly been improved upon by multiple different people over many years.
I just want to fix the hoop and figure out a mechanism to unwind like machines... It will yield a better quality turns. This is my first winding, I am completely unaware of pits & fall doing it, its very likely that I will end up very ugly windings...

Maybe some additional work and need to 3D print few parts... then a trial run using cotton thread :cry:
 
The losses in the core are due to eddy current losses in the steel ( little electrical loops ) made worse by thicker steel and more conductive steel ( hence 4% Si steel ),

and due to hysteresis losses, the area of the B-H loop - these are usually given in Watt / kg for a given level of excitation, e.g. 1.5T peak 50Hz

Thus depending on the steel, for the VA measured at idle, losses could be anywhere from 20% to 80% of the VA measured - depending on the steel - and the level of excitation.
 
Thus depending on the steel, for the VA measured at idle, losses could be anywhere from 20% to 80% of the VA measured - depending on the steel - and the level of excitation.
What it means is transformer under full load will have greatly reduced efficiency, Its something cannot be avoided.

But idle current is very important for battery life and in keeping the energy bills low.
 
Dóh - the flux does not change with load, it is fixed by the applied volt seconds, 230Vac, 50Hz in this case.

Full load efficiency is most largely affected by the thickness of the wires
 

LaTeX Commands Quick-Menu:

Similar threads

Part and Inventory Search

Welcome to EDABoard.com

Sponsor

Back
Top