Continue to Site
Follow along with the video below to see how to install our site as a web app on your home screen.
Note: This feature may not be available in some browsers.
View attachment 122880
Does the UART GPIO's go low or high when data is transmitted? What is the Idle state?
Just use BJT's, you also get them in double packages.
The brightness of the LED is determined by its on time duty-cycle. If the data is mostly 01111110 then the LED will be bright. But if the data is mostly zeros then the LED might blip pulses of light that are too short in duration to be seen or the LED will appear to be dimmed.
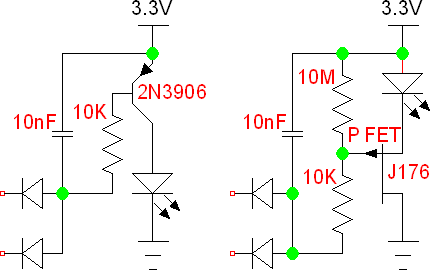
Your text of using a PNP transistor has the polarities backwards. Your text uses the polarities for an NPN transistor (LED and its resistor from +5V to the collector. Emitter is grounded).
Then you show a schematic that is different and has no current-limiting resistor in series with the LED so when the transistor turns on then the LED and transistor might instantly burn out.
We do not know if the GPIO will burn out when it tries to charge the capacitor without anything limiting the charging current.
EDIT: You did not look at the datasheet of an old J176 P-channel Jfet. It will NEVER turn off in your circuit.
So I just went with a single PNP pre-biased transistor (https://www.digikey.com/product-detail/en/DTA123JUAT106/DTA123JUAT106CT-ND/1158734) that will operate similarly to this https://goo.gl/K5XWwH
Im trying to keep the parts down so I'm limiting current to the LED without a resistor and just using the voltage drop on LED and bias resistors on transistor to limit current. That simulator is very basic though so is there a way to calculate the exact current value across the LED with that transistor? Or do all PNP based resistors draw the same amount of current based on Vce and input current?
I tested it with a 2N3906, but I have no idea whether that will match the transistor I have linked above.
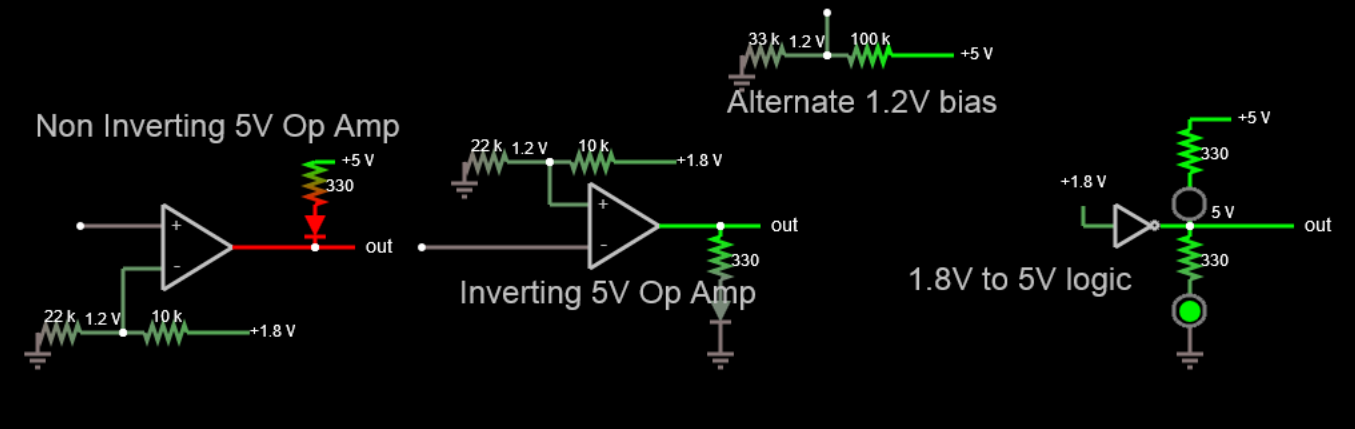
The simulator is as accurate as your model for current gain at operating Vce and diode forward voltage, neither of which you know how to specify.
Trying to save parts count is a lazy man's approach or a feeble effort to have an elegant simple design without thorough awareness of all the parameters, that you need to specify and may be added to Falstad's primitive ( yet accurate as your model) design.
No you cant add a part number to the simulator but you can add an ESR based on power of diode or VI curve when saturated and you can specity colour for appearance and Vf for saturated characteristic.
Vf of diode, may be edited, then add ESR of diode with discrete R, both based on selected LED, none of which you have specifiied.
Cost of design and production and performance far outweights parts count.
Now if you can you add more specs you can get a better design.
I understand how the simulator works and it has the correct forward voltage, my main concern is what the gain will be for that particular transistor and setup with LED and how to calculate it. The only parameter that can be changed on the transistor is just gain, but gain is dependent on the current drawn from the LED.
Im here to learn, so instead of calling my efforts feeble and lazy I would appreciate more constructive feedback. I understand you know more about electrical engineering than I do, but Im sure you started somewhere too.
BTW the LED im using has a foward voltage of 2v and 30ma forward current at that voltage.
Transistors with the same part number have a range of current gain. Some have low gain and others have high gain. You get whatever they have.
The datasheet for EVERY transistor shows that when it is used as a saturated switch like you are doing then you simply plan that its base current is 1/10th its collector current and EVERY transistor will switch properly.
Your LED does not have a forward voltage of 2.0V unless you bought hundreds of them, tested them all and selected the one that has a forward voltage of 2.0V. Like most electronic parts, LEDs have a range of forward voltage. Yours might be 1.7V or 2.2V or anything in between and you must calculate the current for each end of the range so that the LED does not burn out but is bright enough.
Another problem might be that your LED probably has a maximum never to be exceeded current rating of 30mA if it is cooled properly. Most LEDs are rated and operated at 20mA.
Absolutely NOT!LED has a forward voltage range of 1.8 to 2.1v and transistor as a MINIMUM gain of 80, so at the very least I can plan that the base current will be 1/80th of collector, yes?
I guess you are talking about the PNP emitter-follower transistor in the Falstad simulation that has a series 2.2k base resistor? What input device drives it to ground with no voltage loss?So in the case were transistor is minimum gain of 80 the LED will see between 18-25ma of current with a base resistor of 2.2k, and is guaranteed to turn on since at even 2.1 forward voltage the collector will see at least 1v which is enough to turn it on when base is grounded. And according to charts the maximum gain is 200, which at worst case at 1.8v forward the LED would see about 35ma.
I understand how the simulator works and it has the correct forward voltage, my main concern is what the gain will be for that particular transistor and setup with LED and how to calculate it. The only parameter that can be changed on the transistor is just gain, but gain is dependent on the current drawn from the LED.
Im here to learn, so instead of calling my efforts feeble and lazy I would appreciate more constructive feedback. I understand you know more about electrical engineering than I do, but Im sure you started somewhere too.
BTW the LED im using has a foward voltage of 2v and 30ma foward current at that voltage.
