Continue to Site

Welcome to EDAboard.com

Welcome to our site! EDAboard.com is an international Electronics Discussion Forum focused on EDA software, circuits, schematics, books, theory, papers, asic, pld, 8051, DSP, Network, RF, Analog Design, PCB, Service Manuals... and a whole lot more! To participate you need to register. Registration is free. Click here to register now.

Solar charge controller

Status
Not open for further replies.

vbdev

Member level 1
Member level 1
Joined
Jul 21, 2012
Messages
32
Helped
1
Reputation
2
Reaction score
1
Trophy points
1,288
Visit site
Activity points
1,554
While I was searching for a solar charge controller design I came across this one.


4 Amperes Photovoltaic Charge Controller.png

I am specially impressed because n-channel mosfet is used, which are commonly available. Most other design use p-channel mosfets.

My query is that how the battery terminal voltage is monitored? I think R1 should be connected to the cathode of D1. Please help whether the circuit design is alright or there is some error.
 

I decided on using an N-mosfet as the switching device, when I made a homebrew PV charge controller for my 24V battery bank.

My arrangement is similar... the battery is in the drain leg (the more positive leg). Then it does not interfere with biasing, and I can get full current from the PV panel.

I used an op amp to detect battery voltage. The op amp turns the mosfet on and off.

My concept of op amp operation caused me to decide against using a P-mosfet.

I was able to get my circuit to work. I can't be certain if it operates exactly the same way as the control network in your schematic.


Okay, what do you think about the voltage monitoring section in my previous circuit. Is R1 connected correctly or it should be connected to the cathode of diode D1 which is the positive terminal of the battery.
 

Yes, from the appearance, the control network monitors the PV panel voltage rather than the battery voltage.

However the battery pulls down the voltage coming from the PV panel. The control network monitors battery voltage plus the diode drop. This is workable, evidently.

The designer also realized the 'charging' led should not light up when the battery is connected, but the PV panel is not. That may be the chief purpose of D1. I imagine he tried putting D1 in various places, to find out which works best.
 

Thanks for your reply.

Though it is correct that the monitored voltage will be the battery voltage plus diode drop, it will also depend on the conduction level of MOSFET T1.

Okay, I will build it & let you know the results.
 

I know the purpose of D1. My question is that how the battery voltage is monitored. Because the voltage divider for TL431 is not connected directly to the battery terminals. Neither positive (D1) nor negative (T1)
 

Circuit works like this that when voltage start rising from solar cell then at certain level mosfet turn on (about 4V). We can say that initially mosfet is on. When voltage of solar cell rises above battery voltage+ voltage drop on diode(0.3V), the battery gets charging current. Important point here is that battery damps the voltage from solar cell, only charging current increases with more light. It behaves as if it is connected to battery and is monitoring battery voltage. When voltage rises from set point by variable resistor, FET switch turns off, charging stops and now voltage of solar cell rises to its maximum level as now there is no current drawn. This circuit works fine but there is a problem, when battery is discharged and now charging is off so now circuit is not monitoring battery voltage, the circuit will not turn the FET on and battery will remain discharged. It requires to remove light source to drop voltage from solar cell so that FET turns on again.
The circuit around T3 covers this draw back. When charging is off the lower side of led becomes floating. Capacitor C1 is charged slowly through R4. Transistor T2 is connected as diac. It fires above certain level causing T3 to conduct. Vref drops and in turn TL431 turns off and FET is turned on generating a charging pulse. This pulse happens after every few seconds depending on value of R4 and C1. Circuit works like this that when voltage start rising from solar cell then at certain level mosfet turn on (about 4V). We can say that initially mosfet is on. When voltage of solar cell rises above battery voltage+ voltage drop on diode(0.3V), the battery gets charging current. Important point here is that battery damps the voltage from solar cell, only charging current increases with more light. It behaves as if it is connected to battery and is monitoring battery voltage. When voltage rises from set point by variable resistor, FET switch turns off, charging stops and now voltage of solar cell rises to its maximum level as now there is no current drawn. This circuit works fine but there is a problem, when battery is discharged and now charging is off so now circuit is not monitoring battery voltage, the circuit will not turn the FET on and battery will remain discharged. It requires to remove light source to drop voltage from solar cell so that FET turns on again.
The circuit around T3 covers this draw back. When charging is off the lower side of led becomes floating. Capacitor C1 is charged slowly through R4. Transistor T2 is connected as diac. It fires above certain level causing T3 to conduct. Vref drops and in turn TL431 turns off and FET is turned on generating a charging pulse. This pulse happens after every few seconds depending on value of R4 and C1. Capacitor C1 is discharged through R5 and T3. Cycle repeats itself. This pulse serves two purposes. It reset the circuit and if the battery is discharged it will damp the voltage of solar panel and the charging will be started in normal way. If battery is charged, it will trickle charge it.
T2 is configured in rare way that when emitter/collector voltage is opposite than normal, it behaves as diac. This pulse serves two purposes. It reset the circuit and if the battery is discharged it will damp the voltage of solar panel and the charging will be started in normal way. If battery is charged, it will trickle charge it.
T2 is configured in rare way that when emitter/collector voltage is opposite than normal, it behaves as diac.
LED is connected in an intelligent way. When it is on, it drops voltage on C1 and pulse generation is seized.
 

My query is that how the battery terminal voltage is monitored? I think R1 should be connected to the cathode of D1. Please help whether the circuit design is alright or there is some error.
Hi
As a short answer , you can take a look at how a variable zener ( TL431 ) does work . in fact , that's a simple linear PSU . if you want to understand how it does work , first learn how tl431 works . refer to the datasheet which presents a lot of valuable information about it .

Best Wishes
Goldsmith
 

Hi, thank you everybody for sparing time for me, & sorry that I am so late to respond.

As there is some changes going on in my office lab, I am not able to test the circuit. I will post the as soon as I do the actual testing.
 

Today I made the circuit. For the adjustment I followed the following guide as mentioned in the webpage.

To adjust the circuit you’ll need a good digital voltmeter and a variable power supply. Adjust the supply to 14.9 V, that’s the 14.3 volts bat- tery setting plus approximately 0.6 volts across the Schottky diode.

Turn the trimpot until at a certain point the LED goes dark, this is the switch point, and the LED will start to flicker. You may have to try this adjustment more than once, as the closer you get the comparator to switch at exactly 14.3 V, the more accurate the charger will be. Disconnect the power supply from the charge controller and you are ready for the solar panel.


It has been observed that while adjusting the pot the LED goes dark at some point but it never starts to blink. The voltage across the capacitor rises fast up to 8.4V but after that it remains steady & transistor T2 never fires. Any ideas? I will try changing the T2 with 2N2222 or BC547.
 

As I am facing some problems I am not going to use this circuit. The transistor only fires if the resistor is reduced to 470K. But then the LED blinks fast. Similarly if the battery is disconnected while charging and again connected the charging stops. It will only start again when we disconnect & connect the solar panel.
 

As you have reduced the value of timing resister, you have to increase timing capacitor. Make it 100uF instead of 22uF.
battery is disconnected while charging and again connected
This will also help stretch the pulse. Put a 100 ohm resister in series with T2.It requires battery to discharge below a certain level to start charging cycle.
If you are testing it with power supply. The filter capacitor in supply won't let drop voltage rapidly and charging will not start.
 

Thanx ALERTLINKS,

I will test today replacing the capacitor. Where should I connect the 100 ohm resistor in collector or emitter leg?
 

Thanks I will go through the links. After ALERTLINKS' modifications the circuit worked okay with 470K & 100uf capacitor. The LED starts blinking slowly after proper adjustment without load.

But when I connected a battery (discharged to 10.5V) it was still blinking. That means trickle charging was performed.

Then I adjusted the pot so the the LED just glows normally, and found that the battery voltage rises to 16.2 when the panel voltage was nearly 17V. The charging current was very low nearly 100mA. So I assumed that the circuit was not working well??? (Is the voltage as high as 16V across the battery alright?)

In the meanwhile please explain the purpose of biasing the MOSFETs in the following circuit.
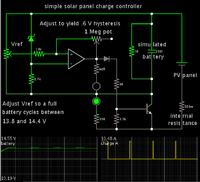
Charge Controller.png
 

Charge cycle is between 12.2V and 14.4V. Put the spared 22uF capacitor across variable resistor and see the result.
 

Thanks ALERTLINKS, I will try that & will post the results. Can you please explain the operation of MOSFETs in the circuit I have recently added!!!
 

found that the battery voltage rises to 16.2
The charging current was very low nearly 100mA.
It is an indication of faulty battery. This is also a reason of not starting charging cycle.
With 10.5V battery, panel voltage will be damped to near 11V and battery should take maximum current from panel.
 
Last edited:

Status
Not open for further replies.

Similar threads

Part and Inventory Search

Welcome to EDABoard.com

Sponsor

Back
Top