Continue to Site

Welcome to EDAboard.com

Welcome to our site! EDAboard.com is an international Electronics Discussion Forum focused on EDA software, circuits, schematics, books, theory, papers, asic, pld, 8051, DSP, Network, RF, Analog Design, PCB, Service Manuals... and a whole lot more! To participate you need to register. Registration is free. Click here to register now.

pic18f4550 (configuration)

Status
Not open for further replies.
thank you ,I thank everyone for your time and the help .

if it is not too much to ask I need the exactly frequency of compatible "Programmer PICKIT 2"
If you have links to buy it but please be sure to avoid any problem and also I need for cable (RS232 and USB)

thank you
 

please can you give me the frequencies of "Programmer PICKIT 2" I need to avoid any problems and also I need for cable (RS232 and USB)

I do not understand the reference to "frequencies", the links I provided below have the required documentation.

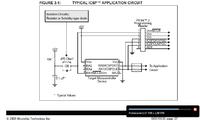
You will need an external programmer/debugger to initially load the bootloader into the device.

As suggested several members above, a PICkit 2, PICkit 3 or a used ICD 2 would be good choices.

**broken link removed**

**broken link removed**

**broken link removed**

You will find all the appropriate documentation for each of the devices on the product pages above.

PICkits available on eBay:

PICkit eBay Search

I would recommend purchasing a genuine Microchip PICkit or ICD, as a beginner you'll have enough issues to deal with besides whether your programmer or its driver are functioning correctly.

How to Program PICs (DIP) with Breadboard and PICkit 2?

C18 Junebug / PICkit2 Tutorial 1

BigDog
 
  • Like
Reactions: khiat

    khiat

    Points: 2
    Helpful Answer Positive Rating
thank you ,thank evryone for your reply
 

please can you give me the frequencies of "Programmer PICKIT 2"
What? I don't really understand what you meant...

Frequency of oscillator is one thing, and the Pickit 2 is other thing. For PIC18F4550 USB transceiver to work you need a crystal of 4 MHz frequency (or it's multiple like 8, 12 or 16 MHz). This is the requirement of internal PLL inside PIC. The PLL is used to increase frequency to 96 MHz which is then divided by two getting master clock of 48 MHz which is equivalent to 12 MIPS. Also 48 MHz is the frequency which is needed by USB 2.0 transceiver. That is why u need an oscillator.

Pickit 2 is the other thing. I will work and be able to program pic no matter what you connect to it. For the programming you can have only VCC, GND, !RESET, PGM and PGC from pickit to PIC connected and programming will still work.

You don't need USB to RS-232 cable. U need USB to UART converter which is for example FT232R chip manufactured by FTDI. The reson is following:
If you have a computer with COM port, this is RS-232. RS-232 is a standard which defines signal names and voltages (and some other things). Voltages of RS-232 are in the range of -13 to +13 V or something like that. If you want to interface RS-232 COM port to PIC which operates at 5V you need a level translator such as MAX232 chip from Maxim-Dallas. This converts -13/+13V of RS-232 to 0-5V logic level which is appropriate for PIC. You connect this signal to UART port of PIC. UART can understand RS-232 transmission, only voltages need to be changed.

If you don't have COM in your computer, then you need a USB to UART converter, not an USB to RS-232 converter. If you used USB to RS-232 converter, then you would need to use next converter to change RS-232 levels to UART levels. This may seem complicated but when you think about it for a while you will understand what I mean.
 
  • Like
Reactions: khiat

    khiat

    Points: 2
    Helpful Answer Positive Rating
thank you poorchava,but I can connect directly my pic to pickt2 and pickt2 to my laptop in order to program my pic?? and use PICPgm as Bootloaders to download program into MCU
 

but I can connect directly my pic to pickt2 and pickt2 to my laptop in order to program my pic?? and use PICPgm as Bootloaders to download program into MCU

Yes, you can attach the PICkit 2 directly to your PIC to be programmed and to your laptop via the USB port.

If your using the PICkit 2 as a programmer/debugger the MPLAB IDE provides the downloading, debugging and driver interface for the PICkit.

No other application is needed when using the PICkit 2, PICkit 3 or ICD 2.

BigDog
 

thank you a lot,but
I mean as shown in the picture

and thank you
 

Yes, that is basically the configuration needed. Be aware that MPLAB cannot be installed in Vista or Windows 7 directly, Microchip is currently developing the new version MPLAB X and is available in Beta version now:

**broken link removed**

It may require the PICkit 3, so check the documentation if you plan on using MPLAB X.

If you want to use MPLAB in Vista or Windows 7, you'll need to implement a virtual machine with a program like VirtualPC and install Windows XP PRO.

BigDog
 
Last edited by a moderator:
  • Like
Reactions: khiat

    khiat

    Points: 2
    Helpful Answer Positive Rating
thank you BigDog thank you very much

---------- Post added at 18:52 ---------- Previous post was at 18:44 ----------

yes I use Windows 7, so I have to buy pickit 3 and install MPLAB X to recognize pickit 3 and program the pic, thank you
 

Pickit 2 works completly fine with Win 7 (both 32 and 64 bit version). I don't use mplab X though...
 
  • Like
Reactions: khiat

    khiat

    Points: 2
    Helpful Answer Positive Rating
thank you poorchava

---------- Post added at 20:37 ---------- Previous post was at 20:30 ----------

poorchava,can you please give me an exact link to buy PICkit 2 like yours (usually cd of MPLAB is accompanied with PICkit 2) ,to ultimately realize the implementation
shown in the picture in my previous post and thank you
 

I can't give you an exact link. I've bought an original Microchip made Pickit 2 (i mean not a clone, though they function identically, because the code is open now). Mine looks exactly the same as the one in your photo. You can get it from Microchip Direct, but depending on your location the shipping and handling fee might be very high (even higher than price of pickit itself). I have bought mine from authorized distributor in Poland. Product Search - microchipDIRECT the part number is PG164120. Don't donfuse it with developement board of number DM164120-5.

If you plan on experimenting further with PIC, then consider Pickit 3 as it supports all of the devices produced, which Pickit 2 does not.

Anyway, I've been running ordinary MPLAB 8.xx (different versions, builds, updates etc) on my PC with Win 7 32-bit Proffessional and my netbook with Win 7 64-bit Home edition. Never encountered a single problem.

btw.
why do you insist so hard on copying exactly what other people have on photos? I rather recommend reading lots of tech documentation. For example if you want a 100% sure to be operational schematic of USB device then read documentation of PICDEM FSUSB developement board. It's based on the same microcontroller which you want to use. Refer to the schematic there and do changes as needed by part availability and our assembly skills.
 

thank you,thank you evryone

---------- Post added at 15:19 ---------- Previous post was at 15:04 ----------

thank you poorchava ,but i want only to gain time that's all
 

Ok, so there are few things which need to be connected to PIC in order for USB to work.

-crystal oscillator,4 MHz or multiple of it
-100 nF capacitor from each power pin to ground as close to the PIC as possible
-reset circuit as in the following schematic
-470 nF capacitor from VUSB pin to ground which is needed by internal voltage regulator
-USB D+, D- and GND connected
 
  • Like
Reactions: khiat

    khiat

    Points: 2
    Helpful Answer Positive Rating
thank you a lot, you explain very well you are great, thank you very much thank you
 

hello
please do, my project,work without using the component,
I mean without
- crystal oscillator, 4 MHz
-100 NF capacitor
-470 NF capacitor

I mean just with (PICkit2, led, PIC18F4550, pc, breadboard) I can have led flashing
thank you
 

hello
please do, my project,work without using the component,
I mean without
- crystal oscillator, 4 MHz
-100 NF capacitor
-470 NF capacitor

I mean just with (PICkit2, led, PIC18F4550, pc, breadboard) I can have led flashing
thank you

its because 18f4550 have an internal oscillator, if you do not connect external oscillator it uses internal. but if you are using internal oscillator then i don't think you will be able to use USB communication.
 

thank you , but nothing happen
 

have you used 10K resistor at MCLR pin, as shown in the schematic posted by poorchava in the above post?
check if you have assigned proper pin to the led

in your led toggle loop place a delay of atleast 50 miliseconds after changing pin state, so you can see led blinking. something like this:
Code:
high(porta.0)
delay(50)
low(porta.0)
delay(50)

hope this helps
 
Last edited:

Status
Not open for further replies.

Similar threads

Part and Inventory Search

Welcome to EDABoard.com

Sponsor

Back
Top