Continue to Site

Welcome to EDAboard.com

Welcome to our site! EDAboard.com is an international Electronics Discussion Forum focused on EDA software, circuits, schematics, books, theory, papers, asic, pld, 8051, DSP, Network, RF, Analog Design, PCB, Service Manuals... and a whole lot more! To participate you need to register. Registration is free. Click here to register now.

EUSART Data is not showing as expected

Status
Not open for further replies.
I have 20 MHZ externa crystal
So you should have changed
#define _XTAL_FREQ 8000000
to
#define _XTAL_FREQ 20000000
which I see you have now done.

I am connecting USB-RS232 adaptor directly through a cable
"through a cable" is not "directly".
Are you sure this is a "straight though" cable?
i.e. every pin at one end connects to the same pin at the other end?
"Null modem" cables are also common, which swap the TX and RX pins from one end to the other.
 
So you should have changed
#define _XTAL_FREQ 8000000
to
#define _XTAL_FREQ 20000000
which I see you have now done.


"through a cable" is not "directly".
Are you sure this is a "straight though" cable?
i.e. every pin at one end connects to the same pin at the other end?
"Null modem" cables are also common, which swap the TX and RX pins from one end to the other.

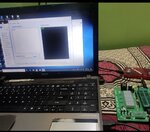
This is picture of my connection

IMG_20201013_131716.jpg
 

So there is no cable between the adaptor and the DE-9 connector.
The USB cable on the other side of the adaptor doesn't count.
So, still garbage displayed in your terminal program.
Have you done the voltage checks around the MAX232 chip that I asked you to do on the Microchip forum?
 
So there is no cable between the adaptor and the DE-9 connector.
The USB cable on the other side of the adaptor doesn't count.
So, still garbage displayed in your terminal program.
Have you done the voltage checks around the MAX232 chip that I asked you to do on the Microchip forum?

Voltage between VCC and ground is 5.5 volt
voltage between pin#2, and pin#6 is 14.83 v
voltage between pin#2, and gnd is 8.20 v
voltage between pin#6, and gnd is- 6.7 v

1602583675536.png


Edit :
MCU RC7 pin connected to Tx jumper pin
MCU RC6 pin connected to Rx jumper pin
 
Last edited:

All the voltages should be measured with respect to ground.
I guess you mean that from ground to pin #6 is -6.7V. i.e. a negative voltage.
That is a little lower than I would have expected, but still ok.
So, when the PIC is just idling, pin#11 (T1IN) should be high ( 3 to 5V), and pin#14 (T1OUT) should be low (about -6V).
That -6V should go to pin 2 on the DE-9 connector.
MCU RC7 pin connected to Tx jumper pin
MCU RC6 pin connected to Rx jumper pin
measured 0.32v between pin#11 and gnd pin#15
measured 1.97v between pin#14 and gnd pin#15

MCU RC7 pin connected to Rx jumper pin
MCU RC6 pin connected to Tx jumper pin

measured 5.01 V between pin#11 and gnd pin#15
measured - 0.83V between pin#14 and gnd pin#15

Note I only get garbage value when MCU RC7 pin connected to Rx jumper pin and When I connect MCU RC7 pin connected to Tx jumper pin I don't get any value in hyper terminal
 
Last edited:

Hi,
Note I only get garbage value when MCU RC7 pin connected to Rx jumper pin and When I connect MCU RC7 pin connected to Tx jumper pin I don't get any value in hyper terminal
"Garbage" is a value. And according this value there is a chance to find out what is gong wrong.
example: when you send one byte, but receive bytes then the sender baudrate is less than the receiver´s baud rate.
Thus for debugging I recommend to send just a single known byte. like 0x0F and see what comes back.
A scope would be very useful .... I gues you don´t have one. Can you lend one?

Klaus
--- Updated ---

MCU RC7 pin connected to Tx jumper pin
MCU RC6 pin connected to Rx jumper pin
measured 0.32v between pin#11 and gnd pin#15 --> invalid level
measured 1.97v between pin#14 and gnd pin#15 --> invald level


MCU RC7 pin connected to Rx jumper pin
MCU RC6 pin connected to Tx jumper pin

measured 5.01 V between pin#11 and gnd pin#15
measured - 0.83V between pin#14 and gnd pin#15 --> invald level

There either is a hardware problem. .. and/or maybe a port configuration problem.
..maybe you even killed something

Klaus
 

Hi,

"Garbage" is a value. And according this value there is a chance to find out what is gong wrong.
example: when you send one byte, but receive bytes then the sender baudrate is less than the receiver´s baud rate.
Thus for debugging I recommend to send just a single known byte. like 0x0F and see what comes back.
char message[]= { 0x0F};

debug1.jpg


A scope would be very useful .... I gues you don´t have one. Can you lend one?
sorry but no one keep scope in my circle

There either is a hardware problem. .. and/or maybe a port configuration problem.
..maybe you even killed something

Klaus
I also think the problem with hardware That's why want to use IC maxrs232 on 8051 board

I just want to try last chance , I found circuit https://www.indiamart.com/proddetai...51-project-development-board-16655627997.html
 

OK - I have taken a high-strength chill-pill, had a lie-down in a dark room and had a good night's sleep.
Doctor says I can be allowed back into the community as long as I have adult supervision and keep taking the meds :)

Seems to me that the obvious test of PIC dev board 232 port has not been done.
Connect dev board Tx to Rx (remove PIC just to be 100 % sure) connect D9 cable and see if typing on laptop terminal causes echo. Remove Tx/Rx link and check that characters are no longer echoed.

Circuit diagram is misleading. Tx and Rx stake pins do NOT connect to RC6 or RC7. Check out the photograph of the rear of the PIC dev board to confirm for yourself.

EDIT: forgot to say - make sure PIC dev board is powered when performing loop test
 
OK - I have taken a high-strength chill-pill, had a lie-down in a dark room and had a good night's sleep.
Doctor says I can be allowed back into the community as long as I have adult supervision and keep taking the meds :)

Seems to me that the obvious test of PIC dev board 232 port has not been done.
Connect dev board Tx to Rx (remove PIC just to be 100 % sure) connect D9 cable and see if typing on laptop terminal causes echo. Remove Tx/Rx link and check that characters are no longer echoed.
I pray to God that your health be recovered as soon as possible

First picture with no pic on development board sending data tx and rx connected.

Second picture with no pic on development board sending data
tx and rx are not connected

It seems here that whenever Tx and Rx are connected on the board whatever I type on the terminal, I receive
 

Attachments

  • IMG_20201013_205200.jpg
    IMG_20201013_205200.jpg
    412.1 KB · Views: 83
  • IMG_20201013_205436.jpg
    IMG_20201013_205436.jpg
    704 KB · Views: 87
Last edited:

Was it you that typed "ggfgh" for first picture? - if so...

As far I can tell - there is nothing wrong with the dev board serial port. Hardware seems good. I am guessing that garbage shown on second picture is a result of floating Rx pin (possibly made worse by red lead left connected).

Will not be able to verify your PIC code until my PIC18F45K80 is delivered.
 
Last edited:
As far I can tell - there is nothing wrong with the dev board serial port. Hardware seems good. I am guessing that garbage shown on second picture is a result of floating Rx pin (possibly made worse by red lead left connected)
I hope the development board has not been damaged
Was it you that typed "ggfgh" for first picture? - if so...

As far I can tell - there is nothing wrong with the dev board serial port. Hardware seems good. I am guessing that garbage shown on second picture is a result of floating Rx pin (possibly made worse by red lead left connected).

Will not be able to verify your PIC code until my PIC18F45K80 is delivered.
Yes i typed "ggfgh" I am also trying to find a solution of the problem.
 

No, the development board is NOT damaged
The first picture shows that your dev board is working OK

Be sure to wire Rx to RC6 and Tx to RC7

After that - any problems are in code
 

it seem to be hardware wiring problem.
. I agree he has a hardware connection problem, but he seems to have a very short attention span, and ignores half of what he is told.

There either is a hardware problem. .. and/or maybe a port configuration problem.
..maybe you even killed something

Klaus
@hexreader

Thanks to all of you for investing time on me and helping me a lot. and finally I did it after so many time reading the datasheet

There is no problem in hardware. there was so many problem in code

1602696565625.png


C:
#define _XTAL_FREQ 8000000
#include <xc.h>
// PIC18F45K80 Configuration Bit Settings
// 'C' source line config statements
// CONFIG1L
#pragma config RETEN = OFF      // VREG Sleep Enable bit (Ultra low-power regulator is Disabled (Controlled by REGSLP bit))
#pragma config INTOSCSEL = HIGH // LF-INTOSC Low-power Enable bit (LF-INTOSC in High-power mode during Sleep)
#pragma config SOSCSEL = HIGH   // SOSC Power Selection and mode Configuration bits (High Power SOSC circuit selected)
#pragma config XINST = OFF       // Extended Instruction Set (Enabled)
// CONFIG1H
#pragma config FOSC = INTIO2    // Oscillator (Internal RC oscillator)
#pragma config PLLCFG = OFF     // PLL x4 Enable bit (Disabled)
#pragma config FCMEN = OFF      // Fail-Safe Clock Monitor (Disabled)
#pragma config IESO = OFF       // Internal External Oscillator Switch Over Mode (Disabled)
// CONFIG2L
#pragma config PWRTEN = OFF     // Power Up Timer (Disabled)
#pragma config BOREN = SBORDIS  // Brown Out Detect (Enabled in hardware, SBOREN disabled)
#pragma config BORV = 3         // Brown-out Reset Voltage bits (1.8V)
#pragma config BORPWR = ZPBORMV // BORMV Power level (ZPBORMV instead of BORMV is selected)
// CONFIG2H
#pragma config WDTEN = OFF      // Watchdog Timer (WDT disabled in hardware; SWDTEN bit disabled)
#pragma config WDTPS = 1048576  // Watchdog Postscaler (1:1048576)
// CONFIG3H
#pragma config CANMX = PORTB    // ECAN Mux bit (ECAN TX and RX pins are located on RB2 and RB3, respectively)
#pragma config MSSPMSK = MSK7   // MSSP address masking (7 Bit address masking mode)
#pragma config MCLRE = ON       // Master Clear Enable (MCLR Enabled, RE3 Disabled)
// CONFIG4L
#pragma config STVREN = ON      // Stack Overflow Reset (Enabled)
#pragma config BBSIZ = BB2K     // Boot Block Size (2K word Boot Block size)
// CONFIG5L
#pragma config CP0 = OFF        // Code Protect 00800-01FFF (Disabled)
#pragma config CP1 = OFF        // Code Protect 02000-03FFF (Disabled)
#pragma config CP2 = OFF        // Code Protect 04000-05FFF (Disabled)
#pragma config CP3 = OFF        // Code Protect 06000-07FFF (Disabled)
// CONFIG5H
#pragma config CPB = OFF        // Code Protect Boot (Disabled)
#pragma config CPD = OFF        // Data EE Read Protect (Disabled)
// CONFIG6L
#pragma config WRT0 = OFF       // Table Write Protect 00800-01FFF (Disabled)
#pragma config WRT1 = OFF       // Table Write Protect 02000-03FFF (Disabled)
#pragma config WRT2 = OFF       // Table Write Protect 04000-05FFF (Disabled)
#pragma config WRT3 = OFF       // Table Write Protect 06000-07FFF (Disabled)
// CONFIG6H
#pragma config WRTC = OFF       // Config. Write Protect (Disabled)
#pragma config WRTB = OFF       // Table Write Protect Boot (Disabled)
#pragma config WRTD = OFF       // Data EE Write Protect (Disabled)
// CONFIG7L
#pragma config EBTR0 = OFF      // Table Read Protect 00800-01FFF (Disabled)
#pragma config EBTR1 = OFF      // Table Read Protect 02000-03FFF (Disabled)
#pragma config EBTR2 = OFF      // Table Read Protect 04000-05FFF (Disabled)
#pragma config EBTR3 = OFF      // Table Read Protect 06000-07FFF (Disabled)
// CONFIG7H
#pragma config EBTRB = OFF      // Table Read Protect Boot (Disabled)
void Port_Initialized (void)
{
    LATA = LATB = LATC = LATD = LATE =  0;
    TRISA = 0b0000000;// all are output, Unused
    TRISB = 0b0000000;// all are output, Unused
    TRISC = 0b1000000; // TX Pin set as output, RX Pin set as input
    TRISD = 0b0000000;//all are output, Unused
    TRISE = 0b0000000;// All are output, Unused

    ANCON0 = 0; // digital port
    ANCON1 = 0; // digital port
    CM1CON = 0; // Comparator off
    CM2CON = 0; // Comparator off
    ADCON0 = 0; // A/D conversion Disabled
}

void send(char message)
{
    while(TX1IF == 0 );  // Wait till the transmitter register becomes empty
    TXREG1 = message;
}
void string(char *p)
{
   while(*p != '\0') {
     send(*p);
     __delay_ms(1);
     p++;
   }
}
void Uart_Initialized(void)
{
    //TXSTAx TRANSMIT STATUS AND CONTROL REGISTER

   TXSTA1bits.CSRC = 0; //: Don?t care.
   TXSTA1bits.TX9 = 0; //Selects 8-bit transmissionbit
   TXSTA1bits.TXEN = 1; // Transmit Enable
   TXSTA1bits.SYNC  = 0;   // Asynchronous mode
   TXSTA1bits.SENDB = 0;
   TXSTA1bits.BRGH =  1;   //  High speed mode

   TXSTA1bits.TX9D = 0;
   //RCSTAx: RECEIVE STATUS AND CONTROL REGISTER
   RCSTA1bits.SPEN  = 1 ;   //Serial port enabled
   RCSTA1bits.RX9 = 0; //Selects 8-bit reception
   RCSTA1bits.SREN  = 1 ;//Don?t care.
   RCSTA1bits.CREN  = 1 ;// Enables receiver
   RCSTA1bits.ADDEN = 0; //
   RCSTA1bits.FERR  = 0 ;// No framing error
   RCSTA1bits.OERR  = 1 ;   // Overrun error
   RCSTA1bits.RX9D   = 0 ;   //Selects 8-bit reception
 
    SPBRGH1 = 0;
    SPBRG1 = 51,
 
       INTCON = 0x00;
    PIR1 = 0x00;
    PIR2= 0x00;
    PIR3 = 0x00;
    PIR4 = 0x00;
    PIR5 = 0x00;
    PIE1 = 0x00;
    PIE2 = 0x00;
    PIE3 = 0x00;
    PIE4 = 0x00;
    PIE5 = 0x00;
    IPR1 = 0x00;
    IPR2 = 0x00;
    IPR3 = 0x00;
    IPR4 = 0x00;
   

}

void main(void)
{
   char message[]= {"Hello"};
   Port_Initialized ();
   Uart_Initialized ();
   string(message);

    while (1)
    {
   
   
    }
}
 
Last edited:

Looks like you have things working - good.
However there are still problems that will trip you over in the future if you try to copy this code.
You still have the XTAL_FREQ wrong. The reason this does not matter is that the only place this is used in in the 'delay' functions (so they know how to turn the time you specify as the parameter into machine cycles that it uses) and the delay function in your code is effectively useless. Given that you delay at the start of the 'send' function until the UART is able to accept the next value to send, then there is no need to put i a delay between the characters within the 'string' function.
However with the wrong XTL_FREQ value (too low by about 2.5 times), your delay function will be delaying for longer than the 1ms you intend.
It may not be the case with this particular MCU, but some of the Microchip UART hardware are very sensitive to how they are initialised. The data sheet tells you the order to set the various configuration values. While you seem to have got the UART working by not following the recommended instruction sequence in this case, that may not be the situation in the future and I would recommend that you follow the data sheet in future.
Susan
 

Hi,
your delay function will be delaying for longer than the 1ms you intend.
Generally I agree....but since the true XTAL frequency is faster then the value given in the code I expect that the delay time will be shorter than expected value.

Klaus
 
You still have the XTAL_FREQ wrong.

This is how I think to set internal crystal frequency

OSCCON = 0x60; // internal crystal frequency 8Mhz
OSCCON = 0x70; // internal crystal frequency is 16Mhz
OSCCON = 0x50; // internal crystal frequency is 4 Mhz

1602770375209.png
 

The point is there is NO internal crystal.
The INTOSC (INTernal OSCillator) modes are not crystal controlled and are therefore not particularly accurate. They are used in applications where cost is important but precise timing isn't needed because it saves the cost of crystal and two capacitors and also in most cases releases the pins for other uses.
If possible - like on your prototyping board - use the crystal provided and set the program accordingly. This is why I advised you to do it when debugging your serial problem, if INTOSC had been far enough away from 8MHz it would have caused errors like the ones you observed.

Brian.
 

HI,

The problem is that the compiler statement is "XTAL_FREQUENCY", although there may be no crystal.

Is there a more neutral alternative name?


Klaus
 

I think it is a really unfortunate name because many beginners think that defining this pre-processor symbol actually SETS the oscillator frequency. Many a question on the Microchip forums has been caused by this misunderstanding.

In post #20, the OP states that he has a 20MHz crystal and FOSC is set to HS2. (And KlausST - you are right: the delay will be shorter, not longer.) Then in Post #34 the FOSC config setting is INTIO2 which indicates that the the crystal is not being used.
Hence my confusion as I missed the change.
Susan
 

Status
Not open for further replies.

Similar threads

Part and Inventory Search

Welcome to EDABoard.com

Sponsor

Back
Top