Continue to Site

Welcome to EDAboard.com

Welcome to our site! EDAboard.com is an international Electronics Discussion Forum focused on EDA software, circuits, schematics, books, theory, papers, asic, pld, 8051, DSP, Network, RF, Analog Design, PCB, Service Manuals... and a whole lot more! To participate you need to register. Registration is free. Click here to register now.

[SOLVED] PIC Design, State of Madness, Mayhem, Trauma

Status
Not open for further replies.
When using open wire construction there will never be a ground plane.
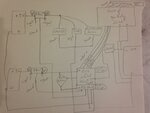
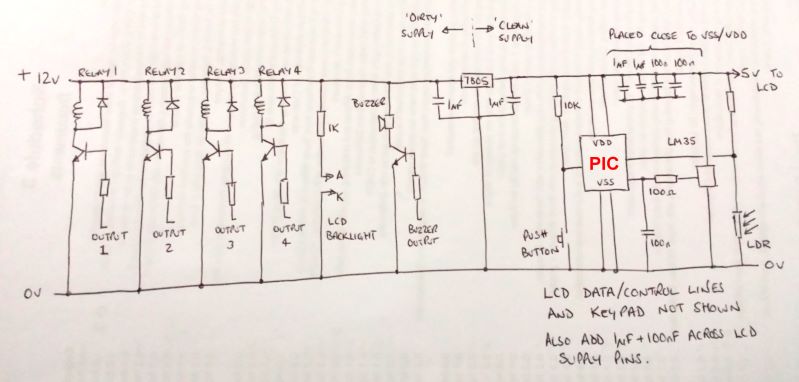
And to face the facts, it's unlikely to achieve regular EMI strength with the circuit. Some things, e.g. switching power loads with a relay near the circuit simply must be omitted.
 
For inductance to affect the wire wouldn't it need to be near a significant electromagnetic source with a large surface area to induct a signal larger than a few 100mV? At 5V that should not affect the signal too much. That can be averaged out in software.

If the sensor is a light sensitive resistor we may be barking up the wrong tree. This why I need to know what the sensors connected to the ADC are.
 

For inductance to affect the wire wouldn't it need to be near a significant electromagnetic source with a large surface area to induct a signal larger than a few 100mV?
Not at all, the problem with the wiring inductance is not necessarily liked to magnetic induction although that will play some part. The issue is that sudden transients such as caused by the relays switching on and off will propagate along the wire and could be 'tapped off' at a critical part of the circuit. Also consider what happens when even a short wire is exposed to an electromagnetic field from say a mobile phone. It is quite easy to pick up a significant voltage and although the ADC wont be able to measure it's amplitude directly, the semiconductor barriers and junctions in the devices at each end may rectify it and cause a DC shift on it.

The OP mentioned an LDR which is obviously a fairly immune device but they also mention the temperature sensor readings shift. These may be thermistors which like LDRs are 'tame' but equally, they might be semiconductor devices producing small V/T changes.

Brian.
 

Are they all jumping around or just specific ones?

I would like to do a test to see if the ADC is our problem. Do you have 2 10K resistors? If so build a voltage divider. Connect one end of one of the 10K resistors to the sensors VDD. Disconnect the wire running to the LDR (from the LDR side) and connect it to the other end of the 10K resistor. Now connect one side of the second 10K resistor to wire running to the adc. Finally connect the other end to the second 10K resistor to the sensors VSS.

Tell me what voltage you get and whether or not it is jumping around.
 

Please try this then:

The LM35 has a 10mV/degree output which is quite small and therefore can easily be corrupted by interference on the wiring. AT THE PIC END OF THE WIRE connect a 100nF capacitor from the analog input you are using to VSS and add a 100 Ohms resistor in series with the end of the wire. (so you have a junction of the analog input, capacitor and resistor) This will make a crude low-pass filter which will help to stop sudden changes in voltage appearing at the analog input. As the LM35 can not change it's output voltage quickly it should have no effect on the response time of the measurement.

Please note that a jump of one count in the ADC measurement is quite normal.

Brian.
 

each day, a new problem occur.
I`m feeling lost inside all of these comments, and ideas.
I`m very below that level.
Now, the LCD hasn't got enough brightness to expose, it also don't bright at all sometimes.
I just don't know what to do , how to make a plan for questioning, or how benefit from responses.
!!!!!!!!
 

This is an overall schematic of the circuit.

Please, tell me what is the solution, because every day, a new problem occur.
I have gaps in these topics, this is the first time i wire a complete circuit, and very first time I connect a non-ready PIC circuit.

- - - Updated - - -

This is the real hardware (notice the large distance, and hence large length L of copper wires)
 

Attachments

  • Senior.JPG
    Senior.JPG
    2 MB · Views: 95
  • photo(19).JPG
    photo(19).JPG
    2.1 MB · Views: 97

Don't get disheartened, it is slowly taking shape and improving. It is quite an advanced design for a first project.

There are still things to improve but lets take one step at a time. The brightness of the LCD is decided by how much current flows through the backlight LEDs. It is usually quite a high current so those small batteries are going to struggle to provide enough output. As you are starting with 9V and the regulators need 8V or more at their inputs to work properly, there isn't much safety margin. If the battery voltage drops below about 8V the regulated 5V will start to fail and that might account for some of your other problems. Try wiring a 100 Ohm resistor in series with the backlight supply pin on the LCD module, it will drop the brightness a little but also reduce how much current it uses.

Brian.
 
100 ohms will kill led back light. 220 or higher. If the Forward voltage is lower than 3V. Be Safe and not sorry.

Thank you for the diagram. I understand the circuit better now. Have you tried disconnecting the relays completely? From power and the PIC.
 
Last edited:

Thanks for motivation

The both 9V batteries have values of 6V for both.
No wonder.
I will buy two new of them tomorrow, to see where the project has arrived.
 

For this circuit batteries may be a bad choice, as they will die very quickly. I am guessing you are using alkaline batteries. These have a really bad voltage sag towards the end of their life. I would recommend using lithium if at all possible. They hold there output relatively constant till the very end.
 
didn't work
I had replaced both 9V batteries, with new ones.
At first attempt it turned on, at maximum low speed.
it froze at a point, and didn't even reset, using the MCLR pin,

Now when I turn on, blocks occurs on the screen, and it feels like it would blow, put i switch it off.


things are getting too much complicated
 

If the -MCLR pin doesn't reset it then something else is wrong. My first thought is that you are using two batteries on different supplies, if you connect the battery that powers the sensors first, it will put some voltage on the PIC pins while it's own supply is still missing. This violates the maximum voltage rating of the pins which states they should not have more than VDD on them. Try connecting the PIC supply BEFORE the sensor supply so it's VDD is present before any voltage arrives from the sensors.

In a more conventional system, the sensors and PIC would be powered from the same supply so this would not happen.

The other potential danger I can see is from the moisture sensor. I'm guessing this is just two probes pushed into the Earth. If you have used different materials for each probe it may produce a voltage difference across them which again would be present before VDD was supplied. Additionally, if there is any connection through the probes to any other part of the circuit, for example a power socket ground, that might produce a voltage on them as well.

KhaledOsmani, don't give up! you are almost there.
The electrical design isn't wrong, it is just the construction that causes the problems, we all go through this phase of learning - some of us a long time ago!

Brian.
 
Okay, we are going to have to go backwards for a little bit.

First if you have a spare pin on the pic connect a LED (remember current limiting resistor), and turn the led on and off in the while loop. What we are looking for here is to see if it ever stops blinking. Or changes rate.

If that goes okay try this:

1. Check all data lines to the lcd. Make sure that one of them is not accidentally tied to another, ground or +5V.
2. Disconnect all the sensors from the PIC in its place put a 10K or higher resistor to ground. (So one end to the sensor input pin on the PIC and the other to ground.)
3. Remove the sensors VDD and VSS, (So that they are not on or connected in any way.)

This will remove the ADC from the circuit. Now see if it is stable. (All sensor reading will be wrong but that is okay.)

If the circuit is not stable remove the +12V power supply completely from the circuit. And remove all relay outputs from the PIC.

Now all that should be present in the circuit is the LCD, power supply and PIC. See if the circuit is stable.

If not check code. Make sure there is no possible hang points.

If not stable remove adc code, and set sensor variables to a constant value.

If not stable, use another PIC with the same code. (Replacement PIC should be a know working chip).

Now if the power circuit is not stable then know the batteries have to go. Replace with a wall-wart.

Write down everything you did for each step so that you can put it back together. This process hopefully will yield a problem very early on.
 
nothing ok
why is this happening ive tried all
not working simply
one day it work
other it doesn't
after it work, three days forward won't

why is this too much complicated
its a simple circuit it must not be that difficult to solve

the deadline of the due date is 1/6
it won't be finished if current problem persists
 

This is my interpretation of what you should have, I did not have space to sketch the LCD and keypad wiring. Please confirm it is basically correct. You will note I changed the power supply so it all runs from a single 12V source which is a far better method than using two batteries as well.

Sorry about the quality - I never was much good at drawing!

Brian.

I have no idea why the thumbnail is OK but the full image is upside down - I suggest for now downloading it and then rotating it.

 
Can you message me your code, since its for your project I can understand you not wanting it out in the open.

So you tried all the steps in my last post, and nothing worked?

This means the relays and adc are not the primary problem. I am now wondering if it is the power, PIC itself or the code. I am leaning towards power though.

Lets do one more test. Disconnect the adc and relays from the circuit as described in my last post. Also remove the adc code and replace results with constant values. Now attach an LED to a pin on the PIC. (You need a current limiting resistor 220-560 should work. You should have the PIC sink the current, ie the diode points to the PIC. So VDD -> LED -> resistor -> PIC pin. Just in case the pin is open drain and not push pull. Make sure you set the pin as a digital output.) Have this led change states (go from off to on then on to off) every time you reach the top of the main code loop. ( A command like LATBbits.RB0 = ~LATBbits.RB0)

Let me know how it goes.
 
There is no code error
It was running and at a day it ran for hours without a single crash
I didnt change the code from then also no hardware changes
The system wont start up!
 

There is no code error
It was running and at a day it ran for hours without a single crash
I didnt change the code from then also no hardware changes
The system wont start up!

Unfortunately this does not help us very much. Something must have changed. Sometimes it takes a bad circuit a while to fail. (Very well could have been the PIC itself, but that should have been tested already.) Sometimes it happens instantly. Sometimes you have to do process of elimination to find the bug. By going back to a known working state. This is why I am asking for these tests and for your code. A video of it not working would also help.
 
Status
Not open for further replies.

Similar threads

Part and Inventory Search

Welcome to EDABoard.com

Sponsor

Back
Top