Continue to Site

Welcome to EDAboard.com

Welcome to our site! EDAboard.com is an international Electronics Discussion Forum focused on EDA software, circuits, schematics, books, theory, papers, asic, pld, 8051, DSP, Network, RF, Analog Design, PCB, Service Manuals... and a whole lot more! To participate you need to register. Registration is free. Click here to register now.

[PIC] PIC16F877A reprogramming failure using PICKIT2 programmer

Status
Not open for further replies.

Ngoroka

Junior Member level 1
Joined
Apr 29, 2017
Messages
15
Helped
1
Reputation
2
Reaction score
1
Trophy points
3
Activity points
150
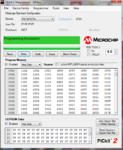
I wrote a program to upload to my PIC16F877A. Initially it uploaded correctly using the PICkit2 programmer and the microcontroller worked fine, but when I tried to change a piece of code and reprogram the same PIC the program was successfully uploaded but when I tried to test the chip it didn't work.

I tried several times without success. What is the possible solution? The code was written on MPLAB XC8 IDE v3.5. Configuration is
Code:
#pragma config FOSC = HS ,WDTE = OFF ,PWRTE = OFF,BOREN = OFF,LVP = OFF ,CPD = OFF,WRT = OFF,CP = OFF
. I'm using an external 8 MHz crystal.

After failure in MPLAB I tried to write a simple "Blinking LED" in MikroC but no success, it still didn't work. here is a configuraion bits of mikroC
CONFIG.PNG
 

I think there is nothing wrong with the Configuration settings. You may disable the Brownout Reset as of now.

Is Your program not uploading ? or the uploaded program is not working?

If you provide the coding then we can find the issue..
 

It is uploading successfull and if you check no blank. it also read successfull but when you operate the pic does not work.
Due to the problem I decided to upload simple code of LED blinking that blink after 1sec. but won't work.
I tried use new PIC it function successfull but when you try to reprogram with new code it turns to same problem. what is the problem?

- - - Updated - - -

I think there is nothing wrong with the Configuration settings. You may disable the Brownout Reset as of now.

Is Your program not uploading ? or the uploaded program is not working?

If you provide the coding then we can find the issue..

It is uploading successful, and if you check for blank there is no blank, and also if you read it reads successful, but after successful programing the PIC does not work, due to the problem I decide to upload a simple code to blink an LED for every 1sec but won't work too,
There after I decided to change the PIC with new one, it uploaded successful and works fine, but when I tried to change the and re-upload, fine it uploads but won't work again, currently I have four chips of that kind all not working totally. I don't know what is the problem? here is simple code of LED blinking
Code:
void main() {
TRISD=0x00;
PORTD=0x00;
while(1){
PORTD=~PORTD;
delay_ms(1000);
}
}
I found some where seems like the same problem https://www.microchip.com/forums/m709804.aspx comment of Ian.M, but the implantation of
Code:
#pragma config MCLRE=1
in my MLAB XC8 does not recognize it, so I failed.
 

I think there is nothing wrong with the Configuration settings. You may disable the Brownout Reset as of now.

Is Your program not uploading ? or the uploaded program is not working?

If you provide the coding then we can find the issue..


It is uploading successful, and if you check for blank there is no blank, and also if you read it reads successful, but after successful programing the PIC does not work, due to the problem I decide to upload a simple code to blink an LED for every 1sec but won't work too,
There after I decided to change the PIC with new one, it uploaded successful and works fine, but when I tried to change the and re-upload, fine it uploads but won't work again, currently I have four chips of that kind all not working totally. I don't know what is the problem? here is simple code of LED blinking
Code:
void main() {
TRISD=0x00;
PORTD=0x00;
while(1){
PORTD=~PORTD;
delay_ms(1000);
}
}
I found some where seems like the same problemhttps://www.microchip.com/forums/m709804.aspx comment of Ian.M, but the implantation of
Code:
#pragma config MCLRE=1
in my MLAB XC8 does not recognize it, so I failed.
 

You check the MCLR pin in PIC. It should measure the voltage equal to Vdd. If MCLR reads as 0V then your controller is in the Reset state and you have to enable the MCLR in configuration register.
 

You check the MCLR pin in PIC. It should measure the voltage equal to Vdd. If MCLR reads as 0V then your controller is in the Reset state and you have to enable the MCLR in configuration register.

MCLR pin is not equal to zero, it is powered through a 10K resistor, rather that same board was working before the malfunctioning of the PIC.
 

Is the PicKit2 still connected?

If it is, make sure you have the reset line released or it can drive MCLR low even though you have a pull-up resistor in circuit.

Brian.
 

Is the PicKit2 still connected?

If it is, make sure you have the reset line released or it can drive MCLR low even though you have a pull-up resistor in circuit.

Brian.

I'm using PICkit2 PIC KIT2 debugger programmer + Programming Adapter M123 so during program uploading I fix my PIC on a a programming adapter, after successful uploading I fix on my board. here is my PICkit2 PIC KIT2 debugger programmer + Programming Adapter M123

s-l1600.jpg
 

You have turned LVP off so the PicKit2 can only program the device a 2nd time by taking the \MCLR\ to Vpp (which is about 12V) so make sure that there is nothing else connected to the pin when you try to program it. (This is why the default is to have LVP on so you don't have this problem.)
Also regarding your comment about the advice from Ian.M - that was for a different chip that has the MCLRE config options - your chip does not so therefore it will not work for you.
Susan

Thanks for your solution,
I connected the Aux pin to PGM pin of PIC16F877A and disconnected all unused pins, and try to program using LVP entry, it alerted to change configurations, I changed the LVP to ON in codes, and upload the program successful, after programming I plugged my chip to my board but still the problem persisted, still not working, I don't know what to do with it?.
 

Did you build for debug or release? If you move the chip from the programmer to the board (and don't have a debugger connected to the board) then you must build for release or the code will sit forever (after power up) waiting for the debugger to be detected.
Also what is the schematic for the hardware? Have you got connections to all of the Vcc and Vdd pins, plus bypass capacitors? How is the \MCLR\ pin connected? Is the oscillator working (and how can you tell)?
Susan

Sorry, I have got no much experience on this microcontroller, I don't know how to build for debug or release,
in case of schematic for hardware it is well soldered to all two Vss and two Vdd and the MCLR pin is connected through 10K resistor but there is no bypass capacitors. But rather than that the same board was working before reprogramming of the chip, also if you insert the chip from other boards it works fine. But if I insert among those three reprogrammed chips, do not work.

I also tried to connect for LED blinking on the breadboard away from my PCB board but won't work, I don't know what is the cause?.
 

If the circuit works without bypass capacitors then you are probably using a very large bench power supply and/or a re very lucky. Bypass capacitors are a MUST for any real circuit.
Which IDE are you using now as you have mentioned MPLAB (and I hope that you are actually using a recent version of MPLABx) and MikroC? Both are capable of generating code that can be used for 'production' use (called 'release' mode in the MPLABx IDE that I've always used) and for 'debug' mode. In the MPLABx IDE you select which build by the compile menu option or toolbar button that you select to compile/build.
The difference is that the release mode will let the MCU run as soon as the power is applied. However it tends to assume that the code is correct and the processor will simply do what it is programmed to do. THis is how you normally want your code to run once you have finished developing it.
Debug mode means that the IDE can continue to interact with your code as it is running by setting breakpoints, examining variables and registers (when the code is stopped) and so on. When you do a debug compile the compiler normally turns off any optimisation that would break the relationship between the source code lines and the generated code, and the linker will bring in an extra bit of code (called the 'debug kernel') that will take control of the device when the power is applied or after any reset. The debug kernel will loop for a connection with the IDE and only start executing your code when the IDE tells it to.
As you can see, if you are doing a debug build but not connecting the MCU to the IDE, then the device will appear to just sit there as it is waiting for something that will not happen (as there is no IDE to connect to).
It could well be that the other MCUs that you have plugged in have release mode code programmed into them and so they run quite happily. However if you are doing a debug build then your MCU will appear to not work.
Susan

I'm using MPLAB version 3.5 IDE and MikroC pro version 6.6.3
Thanks I get you about running in debug and release but how to interface the PIC so that I run in debug or release mode, because in you explanations seems that I need to run the PIC while still connected to IDE.
**broken link removed****broken link removed**

case 2: During building a hex file in MPLAB IDE I use the icon of hammer on the tool bar and in the MikroC I use the "build" menu on the menu bar.

case 3: During Upload of the program into the chip I use PICKIT2 application version 2.6 and not direct fro MPLAB or Mikroc IDE's. as I tried to use direct each did not support it seems like the programmer is not visible to it, therefore I'm using PICKIT2 application.**broken link removed**
 
Last edited:

In MicroC, the setting is under "Build/Debugger Type". You should set "Build Type" to "Release" and not "ICD Debug".

In MPLABX, click on the little arrow beside the hammer icon and select "Build Main Project".

Using Pickit 2 software directly is fine. That's how I use it all the time, with MPLABX and with other IDE too.

Brian.
 

Please don't quote my entire message each time - it is already there for others to see. By all means quote a section of it if you want to make clear the part you are responding to.
Release mode does not require the programmer/debugger (the PicKit2 in your case) to be connected.
Debug mode certainly does require that connection as the programmer/debugger forms the connection between the MCU and the debugger in the IDE. Most Microchip MCUs are designed so that they can be programmed and debugged in circuit (i.e. when the MCU is soldered into the PCB). The requirements are that the \MCLR\ can be driven by the programmer (and that you have with the 10K resistor to Vss is fine which will hold the pin high when the programmer is not connected) and the programming lines (on your chip the PGM (if you use LVP programming), PGC and PGD lines) are not driven by other devices or have capacitors connected to them. If you design your circuit (at least in the prototyping stage) with these conditions in mind, then you can program the MCU and do all of the debugging functions (stopping to examine register and variable values, single stepping etc.) while your MCU interacts with your hardware. Sections 14.18 and 14.19 in the data sheet explain the ICSP capabilities and 14.15 describes in-circuit debugging.
Susan
(By the way - I can't see the attachments that you link to - just a message "Invalid attachment specified")
 

(By the way - I can't see the attachments that you link to - just a message "Invalid attachment specified")

Here is the attachments of the past comment, I was showing the type of software I'm using,


I tried to use the programmer directly from MPLAB IDE directly I got this error
"The programmer could not be started: Could not acquire hardware tool communications resources: PICkit2PlatformTool SN#<sn>kassim
"

and MikroC is not detecting the connected device but the same device is detected when using PICKIT2 programming application as shown on the first attachment and that is the one I have been using.
 

Attachments

  • mikroc.PNG
    mikroc.PNG
    73.9 KB · Views: 124
  • mplab.PNG
    mplab.PNG
    67.3 KB · Views: 123
  • PICKIT2.PNG
    PICKIT2.PNG
    91.9 KB · Views: 131

The MPLABx IDE does support the PicKit2 (MPLABx IDE User Guide, Section 10.4) so if you are having trouble getting the MPLABx to talk with the programmer then that is the problem that you need to sort out first.
I would also suggest that you don't keep switching IDEs and compilers every time you find something wrong. Not only is it a waste of your time, you end up telling a very confusing story to us as we don't always not which problem goes with which combination of software. The only time you should change something is if the combination is not supported.
Susan

- - - Updated - - -

Also looking at your comment about using the "hammer" button to build your application, I must admit that I've not ever used that. Instead I use the 'Debug Run' icon that will do any necessary compiles, links and programming of the MCU before entering the debug window (see the MPLABx User Guide Section 3.4.3). Only when all of the code is working as I expect it to will I do a release build and even then I tend to use the 'Run Code' icon (Section 3.4.2).
Susan
 

Historically, there were some issues with Pickit serial numbers not being read properly which resulted in the device not being recognized but I think they were sorted out long ago and only affected Windoze 7 and 8.

I agree with Susan, look for the obvious before confusing matters with different compilers. Try using the MPLABX built-in simulator and see what it shows before trying on real silicon.

Brian.
 

Status
Not open for further replies.

Similar threads

Part and Inventory Search

Welcome to EDABoard.com

Sponsor

Back
Top