Continue to Site

Welcome to EDAboard.com

Welcome to our site! EDAboard.com is an international Electronics Discussion Forum focused on EDA software, circuits, schematics, books, theory, papers, asic, pld, 8051, DSP, Network, RF, Analog Design, PCB, Service Manuals... and a whole lot more! To participate you need to register. Registration is free. Click here to register now.

Simulation not working in proteus

Status
Not open for further replies.

scorrpeio

Full Member level 5
Joined
Dec 26, 2006
Messages
286
Helped
10
Reputation
20
Reaction score
9
Trophy points
1,298
Activity points
3,496
Hello,

I am attaching the .dsn file where I want to simulate a code written for P12F675.
Even though it is regular design and nothing complicated in code too, it is not working at all.

Please see it.
 

Attachments

  • schematic.JPG
    schematic.JPG
    101.1 KB · Views: 402
  • project.rar
    39.6 KB · Views: 82

Can you post or upload your code as well?

What are you expecting your program to accomplish?

Or

What are you expecting to take place which is not taking place?

BigDog
 
you haven't provided the hex code so I had to remove the pic from the circuit but when I tried to drive the transistor base using a LOGICSTATE component to provide 0/5v it wasn't working, (relay always on and transistor always off) when I removed the upper psu part it started working fine.

I have placed a voltage probe in the base of the transistor (in the full schematic) and no matter what input I gave (using LOGICSTATE )it showed almost 0.
I think the the pcu circuit messes the gnd reference for the digital supply or signals, remove the psu part and try your simulation again.
 
Code:
#include <htc.h>

//Set Internal Oscillator with 4MHz freq
//Disable WatchDogTimer and Brownout Reset
//Disable code protection
//Enable MCLR
 __CONFIG( MCLREN & UNPROTECT & BORDIS & WDTDIS &PWRTEN & INTIO);	

void main()
{
	TRISIO = ~(1<<1);

	while(1)
	{
		GPIO1 = 1;
	}

}

This is the code, I was trying to simulate.
Actually, I had built the hardware and tried to work on it, but it didnt respond. So, I tried to simulate it in the proteus. But even in proteus it didnt work.
 

Attachments

  • TestCode.rar
    26 KB · Views: 50

@Alexan_e

I had also got the similar result.
But, my project hardware has the 7805 circuit as well. So I wanted to include that and power the MCU and Transistor using that power supply.
But it didnt work at all :(
 

your pic output pin gets grounded (shown as blue in simulation) from resistors R3-R2 which work as pull down for the pin, if you remove that connection (disconnect mcu pin ) then the output pin of your mcu is shows floating and is neither 0 or 1.
You have probably something wrong in your code and I think that GP1 is not even set as output but I have no idea about PIC so I can't help you to fix it.

Alex
 
Scorrpeio,

You are using GP1 as the driver pin.

Reference PIC12F629/675 Data Sheet, pg 21, Section 3.1 GPIO and the TRISIO Registers:

PIC12F629/675 Data Sheet

Note: The ANSEL (9Fh) and CMCON (19h)
registers (9Fh) must be initialized to
configure an analog channel as a digital
input. Pins configured as analog inputs will
read ‘0’. The ANSEL register is defined for
the PIC12F675.

You can use the following code snippet to disable the ADC and Comparator peripherals:

Code:
GPIO = 0x00;    // Initialize GPIO
CMCON = 0x07; // Disable Comparator
ANSEL = 0x00;  // Disable ADC
TRISIO = 0x00; // Set all I/O as outputs
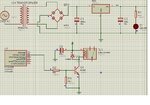
Without disabling the peripherals the GP1 pin is configured as an Analog input.

BigDog
 
I will try this code tonight.
 

Still the schematic is not working.

I have done changes in the code and now code is working in MPLAB Simulator.

In proteus, there is nothing +ve. I have removed the Power Supply Unit. I have also disconnected the PIC connection to transistor. I instead used a clock pulse of 100hz at the base of transistor. But, it holds only Low state forever.
 

Attachments

  • TestCode.rar
    31.2 KB · Views: 48
  • Project.rar
    32.8 KB · Views: 43

the transistor part of the circuit works fine, below is an analog graph, green trace in left axis is the pulse voltage and red right side axis is the relay coil current, no problem in that but your PIC still has floating pins that don't change to 0/1

Snap1.gif

for anyone wondering about the schematic , it is
Snap2.gif

Alex
 

Yes...I removed everything from the previous design and built it again.
The transistor ckt is working fine.

But, I am still worried about the PIC12F part....it is as good as tristate?

Any suggestion on this?


Also, one more thing I realised when connected Ammeter is that base current is more than Collector current in my circuit. In simulator, can I change the current capacity of the source to make the design accurate/perfect?
 

Attachments

  • Desktop.rar
    32.1 KB · Views: 47

But, I am still worried about the PIC12F part....it is as good as tristate?
what do you mean?

Also, one more thing I realized when connected Ammeter is that base current is more than Collector current in my circuit. In simulator, can I change the current capacity of the source to make the design accurate/perfect?

if the base current is high then you can use a higher base resistor to limit the current, you want the base current to be 1/10-1/20 of the collector current for saturation.
There is no source like the one you want, you can only use a resistor to limit the current of the source.

Alex
 
Status
Not open for further replies.

Part and Inventory Search

Welcome to EDABoard.com

Sponsor

Back
Top