Continue to Site

Welcome to EDAboard.com

Welcome to our site! EDAboard.com is an international Electronics Discussion Forum focused on EDA software, circuits, schematics, books, theory, papers, asic, pld, 8051, DSP, Network, RF, Analog Design, PCB, Service Manuals... and a whole lot more! To participate you need to register. Registration is free. Click here to register now.

radiated emission SEPPIC 24W

Status
Not open for further replies.

seridj_mse

Member level 2
Joined
Jan 18, 2021
Messages
53
Helped
0
Reputation
0
Reaction score
2
Trophy points
8
Activity points
311
HI,

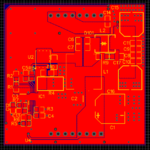
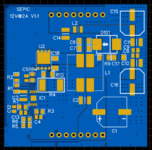
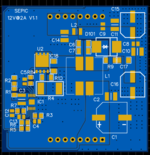
We have tested our equipment SEPIC DC DC input:9-30V output : 12V/24W (PCB 2LAYER) for CISPR 16 radiated emission limits. The emission result is attached. I have trouble shooted the problem element.

for pics i know its about quartz 50Mhz but the probleme is with renonant , i tried with RC , and RDC snubber but i cant solve probleme


1663863275669.png
1663863302218.png
 

Hi,

I won´t do simple math for you.

There is the formula for inductance --> impedance.
You know the inductance, you know the critical frequency.
And you know the impedance should be well below the resitance.
... otherwise the reisistor more acts like an inductance and thus causes a (new) resonance (frequency).

Klaus

BTW:
The resistor stray inductance is one thing ... but then the PCB layout inductance add to it.
So you have to calculate with "L_res + L_PCB".

Klaus
 
Hi
"i tried with input and output PI filter with diffrent value (100n,10n,22n,1u,10u and 100uH,1uH,8uH and 12uH ) but nothing change , and what is stange is i didnt have problem with conducted emission ........"
Yes, your solution will not be meaning for frequency above 1Mhz. I confirmed with you that, you have issue with radiated emission, not conducted.
For normal power component as Inductor (100uH,1uH,8uH and 12uH) and capacitor (100n,10n,22n,1u,10u), they did not use for high frequency filter or RF band. Because its IMPEDANCE change when applied frequency higher than their resonant frequency. Power inductor (except coreless or air core) often have resonant frequency < 3Mhz, MLCC often 1Mhz. So that, they can not act as PI filter @150Mhz.
For high frequency thus request nH and pF for filter, normally they are added by layout, no need extra external component. Your layout also did not optimize for shortest ac return path. But here, you can try other solution to reduce EMI to lowest without changing PCB. For Mass production and professional product, you should re-design PCB.
You have to select other capacitor type, which have higher resonant frequency. In mydesign, I often use film capacitor in seri with Resistor. As mention, resistor is true resistor @ working frequency. As other said, wire wround type will have inductance, ... The absorber example is this capacitor kind: disc - high voltage ceramic capacitor 10nF 2kV.
Next, high frequency appear because of L & C leakage on circuit. When have active pulse source, it will ringing with its resonant frequency. So en-sure all net on PCB have it damper/absorber. Don't let any track floating or too high impedance near ac power track.
Diode sould use really ultra fast type.
Add absorber: R 4.7k Ohm between pin 1-3, 2-4 of coupled inductor. Then measure. Then try to reduce resistor and see EMI. This solution will make efficiency down again. Optimize EMI often make efficiency de-crease when layout not good, design select not good component.
Example: some design without any filter still pass EMI standard and other design have to add extra filter make higher BOM cost, size, reduce step load respond.
Ref: https://product.tdk.com/en/search/capacitor/ceramic/mlcc/info?part_no=CKG45KX7T2W474M290JH
1664264171428.png
 

Attachments

  • 1664265432357.png
    1664265432357.png
    68.1 KB · Views: 94
Last edited:
Hi , again thanks for all interesting information !

I got you well, expect :
Your layout also did not optimize for shortest ac return path. But here, you can try other solution to reduce EMI to lowest without changing PCB. For Mass production and professional product, you should re-design PCB.
Yes its for Mass production and professional product, but dont know how i can optimize shortest ac return path. i should pass to 4 layer ?


Don't let any track floating or too high impedance near ac power track.
What u mean by track floating and how i can know if i have high impedance in my trace . For power i have only DC input not AC in my design.


Hi,

how i can optimize shortest ac return path
I already told you. --> post#4.
There are many SMPS layout tutorials. As text, as video, as lesson. Almost every SMPS IC manufacturer provides design notes and example boards.

****
Floating:
If you are the electronics designer, then you need to know which node is high ohmic...

DC / AC:
You design a switch mode power supply. "switch mode" means "frequency", means "AC".
As soon as the current or the voltage is not a straight horizontal line on your scope --> it is AC related.
AC current couples inductively, AC voltage couples capacitively to traces/nodes nearby.

Klaus
 

Hi,


I already told you. --> post#4.
There are many SMPS layout tutorials. As text, as video, as lesson. Almost every SMPS IC manufacturer provides design notes and example boards.
yes i know , that what i did in my design , so i ask what i can do better ....
and maybe Taihung have other remark about my design PCB

****
Floating:
If you are the electronics designer, then you need to know which node is high ohmic...
yes iam electronics designer and i dont know , that why i ask and i post my question here , i need help

DC / AC:
You design a switch mode power supply. "switch mode" means "frequency", means "AC".
As soon as the current or the voltage is not a straight horizontal line on your scope --> it is AC related.
AC current couples inductively, AC voltage couples capacitively to traces/nodes nearby.
yes i want to be sure , he told about this and not about input AC 220V ....
 
Last edited:


Hi,

Datasheet: Thanks. Really a weird pinning where both inductors are crossed. Just wanted to confirm it.

No one talks about 220V AC.
But still the power nodes are DC involtage but AC in current.
(For sure there is DC current, too. But when we talk about EMI the DC is not of interest)

Klaus
 

Hi,

Datasheet: Thanks. Really a weird pinning where both inductors are crossed. Just wanted to confirm it.
oky , now try to re-design the pcb , i cant find what is the diff beetween diode POST#16 and why second diode "MBRS3100T3G" is better , i should use fast diode but in datasheet i cant see any param of time or something about speed ? i add RC snuber for mosfet and diode and RC filter for SENSE current mesure or not need ?

No one talks about 220V AC.
But still the power nodes are DC involtage but AC in current.
(For sure there is DC current, too. But when we talk about EMI the DC is not of interest)
yes, i got it.
 
Last edited:

first root top and bottom without GND plane ! i dont know if its better !

in bottom i have only 2 piste , one for Vin of IC and second divider resistor feedback

1664298816601.png
 
Last edited:

Hi,

doesn´t look that bad.

Sadly there are no part names ... so it´s hard to describe what to do.

One problem is the upper blue line. It divides the GND_OUT pin from the whole GND plane.
I recommend to rout this line at TOP layer outside the the GND_OUT pins.
(between GND_OUT pins and board edge.)

All the big electrolytics capacitors ar slow. They are about useless (compared to ceramics) in the EMI frequency region.
Thus their placement is not critical.
Thus I´d move the input electrolytics to the right.
And then you can move the input ceramics to the left.
capacitor+ points to pin1 of L1.
capacitor- points to the right pad of the shunt.

***
If possible rotate the 8 pin output header 180°. This shortens the traces.

Let´s go on step by step.

Klaus
 

hi, thanks for this information , i tried with input and output PI filter with diffrent value (100n,10n,22n,1u,10u and 100uH,1uH,8uH and 12uH ) but nothing change , and what is stange is i didnt have problem with conducted emission ........

i tried with battery and short cable 4cm same result ...

--- Updated ---


yes , i said 50mhz its about quartz , but i have same trace without harmonic if i test only SEPIC converter

Did you try sticking some tin foil on the top of the transformer with a wire connecting it to 0V? Those Transformers the shield arn't the greatest and can be a challenge getting through EMI without being placed in an enclosure at the best of times. A foil will provide a lower impedance path to 0V which may help bring the radiated down. Its worth trying just to find out its contribution to to the radiated emission.

It could also be comon mode conducted emissions on the input and output lines which would need a CM Choke to rectify, Given the frequencies a clip on ferrite on the wires close to the board could olso show any issue.
 
Last edited:

***
If possible rotate the 8 pin output header 180°. This shortens the traces.
***
No , the pins input and output are fixe.

i will share the last design ,


1664316549226.png
 

Attachments

  • 1664316369034.png
    1664316369034.png
    76.9 KB · Views: 95
  • 1664316396369.png
    1664316396369.png
    42 KB · Views: 99
  • 1664316423928.png
    1664316423928.png
    117 KB · Views: 94

a little change output areas
 

Attachments

  • 1664356069041.png
    1664356069041.png
    32.5 KB · Views: 114
  • 1664356240097.png
    1664356240097.png
    67.8 KB · Views: 89
Last edited:

Hi,

Most important: R9 collides with L1!

Here some sketches about the current loop when the MOSFET switches ON
Loop1.PNG


and when it switches OFF:
loop2.PNG


I see you used multiple VIAs at the correct placement.

Again: I personally don´t recommend the GND pour on the TOP layer. (Other developers do).
I like the clean paths on the BOTTOM side ... and don´t like the multiple paths created on the TOP layer.

Klaus
 

Again: I personally don´t recommend the GND pour on the TOP layer. (Other developers do).
what u mean by that , top layer without GND plan ?

update move output capa c9 c11 and input c2 and delete one trace in bottom side
 

Attachments

  • 1664363609722.png
    1664363609722.png
    39.8 KB · Views: 78
  • 1664363621803.png
    1664363621803.png
    15.5 KB · Views: 76
Last edited:

Hi,

My personal taste: No GND on TOP. just the connections to the vias.
If you add GND on The TOP you get new paths for the current to flow. But - at least I - find it hard to predict now where the the current really flows. Thus I like to "guide" ttrough the bottom layer only. Again: my taste.

It seems you focus on C1, C16, C15. But they are not relevant for EMI. They are too slow. The placement and the via count for them is not that critical.
28 vias at C15 but only 5 of them will carry meaningful current.
--> you need the vias at the small ceramics capacitors.

Sadly you now moved C2.
Look at the pictures of post#36:
You see my drawing for the loops of current flow.
--> The bigger the enclosed area, the higher the transmitted EMI.Thus keep the loop small.

You moved C9, C11.
Not a big mistake, but I don´t recommend it, because it creates a bigger loop area ... and multiple possible feedback ways.

What I´d do:
* move R4 down,so you can
* move L1 to the left.Thus you get more space to move C8..C11 into it.

Like this: Excuse my bad art ;-( I´m rather busy...
loop_n.PNG

Cyan is the "dirty current" flow.
Green = already clean signal.

Mind the "slot" between green and cyan to guide the signal.

Klaus
 

Hi,

Most important: R9 collides with L1!

Here some sketches about the current loop when the MOSFET switches ON
View attachment 178778

and when it switches OFF:
View attachment 178786

I see you used multiple VIAs at the correct placement.

Again: I personally don´t recommend the GND pour on the TOP layer. (Other developers do).
I like the clean paths on the BOTTOM side ... and don´t like the multiple paths created on the TOP layer.

Klaus
Underside of IC1 Should be connected to GND/0V also
 

Status
Not open for further replies.

Part and Inventory Search

Welcome to EDABoard.com

Sponsor

Back
Top