Continue to Site

Welcome to EDAboard.com

Welcome to our site! EDAboard.com is an international Electronics Discussion Forum focused on EDA software, circuits, schematics, books, theory, papers, asic, pld, 8051, DSP, Network, RF, Analog Design, PCB, Service Manuals... and a whole lot more! To participate you need to register. Registration is free. Click here to register now.

[SOLVED] Neon Flasher Simulation

Status
Not open for further replies.

joanjay

Newbie level 6
Joined
Nov 27, 2012
Messages
11
Helped
0
Reputation
0
Reaction score
0
Trophy points
1,281
Location
Philippines
Activity points
1,372
fig.1.pngfig.2.PNGfig.3.png

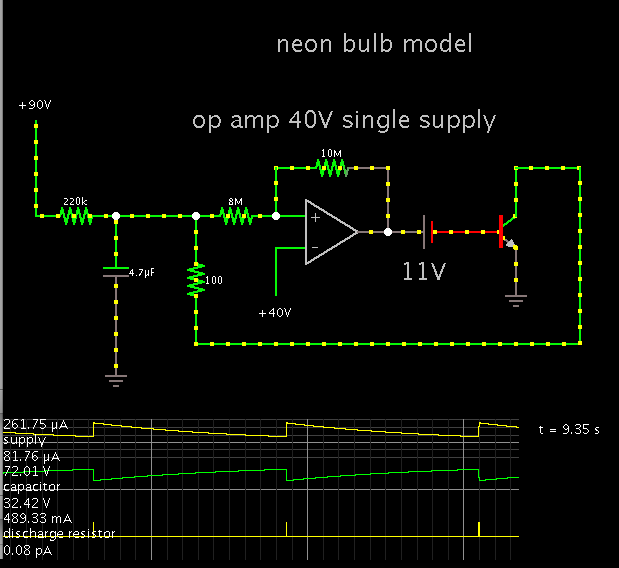
I found the figures above online.. I've been trying to regenerate the same simulation as in Fig.3. I need some help doing it. I have a few questions.

1) What are the values of R and C (fig.1/fig.2) to that will make a 10sec. flash rate?
2) What is the purpose of Rh in Fig.2 and what should be the value?
3) What do you mean by RON=1K and ROFF=10M in Fig.2?

Fig.2 includes a seemingly non-inverting Schmitt trigger circuit if the 8M resistor will be placed be placed just before Rh? My last question:

4) How will the computation given by the link below be affected by the 8M resistor?
http://hyperphysics.phy-astr.gsu.edu/HBASE/electronic/schmitt.html#c3

Neon bulb parameters: VON = 65 V; RON = 1k; ROFF = 10M; hysteresis = 55 V (the bulb remains on until the voltage across it drops below 10 V)
 

I made simulations of the schematics.

Falstad's animated simulator has a spark gap component. I adjusted its parameters to act like a neon bulb.

1) What are the values of R and C (fig.1/fig.2) to that will make a 10sec. flash rate?

A neon bulb typically has a 220k resistor in series when connected to house current. So I used 220k. Then a 47uF capacitor will theoretically give 10 sec.

Screenshot of schematic #1, showing scope traces and edit window:


2) What is the purpose of Rh in Fig.2 and what should be the value?

Schematic #2 is a non-inverting Schmitt trigger as you state.

Resistor Rh represents the plasma between the electrodes as current flows. As it turned out, the only value which worked is 100 ohms. Changing it much either way resulted in convergence errors.

In addition the circuit worked only if I omitted a particular wire. I tried including it, but I found that the transistor conducted between ground and ground, which obviously does nothing.


3) What do you mean by RON=1K and ROFF=10M in Fig.2?

R_off is resistance when not conducting. The gas in the bulb is a poor conductor.

R_on is resistance when the gas is ionized, making it a conductor. (If a safety resistor is not installed, the bulb will conduct overmuch current.)

4) How will the computation given by the link below be affected by the 8M resistor?

The 8M and 10M create the hysteresis. It is tricky to get the values right, to achieve the desired voltage transitions.

To use the formulas at the link, you would examine how node levels change when the op amp output changes. It is complicated by the fact that the incoming signal and the hysteresis feedback both go to the same input.
 

Thank you for the help, will these values work in PSpice? I'll try it anyways. Another question, the spark gap that you had mentioned, can you expound a little about it? Is it similar to the technique of using hysteresis when you simulate neon lamp in PSpice?
 
Last edited:

A spark gap is two electrodes set up so a spark can travel between them. The volt level must be great enough to overcome the distance.

The distance can be small, as in a spark plug. Or it can be several feet, as in a tesla coil. One could say lightning travels between a spark gap.

Falstad's simulator includes a spark gap (and a tesla coil circuit). I saw that its parameters could be adjusted to resemble a neon bulb... at least in the way that it requires a certain volt level (breakdown voltage) to start conducting.

Then it shuts off at a much lower volt level. The holding current is the parameter I adjusted to achieve this. It says 3 mA in the edit window because that's the value that made it shut off below 10V. However the real neon bulbs I've used should not be exposed to more than 1mA.
 

Thank you for explaining. Did you happen to have a Falstad's animated simulator installer? I tried downloading, but for some reasons I can't install/run it. Thank you in advance! If you can, please also include an instruction for me to install it properly in my computer including the system requirements..Thanks again!
 

please also include an instruction for me to install it properly in my computer including the system requirements

I see it is a zip archive. Normally Windows and Macs uncompress these automatically after downloading. If yours did not, then double-click on the archive and it should create a folder called 'circuit', with over 200 items.

Falstad's simulator is a Java script application. It is not like a normal program. I did not need to install it, nor do anything else special to use it. I open it by navigating to its folder and double-clicking 'circuit.jar'.

My computer seems to think it is more like a document than a program. I am not able to get it to open properly if I install its icon on my dock (Macintosh). Something else opens instead.

I have not seen any particular system requirements for the Java applet.

What it appears to need is a plug-in. (I guess I already had Java on my computer.)
There is a line at the webpage: www.falstad.com/circuit
'If you don't have Java, get the Java plug-in.'
It links to this site:


I see it might be difficult to choose the right one. However if you can find the right one for your computer then maybe that will get you going.
 

This quote is from a post which might have been lost in the time since the day before:

When I click the circuit.jar file,I was expecting for the circuit simulator interface,but it opens to wordpad with unidentifiable writings instead(a document as you had mentioned)..How will I get to the interface like the one shown in your screenshots?..What is the plug-in that you have used in your computer?

I suppose you need to get Java. The latest Java plug-in is Version 7, update 10.

The description states that a Mac will automatically get the latest version via its system software update.

A Windows machine requires a download which is available at:

https://www.java.com/en/download/manual.jsp

Choose the online installation if you trust your internet connection to be reliable enough for it to occur without a problem.
Or choose to download the entire installer (30 MB), and save it to your hard drive.
 

Thank you so much! I now have a working Falstad Circuit Simulator, I just want to clarify some part in the schmitt trigger simulation, which supply are you referring as the first signal graph? and which resistor do the third signal (discharging resistor) came from?

- - - Updated - - -

Is there any changes in the bipolar npn transistor that you had used? is the beta value retained at the default 100 value? Im still referring to the neon model using schmitt trigger?

- - - Updated - - -

Strike voltage used in here is 65V..How would it affect the flash rate?
 

Thank you so much! I now have a working Falstad Circuit Simulator, I just want to clarify some part in the schmitt trigger simulation, which supply are you referring as the first signal graph?

The scope trace shows current in the 220k resistor coming from the 90V supply at the left, although the label says 'supply'.

and which resistor do the third signal (discharging resistor) came from?

That is the 100 ohm resistor which discharges the capacitor. It represents the brief pulse of current in the bulb.

Is there any changes in the bipolar npn transistor that you had used? is the beta value retained at the default 100 value? Im still referring to the neon model using schmitt trigger?

Yes, 100. This value is not critical.

Strike voltage used in here is 65V..How would it affect the flash rate?

Notice that the 40V (at the op amp) is not among the parameters for a neon bulb. Where does 40V come from? Answer: it is about in the middle between the typical strike voltage (60 to 70V) and the 11V shut-off voltage.

Then the 8M and 10M resistors were chosen to create approximately 30V hysteresis above and below 40V. It would have been tricky to find values that mimic neon bulb action.

As for what affects flash rate:
It gets faster as the strike voltage goes down.
Or as the hold voltage goes up.
Or as the hysteresis range gets narrower.
Or as the supply V goes up.
Or as the safety resistor gets less.


Above was your simulation and below is my own simulation, I noticed that your simulation had a red marking on the wire fron the negative of the 11V supply to the base of the transistor while the red markings in my simulation extended to the 10M resistor and the output of the comparator.. What does this mean? I believe that the two circuits are very similar but still we came up with different screenshots..also the peak values of the signal graphs was different..

my simulation.PNG

I understand that we may have used different time step size on our simulations and the red marking is changing instantaneously but why is our peak values different.?.then although the red markings are moving, mine was only changing near the 10M resistor only..
 
Last edited:

I noticed that your simulation had a red marking on the wire fron the negative of the 11V supply to the base of the transistor while the red markings in my simulation extended to the 10M resistor and the output of the comparator.. What does this mean?

Red indicates wires are at negative polarity.
Green is positive.
Gray is neutral.

The way I get a red color at the op amp's output, is when I set its output parameters so it swings into the negative region. This caused hangups. I got reliable operation when I set the output at 0 minimum and 40V max.

If you are not getting long pauses or convergence errors, then maybe you're doing something right.

I understand that we may have used different time step size on our simulations

There's a question whether the time step is included in the clickable link containing the schematic.

When the circuit contains a mix of op amps, hysteresis, and transistors... it becomes particularly tricky for the simulator to handle. It can take some experimenting before we get things working consistently.
 

thank you for explaining..

i am thinking of a way on how to represent a complicated circuit in one block (like an IC) and use it several times in other circuit..can i do this in Falstad?..
 

Falstad's comes with a number of readymade IC's, scattered among the Circuits menu. Such as logic gates, flip flops, 555 timer, 4017 decade counter, current conveyor.

To combine circuits... I find the only way is:
1) Import or draw one circuit on the page
2) highlight all of it, and Cut
3) Import or draw another circuit on the page
4) Make room for additional circuitry
5) Paste the previous circuit

If I want a readymade IC in my circuit, I must think through what is the proper sequence to do things in, so I don't lose what I did. (The Undo is invaluable at times.)

I find it does not work when I try to cut and paste between two open Falstad simulators.

I find that the Import function erases what was on the page previously, so I need to copy it all first. The clipboard is independent from the Import text.

Yes, I can relate about the import function. I had used it to save my circuits made from blank by making a new txt file in circuits folder together with editting the javafile ".txt" entry on the code. It was very well said but you had misunderstood me. What I was implying to is to make a visual representation of the circuit I made by replacing it with any desired symbol. Say I had 2 cirucits, the first one-I would like to compress into a symbolic block, then I will use this block instead in my second circuit which will be composed of so many components including maybe 10(for example) of my first circuit. I tried editing the falstad interface window size in the java code to accomodate by bulky design. But it will be better if I can represent my first circuit into a compressed block like an IC. Do you have any idea about this? It will be dealing about programming I guess. Don't know how to start...
 

What I was implying to is to make a visual representation of the circuit I made by replacing it with any desired symbol. Say I had 2 cirucits, the first one-I would like to compress into a symbolic block, then I will use this block instead in my second circuit which will be composed of so many components including maybe 10(for example) of my first circuit. I tried editing the falstad interface window size in the java code to accomodate by bulky design. But it will be better if I can represent my first circuit into a compressed block like an IC. Do you have any idea about this? It will be dealing about programming I guess. Don't know how to start...

I suppose you will need to know Java programming to do this. It would be real handy to be able to add components.

Looking over the source code files (in the 'src' folder)...

The various components each have their own descriptor file. It may be possible to figure out how the Falstad simulator:
(a) stores a component's parameters
(b) draws it onscreen
(c) incorporates it into the running simulation. (Possibly in 'CirSim.java', starting from line 952).

You would likewise create Java code to simulate your circuit block. It might be possible to start with one of the included IC's and modify it to create your own.

I don't know how similar or dissimilar it would be to the more common spice library format.

I don't know what routines are 'invisible' due to being in the Java interpreter itself.
 

Status
Not open for further replies.

Part and Inventory Search

Welcome to EDABoard.com

Sponsor

Back
Top