Continue to Site

Welcome to EDAboard.com

Welcome to our site! EDAboard.com is an international Electronics Discussion Forum focused on EDA software, circuits, schematics, books, theory, papers, asic, pld, 8051, DSP, Network, RF, Analog Design, PCB, Service Manuals... and a whole lot more! To participate you need to register. Registration is free. Click here to register now.

Low Duty Cycle with 555 Timer

Status
Not open for further replies.

TroyDowling

Newbie level 4
Joined
Feb 15, 2010
Messages
7
Helped
0
Reputation
0
Reaction score
0
Trophy points
1,281
Location
Vancouver, Canada
Activity points
1,352
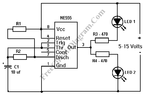
Hey there, this is my first post here and I'm also just a hobbyist with electronics, so bear with me if I'm coming across as a complete newbie. Here's my situation: I'm trying to mimic the way an LED flashes on an automobile engine immobilizer. It flashes once every five seconds or so, and only for only a fraction of a second. I understand that for the most part, a timer such as the NE555 cannot have a duty cycle of less than 50% but I have found this resource that says it is in fact possible. The only problem I have then, is that the low time between the pulses is very short! The LED would blink at a very high frequency that way. My question is, what resistor/capacitor combo would allow me to have a low time of about 5s and a high time of one-tenth a second (approximately) for every cycle? Or, if there is a completely different way I could do this, what would that be? I'm trying to keep this simple and inexpensive because it's just a gag-gift for a friend who's obsessed with his car. :roll: Thanks in advance!
 

Try to do something like this:
Connect the LED between the output (pin3) and +Vcc .. see attached picture => LED1
It’s like reversing the output wave ..
When the output is H the LED will do nothing but when the output is L the LED will be on ..

Time High = 0.69 C (R1+R2) =5s
Time Low = 0.69 C R2 =0.1s

For example:
C=150uF
R1=49k
R2=1k

Rgds,
IanP
 

Attachments

  • led-flasher-555_2032.gif
    led-flasher-555_2032.gif
    8.4 KB · Views: 267

    TroyDowling

    Points: 2
    Helpful Answer Positive Rating
Wow, if that works, that would be perfect! I would have thought inverting the output wave would be much harder... I'm currently waiting for the 555s to ship here so I can't do more than theory at the moment. TO be honest, I wasn't expecting this fast of a reply! In the meantime, I'll see if I can salvage a couple timers from various sources and try out this circuit. Another side question: know of any decent circuit simulator? I understand this is a rare thing, but just a simple one is needed-- I don't need fancy frills. I'm mostly using a java applet located here. Thanks again for your help.
 

https://www.linear.com/designtools/softwareRegistration.jsp

Linear Technology (link above) offers totally free simulator ..
It comes with a model of the 555 and I think it has 555 simulation examples to get you started ..

On the other issue, inverting output wave in 555-timer is so easy only beacuse the output can do both: sink and source current ..

Rgds,
IanP
 

    TroyDowling

    Points: 2
    Helpful Answer Positive Rating
Yeah, that is a handy program. I have to admit it's a little high level for me though. I'll keep it around though since I like some of the feature set. Again, thanks for the speedy help. I'll reply again when I get my shipment of timer ICs and try out the above circuit.

Until then,
Troy.
 

Hopefully this thread isn't dead by now. I finally got my shipment of NE555P timers in! I've been playing around with a couple different circuits, but I haven't had any luck yet with any (and that was after I fried one of the ICs since I never bothered to check the max current first!)

In the first scenario, I had my circuit set up like the following picture. The only exception being I had pin 5 (CTRL) directly to ground.

Wikipedia's 555 Entry

When I used this circuit, the LED would stay permanently on and would not flick on and off like I wanted.

And in the second scenario, I decided to try my own circuit (attached image). In this case, the LED would not turn on at all! I'm kinda bummed out that this simple circuit is proving harder than I thought it would be. Can anyone point out what is going wrong with my circuit.

Thank you,
Troy.
 

You can leave pin 5 not connected or connect 10nF cap .. see attached picture ..

Rgds,
IanP
:D
 

    TroyDowling

    Points: 2
    Helpful Answer Positive Rating
Man, I'm really not sure what I'm doing wrong here, but again the LED is just remaining steadily on. I rebuilt the circuit again to make sure I had it constructed correct and I left pin 5 disconnected. As soon as the circuit is powered, I have my LED remaining on. I can remove the capacitor and the LED still remains on. I've built the circuit in Fritzing to show you. Maybe I am just making a mistake in building it? Thanks for all the help so far, I really appreciate it.
 

I couldn't see connection between the cap's negative pin and 0V [gnd] .. see attached picture ..
Is the drawing wrong or you just don't have it?

Rgds,
IanP
:|
 

    TroyDowling

    Points: 2
    Helpful Answer Positive Rating
Oh, haha, no my circuit was definitely correct. I just forgot the wire in the drawing. :p Anyways, by reversing the LED branch of the circuit (so that the output sinks, instead of sources), the circuit now works! I'm not sure why the LED remained in a constant high state before, but now it flip-flops just like it mathematically should. I'm so happy, haha. I threw on a couple potentiometers in place of the two resistors and I'm just tweaking them until I find a timing I like. This is probably the most trouble I've had with such a simple circuit. Thank you so much for your help and patience on the matter. All I need to do now is fabricate a hard copy and decide on a good mounting for it all. This is going to be a gag-gift for a friend since it is supposed to imitate the flash of an automobile immobilizer.

Thanks again, I've learned a lot.
Troy.
 

You can mount your circuit on a vero-board, then got it potted in a small potting box - that's a good method of protecting circuits in automobile applications .. see attachment ..

Rgds,
IanP
:|
 

That's a good idea I'll keep in mind. For this particular project, I wanted something that was as "ghetto" as my buddy's car. Since this entire running joke is based off of a good security system being worth more than his car, I decided to mount my cheapo circuit in a cheapo manner. I kept all the soldered components visible on the PCB and duct taped a battery to the top of it. I'm going to mount that on a piece of black wood with screws acting as stand-offs between the wood and the circuit board. Then, maybe a duct tape label or something. As soon as my drill charges up, I'll finish this off for good and post a picture up here. It's definitely got that cheap look I was going for. :)

Troy.
 

Status
Not open for further replies.

Similar threads

Part and Inventory Search

Welcome to EDABoard.com

Sponsor

Back
Top