Smarttronics
Newbie
A simple home automation project allows you to control home appliance from anywhere. Blynk provides very good and attractive interface.

Story
Video
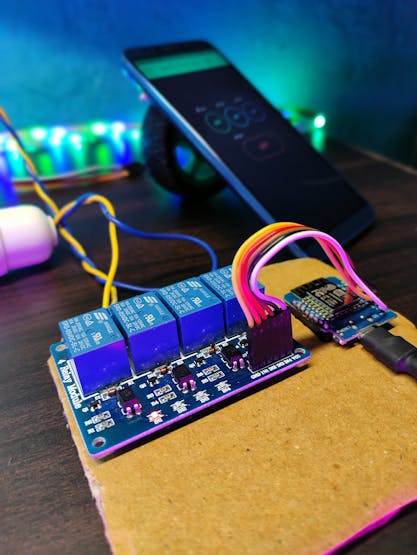
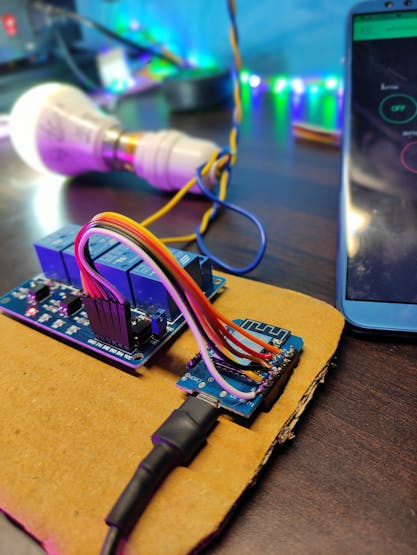
In this project we are going to build simple home automation system in which we can control four relay from blynk app..
In this toturial I will show you how we can build this system.
Lets start...
 Parts list (): -

Wemos D1 Mini - https://amzn.to/2ZzKShARelay Module - https://amzn.to/2AvnDwQJumper Cable - **broken link removed**USB Cable - https://amzn.to/3eV31gdSoldering Iron - https://amzn.to/2C67q1h
Getting to Know
Getting to Know
**broken link removed**
Blynk is a Platform with iOS and Android apps to control Arduino, Raspberry Pi and the likes over the Internet.
Blynk was designed for the Internet of Things. It can control hardware remotely, it can display sensor data, it can store data, vizualize it and do many other cool things.
It's a digital dashboard where you can build a graphic interface for your project by simply dragging and dropping widgets. It's really simple to set everything up and you'll start tinkering in less than 5 mins. Blynk is not tied to some specific board or shield. Instead, it's supporting hardware of your choice. Whether your Arduino or Raspberry Pi is linked to the Internet over Wi-Fi, Ethernet or this new ESP8266 chip, Blynk will get you online and ready for the Internet Of Your Things.
How does it work?
There are three major components in the platform:
Blynk App - allows to you create amazing interfaces for your projects using various widgets we provide.
Blynk Server - responsible for all the communications between the smartphone and hardware. You can use our Blynk Cloud or run your private Blynk server locally. It’s open-source, could easily handle thousands of devices and can even be launched on a Raspberry Pi.
Blynk Libraries - for all the popular hardware platforms - enable communication with the server and process all the incoming and outcoming commands.
Setting Up Blynk With Arduino IDE
**broken link removed**
**broken link removed**
**broken link removed**
This blynk app has set of library files which have to be included in the Arduino IDE environment before the project is executed
1. Follow the link to install libraries
https://www.blynk.cc/getting-started/
2. Once the Zip file is downloaded ,extract it and individually copy all the folder to your libraries folder of your arduino
3. Once done just open Arduino IDE and go to Sketch-> Include libraries and you would see blynk in the menu
4. If you see that then libraries have been included successfully
*Now it is time to include the board configuration in the Arduino IDE
What is board configuration?
Ok , a simple answer is that it contains all the essential parameters which required to get the board booted and configured.
for example in if you go to Tools->Board Menu you would see a list of boards . All this boards listed have different configuration settings. Therefore we should also include NodeMCU's board configurations which typically contain the board architecture , clock speed, baud rate etc.
Lets start. In the Arduino IDE go to File->Preferences
Now Copy the below link and paste it in the Additional Boards Manager Url text box
https://arduino.esp8266.com/stable/package_esp8266c...
Restart the Arduino IDE after that.
Now after restarting the Arduino IDE , go to Tools->Boards and select Node MCU board , mine was version 0.9
Setting Up Blynk
**broken link removed**
**broken link removed**
**broken link removed**
**broken link removed**
**broken link removed**
1. First install the Blynk app from google play store and then sign in
2. After that Press on click on New Project and you will get a screen (Refer Screen shots)
*Enter the name of your project, I have given it as led
*Then Select the Board as ESP8266
and then you will see below the authentication token no. If you want it in your email you can send it through email also
*And then Finally click on to the create button
3. Now you will get your dashboard screen. Just click on the the top most button "+" on the right corner to add widgets to your project.
4. In this project we add a simple button and then configure its settings as Digital GP13 pin.(Refer Screen Shots)
5. Its your choice you can either have the button set as push type or as a switch
6. Then label the Button as ON and OFF in the settings
Note that since Blynk is free only to an extend, you have to choose your widgets wisely
Uploading the Code
**broken link removed**
1.Connect your Esp8266 Wifi to your PC
2. Open Arduino IDE
3. Then go to File->Eamples->Blynk-Boards_Wifi->Esp8266Standalone
(Refer screen shot)
4. Select the correct board (NodeMCU 1.0) and the com port from the Tools Menu
5. A snippet from the code
Serial.begin(9600); // Change Baud Rate to 115200
Blynk.begin(auth, "ssid", "pass"); // Enter your Wifi SSID and password, both inside the double quotation
Finally Save the file and Press Upload
.
1. After uploading the code
2. Open the Blynk app in the Phone
3. Let it connect to dashboard with a button
5. Press Play button on the top most right corner of the app
6. Then Alas!! Press the button and you would see the LED Turn ON!!!")
Now that you have got the basics, you can try some cool stuffs with this awesome board !!
Have fun exploring this board
Happy Inventing!!
Extract the blynkH.zip paste all libraries inside library folder of your arduino and tool to you arduino ide tools folder.
OR
Oper arduino ide
>Goto Sketch
>Click on Include Library
>Click on manage library
>In search bar type Blynk
>Click on it
>Click on Install
>Ok
>Click on tools > Boards >WemosD1 mini
>Select correct com port
>Edit your token authentication key (they will send key to your registered email id when new proect is created on blynk)
>Edit ssid & password
Thanks
Story
Video
In this project we are going to build simple home automation system in which we can control four relay from blynk app..
In this toturial I will show you how we can build this system.
Lets start...
Parts list (): -Wemos D1 Mini - https://amzn.to/2ZzKShARelay Module - https://amzn.to/2AvnDwQJumper Cable - **broken link removed**USB Cable - https://amzn.to/3eV31gdSoldering Iron - https://amzn.to/2C67q1h
Getting to Know
Getting to Know
**broken link removed**
Blynk is a Platform with iOS and Android apps to control Arduino, Raspberry Pi and the likes over the Internet.
Blynk was designed for the Internet of Things. It can control hardware remotely, it can display sensor data, it can store data, vizualize it and do many other cool things.
It's a digital dashboard where you can build a graphic interface for your project by simply dragging and dropping widgets. It's really simple to set everything up and you'll start tinkering in less than 5 mins. Blynk is not tied to some specific board or shield. Instead, it's supporting hardware of your choice. Whether your Arduino or Raspberry Pi is linked to the Internet over Wi-Fi, Ethernet or this new ESP8266 chip, Blynk will get you online and ready for the Internet Of Your Things.
How does it work?
There are three major components in the platform:
Blynk App - allows to you create amazing interfaces for your projects using various widgets we provide.
Blynk Server - responsible for all the communications between the smartphone and hardware. You can use our Blynk Cloud or run your private Blynk server locally. It’s open-source, could easily handle thousands of devices and can even be launched on a Raspberry Pi.
Blynk Libraries - for all the popular hardware platforms - enable communication with the server and process all the incoming and outcoming commands.
Setting Up Blynk With Arduino IDE
**broken link removed**
**broken link removed**
**broken link removed**
This blynk app has set of library files which have to be included in the Arduino IDE environment before the project is executed
1. Follow the link to install libraries
https://www.blynk.cc/getting-started/
2. Once the Zip file is downloaded ,extract it and individually copy all the folder to your libraries folder of your arduino
3. Once done just open Arduino IDE and go to Sketch-> Include libraries and you would see blynk in the menu
4. If you see that then libraries have been included successfully
*Now it is time to include the board configuration in the Arduino IDE
What is board configuration?
Ok , a simple answer is that it contains all the essential parameters which required to get the board booted and configured.
for example in if you go to Tools->Board Menu you would see a list of boards . All this boards listed have different configuration settings. Therefore we should also include NodeMCU's board configurations which typically contain the board architecture , clock speed, baud rate etc.
Lets start. In the Arduino IDE go to File->Preferences
Now Copy the below link and paste it in the Additional Boards Manager Url text box
https://arduino.esp8266.com/stable/package_esp8266c...
Restart the Arduino IDE after that.
Now after restarting the Arduino IDE , go to Tools->Boards and select Node MCU board , mine was version 0.9
Setting Up Blynk
**broken link removed**
**broken link removed**
**broken link removed**
**broken link removed**
**broken link removed**
1. First install the Blynk app from google play store and then sign in
2. After that Press on click on New Project and you will get a screen (Refer Screen shots)
*Enter the name of your project, I have given it as led
*Then Select the Board as ESP8266
and then you will see below the authentication token no. If you want it in your email you can send it through email also
*And then Finally click on to the create button
3. Now you will get your dashboard screen. Just click on the the top most button "+" on the right corner to add widgets to your project.
4. In this project we add a simple button and then configure its settings as Digital GP13 pin.(Refer Screen Shots)
5. Its your choice you can either have the button set as push type or as a switch
6. Then label the Button as ON and OFF in the settings
Note that since Blynk is free only to an extend, you have to choose your widgets wisely
Uploading the Code
**broken link removed**
1.Connect your Esp8266 Wifi to your PC
2. Open Arduino IDE
3. Then go to File->Eamples->Blynk-Boards_Wifi->Esp8266Standalone
(Refer screen shot)
4. Select the correct board (NodeMCU 1.0) and the com port from the Tools Menu
5. A snippet from the code
Serial.begin(9600); // Change Baud Rate to 115200
Blynk.begin(auth, "ssid", "pass"); // Enter your Wifi SSID and password, both inside the double quotation
Finally Save the file and Press Upload
.
1. After uploading the code
2. Open the Blynk app in the Phone
3. Let it connect to dashboard with a button
5. Press Play button on the top most right corner of the app
6. Then Alas!! Press the button and you would see the LED Turn ON!!!
Now that you have got the basics, you can try some cool stuffs with this awesome board !!
Have fun exploring this board
Happy Inventing!!
Extract the blynkH.zip paste all libraries inside library folder of your arduino and tool to you arduino ide tools folder.
OR
Oper arduino ide
>Goto Sketch
>Click on Include Library
>Click on manage library
>In search bar type Blynk
>Click on it
>Click on Install
>Ok
>Click on tools > Boards >WemosD1 mini
>Select correct com port
>Edit your token authentication key (they will send key to your registered email id when new proect is created on blynk)
>Edit ssid & password
Thanks