Continue to Site

Welcome to EDAboard.com

Welcome to our site! EDAboard.com is an international Electronics Discussion Forum focused on EDA software, circuits, schematics, books, theory, papers, asic, pld, 8051, DSP, Network, RF, Analog Design, PCB, Service Manuals... and a whole lot more! To participate you need to register. Registration is free. Click here to register now.

Help With My First LM13232AFW GLCD Project

Status
Not open for further replies.
i have looked over the staf you give me this what i got

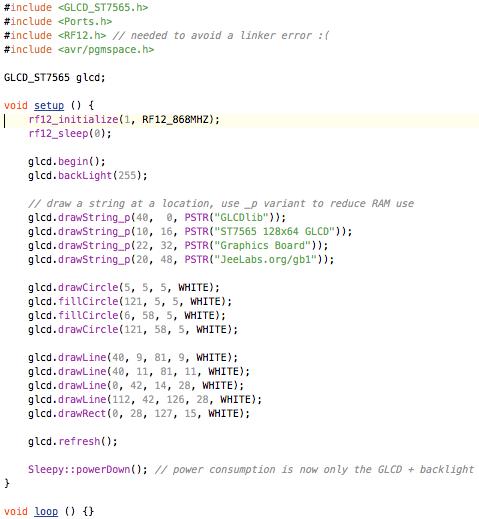
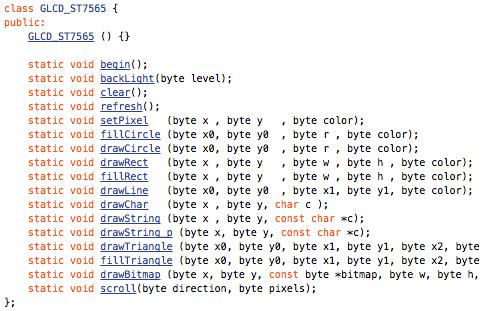
View attachment GLCD CODE.rar

i will stady the links agien

- - - Updated - - -

yes i buy from ram

i did want this one but the price with batter with main so...

and if i put it on my bread board what othe things can i get
 

You should also be aware the LM13232AFW datasheet states the GLCD is a 3.3V device, not a 5V device.

If you mistakenly power the device with 5V the LM13232AFW would most likely be seriously damaged.

You should also be aware the LM13232AFW may have a different pinout then the ST7565 examples I previously posted, including the assembly code you just posted.

Double check the LM13232AFW datasheet before connecting it to your circuit.

BigDog
 
  • Like
Reactions: hesho90

    hesho90

    Points: 2
    Helpful Answer Positive Rating
this in till now my LM13232AFW glcd have ST7565 contorller

i have made the glcd on proteus and make a circekt with pic 16f877a

i made a code with mikroc and mikropascal and the mikropascal code wark on with no eror but i didnt make the lcd say any thing the codes in the file with the pdf of the lcd and a code that come with it

- - - Updated - - -

this a code that i made bay what i luern from the st7565

i got this from the code was here https://github.com/edeca/Electronics/blob/master/Include/st7565.h

#ifndef _ST7565_H_
#define _ST7565_H_

#define GLCD_CS1 LATB0 //latb0 as in rb0 i think
#define GLCD_RESET LATB1
#define GLCD_A0 LATB2
#define GLCD_RW LATB3
#define GLCD_EN LATB4

#define SCREEN_WIDTH 132
#define SCREEN_HEIGHT 32
 

Attachments

  • Glcd test project.rar
    291.4 KB · Views: 94

It appears you have corrected the issue with the Proteus simulation file.

I was able to successfully open the Proteus simulation which you just uploaded.

BigDog
 
  • Like
Reactions: hesho90

    hesho90

    Points: 2
    Helpful Answer Positive Rating
The hex files of mikroC and mikroPascal both are not working. The GLCD displays nothing.
 
  • Like
Reactions: hesho90

    hesho90

    Points: 2
    Helpful Answer Positive Rating
The hex files of mikroC and mikroPascal both are not working. The GLCD displays nothing.


yes i didnt know how to code in (hello warld)

i try many things you got the mikroPascal c file you cant ajst it
 

Unfortunately or fortunately depending on how you look at it, I do not own the MikroPascal compiler, its also been twenty five years or more since I coded in Pascal and I'm not particularly interested in do so again.

I would like to point out the HDG12864L-4 GLCD used in your Proteus simulation utilizes the SED1565 controller, NOT the ST7565 controller on your LM13232AFW GLCD.

They are not 100% compatible, therefore you may encounter issues in later porting the code to your LM13232AFW.

Reference: , Page: 2


BigDog
 

I think this

1- set en to re0/an5/rd
2- set rw to re1/an6/wr and set rw to H to read control
3- set cs1 to re2/an7/cs and set cs1 to L
4- set res to rb2 and set res to initialized
5- set a0 to rb3 and set a0 H for displat data
6- set d4...d7 to rb4...rb7

and make a code from there
the pic and the glcd can be wierd up just need to know what to what the good way and make a code from there with any thing

is this good
 
Last edited:

i got this code just help me to know the diffrent that i need to make so it wark with me

also if you here for st7565 ctrl help this will help

**broken link removed**

https://jeelabs.org/tag/displays/


4041882400_1348444294.jpg
 

Unfortunately you will not be able to use a screen based on the ST7565 in SPI mode with the PIC16F877A. The microcontroller only has 368 bytes of RAM and you need at least 1024 for the screen buffer, before all other variables are taken into account.

Your only option if you wish to use an ST7565 screen with the PIC16F877A is to use parallel mode. As others have already said this is completely different from the HD44780 and code will not be compatible.

The main code (you already linked to the header) is at: https://github.com/edeca/Electronics/blob/master/Include/st7565.c
Documentation for my library is available at: **broken link removed**

I am happy to work on device support for new screens if I am sent one.
 

i did make a code that wark on build in mikroc with no error

it looks just like the one you give post #32 in link 2

and what pic sould i ues i think PIC18F26K20 and do i need to use more then one pics or just in this pic portb street to the glcd

#ifndef _ST7565_H_
#define _ST7565_H_

#define GLCD_CS1 LATB0
#define GLCD_RESET LATB1
#define GLCD_A0 LATB2
#define GLCD_SCL LATB3
#define GLCD_SDA LATB4

#define SCREEN_WIDTH 132
#define SCREEN_HEIGHT 32

#define GLCD_CMD_DISPLAY_ON
#define GLCD_CMD_DISPLAY_OFF


#define GLCD_CMD_ALL_NORMAL
#define GLCD_CMD_ALL_ON
#define GLCD_CMD_DISPLAY_NORMAL
#define GLCD_CMD_DISPLAY_REVERSE
#define GLCD_CMD_BIAS_9
#define GLCD_CMD_BIAS_7

#define GLCD_CMD_HORIZONTAL_NORMAL
#define GLCD_CMD_HORIZONTAL_REVERSE


#define GLCD_CMD_VERTICAL_NORMAL
#define GLCD_CMD_VERTICAL_REVERSE


#define GLCD_CMD_POWER_CONTROL
#define GLCD_CMD_RESISTOR

#define GLCD_CMD_VOLUME_MODE


#define GLCD_CMD_DISPLAY_START

#define GLCD_CMD_COLUMN_LOWER

#define GLCD_CMD_COLUMN_UPPER

#define GLCD_CMD_SET_PAGE

#define GLCD_CMD_RESET


#define GLCD_CMD_NOP 0b11100011


void glcd_init();

void glcd_command(char);

void glcd_data(char);

void glcd_refresh();

void glcd_blank();

void glcd_pixel(unsigned char x, unsigned char y, unsigned char colour);

void glcd_flip_screen(unsigned char flip);

void glcd_inverse_screen(unsigned char inverse);

void glcd_test_card();

void glcd_contrast(char resistor_ratio, char contrast);


unsigned char glcd_buffer[SCREEN_WIDTH * SCREEN_HEIGHT / 8];

unsigned char glcd_flipped = 0;

#endif

void main(){ }

think you
 

i did make a code that wark on build in mikroc with no error

it looks just like the one you give post #32 in link 2

If the only code you compiled is the header file then I am not surprised it was successful. All it contains is a few #defines!

My code is only tested with HiTech (and will therefore work with XC8) but should compile with any sensible compiler.

and what pic sould i ues i think PIC18F26K20 and do i need to use more then one pics or just in this pic portb street to the glcd

I used the 18F26K20 because it has a lot of program space that can be used for font data. You can use any 18F PIC that has >1500 bytes of RAM (1024 for the screen buffer, a few hundred for other variables).
 

so can i go with this code and add staf or its not going to wark at all

- - - Updated - - -

befor i get hte new pic
 

i add some staf to the code if you may

till me what is worng
#ifndef _ST7565_H_
#define _ST7565_H_

#define GLCD_CS1 LATB0
#define GLCD_RESET LATB1
#define GLCD_A0 LATB2
#define GLCD_SCL LATB3
#define GLCD_SDA LATB4

#define SCREEN_WIDTH 132
#define SCREEN_HEIGHT 32

#define GLCD_CMD_DISPLAY_ON 0b10101111
#define GLCD_CMD_DISPLAY_OFF 0b10101110


#define GLCD_CMD_ALL_NORMAL 0b10100100
#define GLCD_CMD_ALL_ON 0b1010010


#define GLCD_CMD_DISPLAY_NORMAL 0b10100110
#define GLCD_CMD_DISPLAY_REVERSE 0b10100111
#define GLCD_CMD_BIAS_9 0b10100010
#define GLCD_CMD_BIAS_7 0b10100011

#define GLCD_CMD_HORIZONTAL_NORMAL 0b10100000
#define GLCD_CMD_HORIZONTAL_REVERSE 0b10100001


#define GLCD_CMD_VERTICAL_NORMAL 0b11000000
#define GLCD_CMD_VERTICAL_REVERSE 0b11001000


#define GLCD_CMD_POWER_CONTROL 0b00101000
#define GLCD_CMD_RESISTOR 0b00100000

#define GLCD_CMD_VOLUME_MODE 0b10000001


#define GLCD_CMD_DISPLAY_START 0b01000000


#define GLCD_CMD_COLUMN_LOWER 0b00000000

#define GLCD_CMD_COLUMN_UPPER 0b00010000

#define GLCD_CMD_SET_PAGE 0b10110000

#define GLCD_CMD_RESET 0b11100010


#define GLCD_CMD_NOP 0b11100011


void glcd_init(); {


GLCD_CS1 = 0;

GLCD_RESET = 0;

DelayMs(50);

GLCD_RESET = 1;

glcd_command(GLCD_CMD_BIAS_9);

glcd_command(GLCD_CMD_HORIZONTAL_NORMAL);

glcd_command(GLCD_CMD_VERTICAL_REVERSE);

glcd_flipped = 0;

glcd_command(GLCD_CMD_RESISTOR | 0x3);

glcd_command(GLCD_CMD_POWER_CONTROL | 0x7);

glcd_command(GLCD_CMD_VOLUME_MODE);
glcd_command(31);

glcd_command(GLCD_CMD_DISPLAY_START);

GLCD_CS1 = 1;
}


void glcd_data(char); {


GLCD_A0 = 1;


GLCD_CS1 = 0;

for (int n = 0; n < 8; n++) {

if (data & 0x80) {
GLCD_SDA = 1;
} else {
GLCD_SDA = 0;
}

// Pulse SCL
GLCD_SCL = 1;
GLCD_SCL = 0;

data <<= 1;
}


GLCD_CS1 = 1;

}

void glcd_command(char);

GLCD_A0 = 0;

GLCD_CS1 = 0;

for (int n = 0; n < 8; n++) {

if (command & 0x80) {
GLCD_SDA = 1;
} else {
GLCD_SDA = 0;
}

GLCD_SCL = 1;
GLCD_SCL = 0;

command <<= 1;
}

GLCD_CS1 = 1;
}


void glcd_refresh();

void glcd_blank();

void glcd_pixel(unsigned char x, unsigned char y, unsigned char colour);

void glcd_flip_screen(unsigned char flip);

if (flip) {
glcd_command(GLCD_CMD_HORIZONTAL_NORMAL);
glcd_command(GLCD_CMD_VERTICAL_REVERSE);
glcd_flipped = 0;
} else {
glcd_command(GLCD_CMD_HORIZONTAL_REVERSE);
glcd_command(GLCD_CMD_VERTICAL_NORMAL);
glcd_flipped = 1;
}
}


void glcd_inverse_screen(unsigned char inverse);
if (inverse) {
glcd_command(GLCD_CMD_DISPLAY_REVERSE);
} else {
glcd_command(GLCD_CMD_DISPLAY_NORMAL);
}
}
void glcd_test_card();

unsigned char p = 0xF0;

for (int n=1; n<=1024; n++) {
glcd_buffer[n - 1] = p;

if (n % 4 == 0) {
unsigned char q = p;
p = p << 4;
p |= q >> 4;
}
}

glcd_refresh();
}


void glcd_contrast(char resistor_ratio, char contrast);
if (resistor_ratio > 7 || contrast > 63) return;

glcd_command(GLCD_CMD_RESISTOR | resistor_ratio);
glcd_command(GLCD_CMD_VOLUME_MODE);
glcd_command(contrast);
}

unsigned char glcd_buffer[SCREEN_WIDTH * SCREEN_HEIGHT / 8];

unsigned char glcd_flipped = 0;

#endif

void main(){


}
 

Status
Not open for further replies.

Part and Inventory Search

Welcome to EDABoard.com

Sponsor

Back
Top