Continue to Site

Welcome to EDAboard.com

Welcome to our site! EDAboard.com is an international Electronics Discussion Forum focused on EDA software, circuits, schematics, books, theory, papers, asic, pld, 8051, DSP, Network, RF, Analog Design, PCB, Service Manuals... and a whole lot more! To participate you need to register. Registration is free. Click here to register now.

[SOLVED] DC Power Jack Symbol... What? How?

Status
Not open for further replies.

zia.newversion

Member level 5
Joined
Mar 28, 2010
Messages
83
Helped
1
Reputation
2
Reaction score
1
Trophy points
1,288
Location
Pakistan
Activity points
2,188
Ok. I am not asking for a PCB footprint for a DC Power Jack since I have searched and seen a few members getting scolded over asking a stupid question which could easily be solved by searching. I already have a PCB footprint of a DC Power Jack. I am using EagleCAD and the schematic is confusing me, partly because I have never used a DC Power Jack before (Yeah, we have a power supply which has croc clips at the power terminals :p)

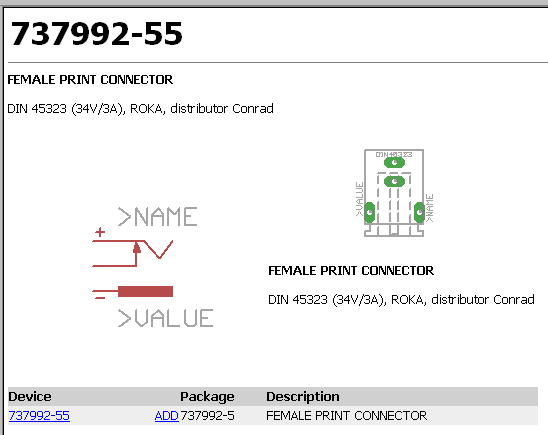
Anyway, the picture of the schematic is attached... Can anyone please explain how a DC power jack works? And where normal power supplies have two terminals, why does it have four? And how would I use this schematic? How can I find out which terminal is V+, which one is V- or GND... Please help. Thank you.

P.S. If anyone is wondering, the schematic AND the footprint came from Sparkfun Library for Eagle.
 

Attachments

  • pjck.jpeg
    pjck.jpeg
    8.2 KB · Views: 409

That is a badly drawn symbol. This one is from the con-conrad.lbr:


From that is should be a bit clearer. When the power connector is inserted it breaks the + contact from the one with the arrow.

Actually the connector 73398? in the same library is a better example because they have labelled the pins 1,2,3 instead of making them invisible!

Keith.
 

That's what's called a 'switching' jack. That type of thing is often used in audio equipment so that unused inputs (inputs with no plug inserted) will have the inputs shorted to minimize noise getting into the low-level circuits. For your application, I'm not sure you need that third terminal for anything, just connect the + and - terminals.
 
The DC jack is switching to break the internal supply (eg battery) when the plug is inserted. Yours only has 3 connections - on the right hand side. If you don't need the switch then you would use the top and bottom connections and ignore the middle one. Which way round you connect it is up to you (and your power supply) but centre positive is most common. The top connection is centre.

Keith
 
Thank you all. I appreciate your help. I get it now.

So the ^ shaped pin on the left is not a pin... The pin connected to a filled cylinder is ground and the rest two pins are connected together unless the jack is connected to wall socket. Right?
And I need not worry about the pin in the middle as it is irrelevant at the moment. However the pin connected to the ^ shape is +ve...
But I do get the concept of the pin in the middle. It is meant for an alternative power source, right? It is there just in case I needed to connect a battery for the time when the jack is NOT connected to the wall socket. When the jack IS connected to wall socket, the battery will be disconnected from the circuit (and the power coming from power adapter will not be charging the battery)...


At least that is what I gather from all your comments... I can proceed to use the symbol in my schematic... Thanks again, everyone.
 

The normal use is for battery powered equipment which can be plugged in to the mains. So, the battery connects to the middle terminal. When you plug in the power supply it cuts the battery from the circuit & powers it from the mains.

They are not used like that so much now because if you plug it in to the mains without the power supply turned on the unit will switch off as the battery will be disconnected - not ideal.

Keith
 

Status
Not open for further replies.

Similar threads

Part and Inventory Search

Welcome to EDABoard.com

Sponsor

Back
Top