Continue to Site

Welcome to EDAboard.com

Welcome to our site! EDAboard.com is an international Electronics Discussion Forum focused on EDA software, circuits, schematics, books, theory, papers, asic, pld, 8051, DSP, Network, RF, Analog Design, PCB, Service Manuals... and a whole lot more! To participate you need to register. Registration is free. Click here to register now.

Arduino nano I2C as slaves and NodeMCU is master

Status
Not open for further replies.

imranahmed

Advanced Member level 3
Joined
Dec 4, 2011
Messages
817
Helped
3
Reputation
6
Reaction score
3
Trophy points
1,298
Location
Karachi,Pakistan
Activity points
6,492
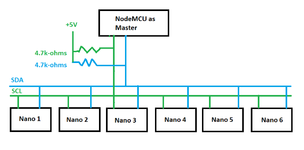
Please let know that I make a circuit of I2C using Six Arduino Nanos are as slaves and NodeMCU as a master.
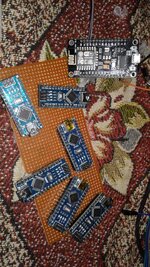
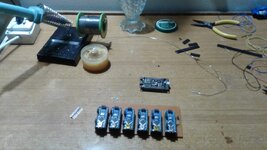
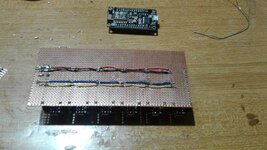
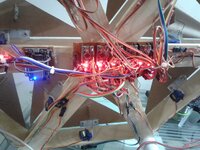
Picture attached I wired up all as picture and +5V and GND all are common for NodeMCU and Nanos.
And make a Android App for for sending commands.

Problem is that only Nano 1,2 and 3 are working well but 4th,5th and 6th Nanos are not working properly they behave as they are restarting thier L Led is blink
when sending command, while 1st, 2nd and 3rd Nanos are working well.
 

Attachments

  • I2C_Picture.png
    I2C_Picture.png
    12.7 KB · Views: 177
Last edited:

Hi, how can we know?

without code, cable length and any other informatin about your application

Klaus
 
Hi, how can we know?

without code, cable length and any other informatin about your application

Klaus
Code is simple as provided in Example folder of Arduino IDE master write and slave read.
SDA and SCL wires are 40cm long, start from NodeMCU to Nano 1 is 40cm then 40cm to Nano 2 then 40cm to Nano 3 till 6th nano every nano has 40cm distance.
Application is that I press ON button and select address 1 from my Android App to Nano 1 and select address 2 then press ON till address 6 same ON and OFF buttons would work for all addresses.
 

Hi,

You know that I2C means "Inter Integrated circuit".
Initially designed for onboard communication. Not for long wires..

We don't know your application, thus I recommend you to read the I2C specification. Especially wiring, cables, cable lenghts, bus capacitance, clock rate...


Klaus
 
Hi,

You know that I2C means "Inter Integrated circuit".
Initially designed for onboard communication. Not for long wires..

We don't know your application, thus I recommend you to read the I2C specification. Especially wiring, cables, cable lenghts, bus capacitance, clock rate...


Klaus
In your given document link, page 28 and page 29 takes about General Call Address and Software reset, same thing occur on my 4th, 5th and 6th Nanos they were reset after receiving command because I seen that when we reset Arduino their Internal LED blinks one time, here same is occuring.
Please let me know how to overcome this reset command issue that 00000110(06h)
--- Updated ---

Hi,

You know that I2C means "Inter Integrated circuit".
Initially designed for onboard communication. Not for long wires..

We don't know your application, thus I recommend you to read the I2C specification. Especially wiring, cables, cable lenghts, bus capacitance, clock rate...


Klaus
I googled to sort out reset issue, I found
https://pebblebay.com/i2c-lock-up-prevention-and-recovery/
Link for preventing lock up and software reset
 
Last edited:

Hi,

As you can see in the table "reset" is optional, thus it depends on the installed software.
Still we don't see your code.
--> give complete informations, as already requested.

My guessing:
I think you installed the identical software at all slaves..but don't know this for sure.
Thus I don't think it's a software problem.

Why don't you provide full information?
Why don't you do (and report) simple debugging on your own?
... Like installing one slave on different locations, then add another one at different locations...and so on...


Klaus
CODE FOR NODEMCU:
Code:
#include "ESP8266WiFi.h"        //I can connect to a Wifi
#include "ESP8266WebServer.h"   //I can be a server 'cos I have the class ESP8266WebServer available
#include "WiFiClient.h"
#include <Wire.h>

const char *ssid = "ESP8266AP";  //Credentials to register network defined by the SSID (Service Set IDentifier)
const char *password = "123456654"; //and the second one a password if you wish to use it.
ESP8266WebServer server(80);    //Class ESP8266WebServer and default port for HTTP

int addr = 0; //This variable is related to the number of turns. If microstepping is disabled, 200 corresponds to a complete turn.
int wing = 0; //This variable is the pulse duration in milliseconds and it is related to the rotation speed. Without microstepping, 1.8º are stepDelay ms.

void handleRootPath() {
 server.send(200, "text/plain", "Ready, player one.");
}

void handleInit() {// Handler. 192.168.XXX.XXX/Init?Dir=HIGH&Delay=5&Steps=200 (One turn clockwise in one second)
addr = 0; //Motor stopped if the arguments are wrong.
wing = 0;
String message = "Initialization with: ";

 if (server.hasArg("Address")) {
 addr = (server.arg("Address")).toInt(); //Converts the string to integer.
 message += " Address: ";
 message += server.arg("Address");
 
 }
 if (server.hasArg("Wing")) {
 wing = (server.arg("Wing")).toInt();
 message += " Wing: ";
 message += server.arg("Wing");
 }
 server.send(200, "text/plain", message); //It's better to return something so the browser don't get frustrated+
 
 Wire.beginTransmission(addr); /* begin with device address 8 */
 Wire.write(wing);  /* sends integer */
 Wire.endTransmission();    /* stop transmitting */
 
}

void setup() {
Serial.begin(115200); //I can debbug through the serial port
// Configure NODEMCU as Access Point
Serial.println();
Wire.begin(D1, D2); /* join i2c bus with SDA=D1 and SCL=D2 of NodeMCU */
Serial.println("Configuring access point...");
WiFi.softAP(ssid, password); //Password is not necessary
IPAddress myIP = WiFi.softAPIP(); //Get the IP assigned to itself.
Serial.print("AP IP address: "); //This is written in the PC console.
Serial.println(myIP);

pinMode(2, OUTPUT); // Pins are outputs


server.on("/", handleRootPath);
server.on("/Init", handleInit);

server.begin(); //Let's call the begin method on the server object to start the server.
Serial.println("HTTP server started");
}

void loop() {
 server.handleClient();
}


CODE FOR SIX NANOS:

Code:
#include <Wire.h>
unsigned int x;
bool f1 = 0 , f2 = 0, f3 = 0;

void setup() {
  Serial.begin(9600);
  pinMode(2, OUTPUT);
  pinMode(3, OUTPUT);
  pinMode(4, OUTPUT);
  digitalWrite(2, HIGH);
  digitalWrite(3, HIGH);
  digitalWrite(4 HIGH);
  Wire.begin(4);  // 1,2,3,4,5,6 Nanos                                                                                                                                                    // join i2c bus with address #8
  Wire.onReceive(receiveEvent); // register event
  delay(2000);
}

void loop() {
delay(50);
}

void receiveEvent(int howMany) {
 
  int x = Wire.read();    // receive byte as an integer
  Serial.println(x);         // print the integer
  if (x == 1) {
    f1=!f1;
    if (f1 == 0) {
    digitalWrite(2, HIGH);
    }
    if (f1 == 1) {
    digitalWrite(2, LOW);
    }
  }

  if (x == 2) {
    f2=!f2;
    if (f2 == 0) {
digitalWrite(3, HIGH);    }
    if (f2 == 1) {
digitalWrite(3, LOW);    }
  }

  if (x == 3) {
    f3=!f3;
    if (f3 == 0) {
digitalWrite(4, HIGH);    }
    if (f3 == 1) {
digitalWrite(4, LOW);    }
  }

}

Arduino Nano 1,2 and 3 are working well but 4,5 and 6 are not working they behave as they are resetting.
 

Hi,

As far as I can see, in this code I2C_RESET is not implemented.
Not in your code, and I don´t think it´s handled by the library.

But it seems you use address 1...6 for the NANOs.
They all are within the "3.1.12 reserved addresses" Table 4 --> they must not be used as slave address.

Serial.println(x); // print the integer
The slaves output the received data to the serial port. I guess for debugging. So use it to see what happens.
And do the other debugging recommended in post#6

Klaus
 
Hi,

As far as I can see, in this code I2C_RESET is not implemented.
Not in your code, and I don´t think it´s handled by the library.

But it seems you use address 1...6 for the NANOs.
They all are within the "3.1.12 reserved addresses" Table 4 --> they must not be used as slave address.


The slaves output the received data to the serial port. I guess for debugging. So use it to see what happens.
And do the other debugging recommended in post#6

Klaus
Hi,

I tried with different slaves addresses 8 to 13 but problem still exist, but I powered all nanos Vin and GND pin and apply 12V, Nano 1,2 and 3 are working well
and all nanos are powered up but 4th, 5th and 6th nanos are working when I connect USB port to it.
I am stuck here.
Double check all connections all are correct.
 

Hi,

The problem from the beginning of this thread is that you don´t provide complete informations.
You don´t give feedback about debugging (Post #6)
We don´t have a clue about what wiring (data lines) you use.

Now you tell about 12V supply .. In post#1 you talked about +5V supply. I don´t have an idea how you wired it. Nor do we have any information about current draw...

When the Nanos work with USB applied, then the problem may be the power supply. It´s just guessing.

Is it so difficult to post a couple of fotos (100kBytes per foto should be sufficient)?

I´ll come back when I see useful informations.

Klaus
 

Working example here -


Cabling, practical experiences -


Your 40 cm does not seem to be an issue, but I would double check pulse integrity
to make sure no ground issues, at slave. But mixed bag for different people.

Regards, Dana.
 

When the Nanos work with USB applied, then the problem may be the power supply. It´s just guessing.

Is it so difficult to post a couple of fotos (100kBytes per foto should be sufficient)?

I´ll come back when I see useful informations.
I completely agree. Particularly we don't know about power supply wiring and ground voltage drops. Ground shift between I2C nodes would be a plausible way to cause communication failure.
Your 40 cm does not seem to be an issue
According to my math, total cable length from master to slave 6 is 240 cm.
 

Last edited:

Thank you valuable replies.

I attached all 6 Arduino Nanos on single Vero Board and connected all SDA and SCL and 4.7k resistors for both to +5V.
I connected servos instead of LEDs and make a Android App for controlling servos.

There are 6 Arduino nanos and 18 servos, single Arduino Nano have 3 servos.
6 Nanos means 6 addresses and I named 3 servos as "wing".
I changed addresses 30,32,34,36,38,40 and Wire,write command for wing are 50,52,54.
Android App have 6 buttons for address select and 3 buttons for wing select.
All are working but there are some malfunctioning, 4th number Arduino nano automatically reset
when sending commands from Android App and some servos are operate but I do not send any command to them.

There are I2C issues I think but I am stuck here, I thought I2C is a simple but it seems complicated.
 

Hi,

no photo?
nothing about supply, wiring, supply current, 12V and 5V...

There are I2C issues I think but I am stuck here, I thought I2C is a simple but it seems complicated.
I don´t think the problems are related to I2C. If you don´t follow design rules you get similar problems with many other interfaces.

Klaus
 

Hi,

no photo?
nothing about supply, wiring, supply current, 12V and 5V...


I don´t think the problems are related to I2C. If you don´t follow design rules you get similar problems with many other interfaces.

Klaus
--- Updated ---

Power supply I used 12VDC @2.5A buck converter.
I used Vin pin of Arduino Nanos and NodeMCU for applying 12V.
 

Attachments

  • nodeMCU as Master Pic.jpeg
    nodeMCU as Master Pic.jpeg
    214.8 KB · Views: 145
  • pic1.jpeg
    pic1.jpeg
    93.2 KB · Views: 110
  • pic2.jpeg
    pic2.jpeg
    130.4 KB · Views: 119

Hi,

I give up.
The only useful information is in the 3rd picture where we can see 4 wires connecting all NANOs in parallel.
No LEDs, no NodeMCU, no power supply, no servos....

I really try to help .. but without almost complete informations it´s impossible.

Good luck.
 

Some considerations with multiple slaves.

https://e2e.ti.com/blogs_/b/analogw...n-connecting-multiple-slaves-to-an-i2c-master and several ap notes at bottom of page.

Latency and collision issues -


Regards, Dana.
 

Hi,

I give up.
The only useful information is in the 3rd picture where we can see 4 wires connecting all NANOs in parallel.
No LEDs, no NodeMCU, no power supply, no servos....

I really try to help .. but without almost complete informations it´s impossible.

Good luck.
Hi I am sending pics and setup pictures, all things are together,

This project refers to kinetic wall,

Total 6 triangles each triangle have 3 servos and 1 arduino nano
NodeMCU as a Master Device.

Master NodeMCU Code:
Code:
#include "ESP8266WiFi.h"        //I can connect to a Wifi
#include "ESP8266WebServer.h"   //I can be a server 'cos I have the class ESP8266WebServer available
#include "WiFiClient.h"
#include <Wire.h>

const char *ssid = "ESP8266AP";  //Credentials to register network defined by the SSID (Service Set IDentifier)
const char *password = "*********"; //and the second one a password if you wish to use it.
ESP8266WebServer server(80);    //Class ESP8266WebServer and default port for HTTP

int addr = 0; //This variable is related to the number of turns. If microstepping is disabled, 200 corresponds to a complete turn.
int wing = 0; //This variable is the pulse duration in milliseconds and it is related to the rotation speed. Without microstepping, 1.8º are stepDelay ms.

void handleRootPath() {
  server.send(200, "text/plain", "Ready, player one.");
}

void handleInit() {// Handler. 192.168.XXX.XXX/Init?Dir=HIGH&Delay=5&Steps=200 (One turn clockwise in one second)
  addr = 0; //Motor stopped if the arguments are wrong.
  wing = 0;
  String message = "Initialization with: ";

  if (server.hasArg("Address")) {
    addr = (server.arg("Address")).toInt(); //Converts the string to integer.
    message += " Address: ";
    message += server.arg("Address");

  }
  if (server.hasArg("Wing")) {
    wing = (server.arg("Wing")).toInt();
    message += " Wing: ";
    message += server.arg("Wing");
  }
  server.send(200, "text/plain", message); //It's better to return something so the browser don't get frustrated+

  if (addr == 45 && (wing == 58 || wing == 59)) {
    for (int ad = 30 ; ad <= 40 ; ad = ad + 2) {
      Wire.beginTransmission(ad); /* begin with device address 8 */
      Wire.write(wing);  /* sends integer */
      Wire.endTransmission();    /* stop transmitting */
    }
  } else if ((addr==30 || addr==32 || addr==34 || addr==36 || addr==38 || addr==40) && (wing==50 || wing==52 || wing==54)) {
    Wire.beginTransmission(addr); /* begin with device address 8 */
    Wire.write(wing);  /* sends integer */
    Wire.endTransmission();    /* stop transmitting */
  }
}

void setup() {
  Serial.begin(115200); //I can debbug through the serial port
  // Configure NODEMCU as Access Point
  Serial.println();
  Wire.begin(D1, D2); /* join i2c bus with SDA=D1 and SCL=D2 of NodeMCU */
  Serial.println("Configuring access point...");
  WiFi.softAP(ssid, password); //Password is not necessary
  IPAddress myIP = WiFi.softAPIP(); //Get the IP assigned to itself.
  Serial.print("AP IP address: "); //This is written in the PC console.
  Serial.println(myIP);

  pinMode(2, OUTPUT); // Pins are outputs


  server.on("/", handleRootPath);
  server.on("/Init", handleInit);

  server.begin(); //Let's call the begin method on the server object to start the server.
  Serial.println("HTTP server started");
}

void loop() {
  server.handleClient();  //
}

Slave Code (Arduino Nano):
Code:
#include <Servo.h>
#include <NewPing.h>
#include <Wire.h>
#define TRIGGER_PIN  2  // Arduino pin tied to trigger pin on the ultrasonic sensor.
#define ECHO_PIN     3  // Arduino pin tied to echo pin on the ultrasonic sensor.
#define MAX_DISTANCE 200 // Maximum distance we want to ping for (in centimeters). Maximum sensor distance is rated at 400-500cm.

Servo servo1, servo2, servo3;  // create servo object to control a servo
// twelve servo objects can be created on most boards
NewPing sonar(TRIGGER_PIN, ECHO_PIN, MAX_DISTANCE); // NewPing setup of pins and maximum distance.
volatile unsigned int x, f1 = 0 , f2 = 0, f3 = 0, f4 = 0;
unsigned long distanceDetect, distanceDetectMapped;
uint8_t tog = 0;
uint32_t oldtime = millis();
int pos = 45;    // variable to store the servo position
void setup() {
  servo1.attach(9);  // attaches the servo on pin 9 to the servo object
  servo1.write(45);
  servo2.attach(10);  // attaches the servo on pin 9 to the servo object
  servo2.write(45);
  servo3.attach(11);  // attaches the servo on pin 9 to the servo object
  servo3.write(45);
  Serial.begin(9600);
  Wire.begin(40);     // join i2c bus with address #30-40
  Wire.onReceive(receiveEvent); // register event
  delay(2000);
}

void loop() {

 // Serial.println(x);      // print the integer

  if (f4 == 1) {
    if ( (millis() - oldtime) > 400) {
      oldtime = millis();
      tog = !tog; // Invert
      if (tog) {
        distanceDetect = sonar.ping_cm();
        Serial.print("distanceDetect = ");
        Serial.println(distanceDetect);
        // distanceDetectMapped = map(distanceDetect, 0, 60, 45, 170);
        if (distanceDetect > 30 && distanceDetect < 40) {
          servo1.write(45);              // tell servo to go to position in variable 'pos'
          servo2.write(45);              // tell servo to go to position in variable 'pos'
          servo3.write(45);              // tell servo to go to position in variable 'pos'
        } else {
          servo1.write(170);              // tell servo to go to position in variable 'pos'
          servo2.write(170);              // tell servo to go to position in variable 'pos'
          servo3.write(170);              // tell servo to go to position in variable 'pos'
        }
      }
    }
  }
  if (f4 == 0) {
    if (f1 == 0) {
      servo1.write(45);              // tell servo to go to position in variable 'pos'
    }
    if (f1 == 1) {
      servo1.write(170);              // tell servo to go to position in variable 'pos'
    }

    if (f2 == 0) {
      servo2.write(45);              // tell servo to go to position in variable 'pos'
    }
    if (f2 == 1) {
      servo2.write(170);              // tell servo to go to position in variable 'pos'
    }

    if (f3 == 0) {
      servo3.write(45);              // tell servo to go to position in variable 'pos'
    }
    if (f3 == 1) {
      servo3.write(170);              // tell servo to go to position in variable 'pos'
    }
  }
}

void receiveEvent(int howMany) {
  //  while (1 < Wire.available()) { // loop through all but the last
  //    char c = Wire.read(); // receive byte as a character
  //    Serial.print(c);         // print the character
  //}
  x = Wire.read();        // receive byte as an integer

  if (x == 50) {
    f1 = !f1;
  }

  if (x == 52) {
    f2 = !f2;

  }

  if (x == 54) {
    f3 = !f3;

  }

  if (x == 58) {
    f4 = 1;
  }
  if (x == 59) {
    f4 = 0;
  }
}

Android App Code:

Code:
package com.example.kineticwall;

import androidx.appcompat.app.AppCompatActivity;

import android.os.Bundle;
import android.view.View;
import android.widget.Button;
import android.widget.EditText;
import android.widget.TextView;

import com.android.volley.Request;
import com.android.volley.RequestQueue;
import com.android.volley.toolbox.StringRequest;
import com.android.volley.toolbox.Volley;

import org.json.JSONArray;
import org.json.JSONException;

import java.io.IOException;
import java.util.concurrent.Executors;
import java.util.concurrent.ScheduledExecutorService;
import java.util.concurrent.TimeUnit;

public class MainActivity extends AppCompatActivity {
    TextView tv, textMode;
    EditText edt_steps, edt_direction, edt_delay;
    Button add1, add2, add3, add4, add5, add6, wing1, wing2, wing3, autoMan;
    String url = "", addr, wing, autoManButtonText;
    boolean flag = true;
    @Override
    protected void onCreate(Bundle savedInstanceState) {
        super.onCreate(savedInstanceState);
        setContentView(R.layout.activity_main);

        add1 = findViewById(R.id.add1);
        add2 = findViewById(R.id.add2);
        add3 = findViewById(R.id.add3);
        add4 = findViewById(R.id.add4);
        add5 = findViewById(R.id.add5);
        add6 = findViewById(R.id.add6);
        wing1 = findViewById(R.id.wing1);
        wing2 = findViewById(R.id.wing2);
        wing3 = findViewById(R.id.wing3);
        autoMan = findViewById(R.id.autoMan);
        autoMan.setText("Auto");
        tv = findViewById(R.id.tv);
        textMode = findViewById(R.id.textMode);
        textMode.setText("Manual Mode");
        if(flag) {
             manualMode();
        }
        autoMan.setOnClickListener(view -> {
            autoManButtonText = autoMan.getText().toString();
            if(autoManButtonText.equals("Auto")){
                //code for auto
                flag = false;
                autoMan.setText("Manual");
                textMode.setText("Auto Mode");
                addr = "45";
                wing = "58";
                url ="http://192.168.4.1/Init?"+ "Address=" + addr + "&" + "Wing=" + wing;
                System.out.println(url);
                requestVolley();
                url = "";
            }else{
                //code for manual
                flag = false;
                autoMan.setText("Auto");
                textMode.setText("Manual Mode");
                addr = "45";
                wing = "59";
                url ="http://192.168.4.1/Init?"+ "Address=" + addr + "&" + "Wing=" + wing;
                System.out.println(url);
                requestVolley();
                url = "";
                manualMode();

            }

        });


//
//        th = new Thread(() -> {
//            while(true){
//                try {
//                    Thread.sleep(500);
//                    requestVolley();
//
//                } catch (InterruptedException e) {
//                    e.printStackTrace();
//                }}
//        });th.start();
        // schedule();

    }

//    public void schedule() {
//        ScheduledExecutorService executor = Executors.newSingleThreadScheduledExecutor();
//        executor.scheduleAtFixedRate(this::requestVolley, 0, 500, TimeUnit.MILLISECONDS);
//    }
    public void manualMode(){

        add1.setOnClickListener(view -> {
            addr = "30";
        });
        add2.setOnClickListener(view -> {
            addr = "32";
        });
        add3.setOnClickListener(view -> {
            addr = "34";
        });
        add4.setOnClickListener(view -> {
            addr = "36";
        });
        add5.setOnClickListener(view -> {
            addr = "38";
        });
        add6.setOnClickListener(view -> {
            addr = "40";
        });


        wing1.setOnClickListener(view -> {
            wing = "50";
            url ="http://192.168.4.1/Init?"+ "Address=" + addr + "&" + "Wing=" + wing;
            System.out.println(url);
            requestVolley();
            url = "";
        });

        wing2.setOnClickListener(view -> {
            wing = "52";
            url ="http://192.168.4.1/Init?"+ "Address=" + addr + "&" + "Wing=" + wing;
            System.out.println(url);
            requestVolley();
            url = "";
        });

        wing3.setOnClickListener(view -> {
            wing = "54";
            url ="http://192.168.4.1/Init?"+ "Address=" + addr + "&" + "Wing=" + wing;
            System.out.println(url);
            requestVolley();
            url = "";
        });


    }

    private void requestVolley() {
        RequestQueue requestQueue = Volley.newRequestQueue(this);
        StringRequest stringRequest = new StringRequest(Request.Method.POST, url, response -> {
            try {
                tv.setText(String.valueOf(response));
                JSONArray jsonArray = new JSONArray(response);
                //   tv.setText(String.valueOf(jsonArray));
                //    JSONObject jsonObject = jsonArray.getJSONObject(0);
                //    String status = jsonObject.getString("message");
                //    if (status.equals("success")) {
                //       JSONObject data = jsonObject.getJSONObject("data");
                //       value = data.getString("value");
                //       tv.setText(value);
                //     }
            } catch (JSONException e) {
                e.printStackTrace();
            }

        }, error -> tv.setText(error.toString()));
//        stringRequest.setRetryPolicy(new DefaultRetryPolicy(
//                6000,
//                DefaultRetryPolicy.DEFAULT_MAX_RETRIES,
//                DefaultRetryPolicy.DEFAULT_BACKOFF_MULT)
//        );
        requestQueue.add(stringRequest);

    }
}
 

Attachments

  • pic4.jpeg
    pic4.jpeg
    82 KB · Views: 118
  • pic3.jpeg
    pic3.jpeg
    149.2 KB · Views: 115

Status
Not open for further replies.

Similar threads

Part and Inventory Search

Welcome to EDABoard.com

Sponsor

Back
Top