Continue to Site

Welcome to EDAboard.com

Welcome to our site! EDAboard.com is an international Electronics Discussion Forum focused on EDA software, circuits, schematics, books, theory, papers, asic, pld, 8051, DSP, Network, RF, Analog Design, PCB, Service Manuals... and a whole lot more! To participate you need to register. Registration is free. Click here to register now.

High voltage issue in my MP3 player - help needed

Status
Not open for further replies.

jzeds1491

Junior Member level 1
Joined
Jan 16, 2020
Messages
15
Helped
0
Reputation
0
Reaction score
0
Trophy points
1
Activity points
99
Hi guys, this mp3 players lcd went black (dead led backlight) and I measured the voltage at connector and it was rated 24volts for 3 leds!,
I replaced 1 led and used another pin for it, it worked but the D256A ic gets really hot and shuts the device down after a couple of seconds. (even without my led connected), this also happens if I connect the charger.
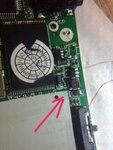
IMG_20200203_203744_434.jpg
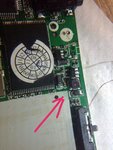
IMG_20200203_203741_885.jpg
thanks in advance
 

When you say you replaced 1 LED what exactly did you do? It is quite likely the LCD backlight uses many diodes in series so it needs a higher voltage, if you only wired one LED across the output it would pull the supply down and probably overheat the inverter transistor.

Brian.
 
I used only one LED instead of 3 LEDS(I connected this led to a lower voltage pin on the board, the thing is these lcd backlight leds only need about 2.5 - 3 volt to light up, which equals 9volts at most but board is providing 24volts
and also about the inverter transistor ,can I test your theory somehow to make sure your explanation about overheating is correct?
**broken link removed**

- - - Updated - - -

When you say you replaced 1 LED what exactly did you do? It is quite likely the LCD backlight uses many diodes in series so it needs a higher voltage, if you only wired one LED across the output it would pull the supply down and probably overheat the inverter transistor.

Brian.

I've attached a drawing Mr Brian thanks for your attention
 

I cannot see the attachment. Please attach a valid file.
 
I cannot see the attachment. Please attach a valid file.

I can't edit my posts sorry, the 24volt connection is not connected to anything ,ive attached 1 led to somewhere with suitable voltage (2volt) on board
IMG_20200203_235344_439.jpg
 

update : with 3 new leds and going back to original setup, the ic is cooler than before(still gets warm but acceptable )
now the leds are super hot, any second they might die as well...
 

It isn't normal to supply 24V to three LEDs but as it seems to work you are on the right track. LEDs are actually current operated rather than voltage and if they are getting more than slightly warm it indicates the current is far too high.

The possibilities are:
1. the new LEDs are OK but the power source to them is faulty. This is suspicious because 24V is more than normal battery voltage and a step-up circuit wouldn't normally be needed. Additionally, if it steps up to 24V, a failure would usually result in little or no voltage at all.

2. They are not single LEDs but multiple dies needing a higher total voltage across them. If you can replace them with normal sized LEDs this is unlikely as they would typically be of a different physical construction and difficult to get hold of.

3. They are electroluminescent lights and not LEDs at all. Backlighting on older devices was often done by a panel that glowed when a high voltage was placed across it. They were popular because they are energy efficient and produce an even lumination over a large flat area.

We would have to see a schematic to be sure what they really are.

Brian.

Thanks and yes, it sounds about right. It's possible that these electroluminescent lights were used .i have to inspect that...
Putting this aside, can I simply remove that "D256A "invert transistor from the board to evade the heating problem and use 1 led solution?

- - - Updated - - -

Thanks and yes, it sounds about right. It's possible that these electroluminescent lights were used .i have to inspect that...
Putting this aside, can I simply remove that "D256A "invert transistor from the board to evade the heating problem and use 1 led solution?

or instead of removing transistor, can I reduce turns of this inductor to reduce voltage at transistor input?
IMG_20200204_213020_004.jpg

- - - Updated - - -

IMG_20200204_213020_004.jpg
(the inductor that I mentioned)
 

update :
I measured the inductor without LEDs and I read different numbers each time (variable from 40 to120volt!) that is connected to a schottky diode (output is 24 v at this diode,with LEDs it's reduced to 8.9v but causing extremely hot LEDs )
the input voltage of inductor is 3.5v(fixed)
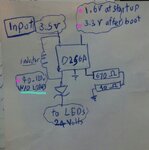
take a look at this sketch(I didn't draw some capacitors for simplicity)
IMG_20200205_155248_749.jpg
 

The varying reading suggest it is a pulsed signal and what you see depends on exactly when the meter 'snapshots' to input to measure it. Seeing significantly higher readings makes me lean more toward this being an electroluminescent driver and not LED. It will still provide power to make an LED light up but will be heavily overloaded in doing so. EL backlights use high voltage but very low current, I think your LEDs are basically pulling the high voltage right down.

Look at the device in the datasheet I attached. It isn't the same device but I think it is similar, it might give you some ideas.

If you want a quick fix, at the expense of the display not being even lit and higher battery consumption, remove the inductor or the D256A to kill that part of the circuit and use LEDs directly across the battery supply via a resistor. I'm not sure what the battery voltage is supposed to be but bear in mind that some white LEDs need as much as 3.6V across them before they give any significant light out. You MUST use a series resistor, if you use more than one LED, add a resistor in series with each LED then wire the LED/resistor combinations in parallel. The resistor value should be (Battery voltage - Vf)/If in Ohms where Vf is the forward voltage of the LED and If is the forward current you choose. I would suggest you use about 0.01A (10mA) for the current. You can find Vf from the LED data sheet.

Brian.
 

Attachments

  • SP4425_SipexCorporation.pdf
    176.5 KB · Views: 112
The varying reading suggest it is a pulsed signal and what you see depends on exactly when the meter 'snapshots' to input to measure it. Seeing significantly higher readings makes me lean more toward this being an electroluminescent driver and not LED. It will still provide power to make an LED light up but will be heavily overloaded in doing so. EL backlights use high voltage but very low current, I think your LEDs are basically pulling the high voltage right down.

Look at the device in the datasheet I attached. It isn't the same device but I think it is similar, it might give you some ideas.

If you want a quick fix, at the expense of the display not being even lit and higher battery consumption, remove the inductor or the D256A to kill that part of the circuit and use LEDs directly across the battery supply via a resistor. I'm not sure what the battery voltage is supposed to be but bear in mind that some white LEDs need as much as 3.6V across them before they give any significant light out. You MUST use a series resistor, if you use more than one LED, add a resistor in series with each LED then wire the LED/resistor combinations in parallel. The resistor value should be (Battery voltage - Vf)/If in Ohms where Vf is the forward voltage of the LED and If is the forward current you choose. I would suggest you use about 0.01A (10mA) for the current. You can find Vf from the LED data sheet.

Brian.


I found out that(D256A) IC is lm2703 (a DC step-up) and It controls voltage of leds automatically (?).
I measured the current through leds and it's almost 0.9Amps! my new leds turned blue:/
Also now I'm sure that screen backlight is not EL and is produced by 3LEDs
--as schematics shows there's a schottky diode limiting current in the circuit, is it possible that my diode is faulty causing 0.9A current each time?
forward current for this diode is 350mA in datasheet.
IMG_20200207_010610.pngIMG_20200207_010648.png
 
Last edited:

Hi,

The schottky diode is not for current limiting.
It is part of every usual boost SMPS circuit ... and acts like some kind of rectifier.
Klaus
 
Hi,

The schottky diode is not for current limiting.
It is part of every usual boost SMPS circuit ... and acts like some kind of rectifier.
Klaus

Thanks, so what explains the high current in this circuit in your opinion ? what if I add resistor at input? (if I add resistor in series with LEDs They are cool but IC gets hot)
 

If it is actually a LM2703, considering its normal marking is 'S48B', it is unlikely to be wired in that configuration. You must understand that SMD markings are not unique, the same device from a different manufacturer might have a different number and the number could be shared with completely different devices.

If you look at the Texas Instruments data sheet for the LM2703, Fig. 17 it will show how it would be wired for driving LEDs. The schematic you show is for constant voltage output but LEDs need a constant current source. I will try to explain:

Like most diodes, LEDs need a small voltage across them to start them conducting, in the case of an LED, it is the point where light first starts to be visible and can be anywhere from about 1V up to 4V for a single device. When it reaches conduction point and LED will try to hold the voltage constant. In a linear device like a resistor, if you pass more current through it, the voltage across it increases proportionally, however in an LED, the voltage is pegged down and any attempt to pass more current only results in it more power being dissipated in it. To some degree this results in more light being emitted but beyond its capability to be brighter, it just produces more heat.

Example - connecting an LED directly across a 12V battery will make it try to pull the battery voltage down to say 2V and so much current flows the LED burns out.

The way we ensure the LED operates efficiently and within its ratings is to use a constant current source to power it. Constant current means just that, we decide how much the current should be (typically around 10mA for small LEDS) and the regulator circuit adjusts the voltage to maintain that current. If the current goes too high, the voltage is reduced, if too low, the voltage is increased. Doing it this way means the voltage across the LED, or maybe several LEDs in series, isn't critical, it adjusts to their demand which makes it ideal to cater for different batches or even types of LED during production.

If you look at Fig.17 in the data sheet you will see the LM2703 output voltage is produced across 'Cout' and applied to the top of the LEDs, this is the voltage that will be adjusted to keep the LED current constant. It senses the current by monitoring the voltage dropped across R2. As this is a resistor, the voltage will be proportional to the current flowing through it, and therefore flowing through the LEDs. By maintaining a constant voltage across R2, it ensures a constant current flows through the LEDs. Even if one or more LEDs were shorted out, the current in the remaining ones would stay the same because the supply voltage would be dropped.

What makes it difficult for us to help you is we don't know what any of the values are and how the LEDs are connected. This is where a schematic really helps but we appreciate they can be almost impossible to get hold of. Your problem seems to be that the LM2703 is producing too much voltage and hence too much LED current, making the IC and LEDS run too hot. The implication is it thinks the LED current is too low so it is trying to compensate by producing more output when it shouldn't be. That suggests the 'FB' pin isn't seeing sufficient voltage being dropped across R2. It could be the resistor itself but it is unusual for them to drop in value significantly, it could be a short across the resistor so no voltage is dropped across it or it could be the 'FB' input in the IC is faulty.

Brian.
 
The schottky diode is not for current limiting.
It is part of every usual boost SMPS circuit ... and acts like some kind of rectifier.
 

If it is actually a LM2703, considering its normal marking is 'S48B', it is unlikely to be wired in that configuration. You must understand that SMD markings are not unique, the same device from a different manufacturer might have a different number and the number could be shared with completely different devices.

If you look at the Texas Instruments data sheet for the LM2703, Fig. 17 it will show how it would be wired for driving LEDs. The schematic you show is for constant voltage output but LEDs need a constant current source. I will try to explain:

Like most diodes, LEDs need a small voltage across them to start them conducting, in the case of an LED, it is the point where light first starts to be visible and can be anywhere from about 1V up to 4V for a single device. When it reaches conduction point and LED will try to hold the voltage constant. In a linear device like a resistor, if you pass more current through it, the voltage across it increases proportionally, however in an LED, the voltage is pegged down and any attempt to pass more current only results in it more power being dissipated in it. To some degree this results in more light being emitted but beyond its capability to be brighter, it just produces more heat.

Example - connecting an LED directly across a 12V battery will make it try to pull the battery voltage down to say 2V and so much current flows the LED burns out.

The way we ensure the LED operates efficiently and within its ratings is to use a constant current source to power it. Constant current means just that, we decide how much the current should be (typically around 10mA for small LEDS) and the regulator circuit adjusts the voltage to maintain that current. If the current goes too high, the voltage is reduced, if too low, the voltage is increased. Doing it this way means the voltage across the LED, or maybe several LEDs in series, isn't critical, it adjusts to their demand which makes it ideal to cater for different batches or even types of LED during production.

If you look at Fig.17 in the data sheet you will see the LM2703 output voltage is produced across 'Cout' and applied to the top of the LEDs, this is the voltage that will be adjusted to keep the LED current constant. It senses the current by monitoring the voltage dropped across R2. As this is a resistor, the voltage will be proportional to the current flowing through it, and therefore flowing through the LEDs. By maintaining a constant voltage across R2, it ensures a constant current flows through the LEDs. Even if one or more LEDs were shorted out, the current in the remaining ones would stay the same because the supply voltage would be dropped.

What makes it difficult for us to help you is we don't know what any of the values are and how the LEDs are connected. This is where a schematic really helps but we appreciate they can be almost impossible to get hold of. Your problem seems to be that the LM2703 is producing too much voltage and hence too much LED current, making the IC and LEDS run too hot. The implication is it thinks the LED current is too low so it is trying to compensate by producing more output when it shouldn't be. That suggests the 'FB' pin isn't seeing sufficient voltage being dropped across R2. It could be the resistor itself but it is unusual for them to drop in value significantly, it could be a short across the resistor so no voltage is dropped across it or it could be the 'FB' input in the IC is faulty.

Brian.

Thanks for detailed answer! I got all the answers for my question)!
I took the resistors out and R2 was 1k and R1 is 10ohm, the inductor and schottky looks fine too, I also tried resistors with higher value (up to 100x)and they didn't change a thing. so this concludes that the FB input is not sensing the voltage drop and my ic is faulty ,i should look for replacement!
 

Hi,

One idea:

Is the original LED return path the same as your LED return path?
It may be that the designer used the LED return path as current feedback ...for the SMPS. Please check.

Klaus
 
Hi,

One idea:

Is the original LED return path the same as your LED return path?
It may be that the designer used the LED return path as current feedback ...for the SMPS. Please check.

Klaus

That was a wise answer :thumbup:
I wish you said it earlier, you're right I didn't connect the LEDs to correct path, cause lcd's flat cable is not easily accessible, I managed to connect negative leads to GND but they weren't supposed to be grounded!!
Then yesterday I connect(LED's neg) to R2(1k) (which is connected to FB pin) and LEDS light up perfectly fine now, I can adjust brightness but... screen is in always-on state!?and only dims after timeout (setting are OK, also I reset the device)
IMG_20200209_153908_983.jpg
 
Last edited:

Hi,

I wish you said it earlier, you're right I didn't connect the LEDs to correct path...
That was just guessing. And maybe I just had this idea only because I already used a switching converter the same way before.

@ all posters with similar problems:
Thus in many similar threads I recommend to give informations we can verify:
* Photos (as you did),
* self made schematics (as you did. Schematics from a datasheet are not that useful, because the show "how it should be" but not how it is in reality)
* wiring diagrams,
* pictures of the PCB layout..
They help to speed up finding the problem .... often , but not always.

Klaus
 
I cannot see the attachment. Please attach a valid file.
 

Status
Not open for further replies.

Similar threads

Part and Inventory Search

Welcome to EDABoard.com

Sponsor

Back
Top