Continue to Site

Welcome to EDAboard.com

Welcome to our site! EDAboard.com is an international Electronics Discussion Forum focused on EDA software, circuits, schematics, books, theory, papers, asic, pld, 8051, DSP, Network, RF, Analog Design, PCB, Service Manuals... and a whole lot more! To participate you need to register. Registration is free. Click here to register now.

how to design transmitter circuit Ma40s4s ultrasound

Status
Not open for further replies.

hoalieuo

Newbie level 2
Joined
Oct 28, 2016
Messages
2
Helped
0
Reputation
0
Reaction score
0
Trophy points
1
Activity points
25
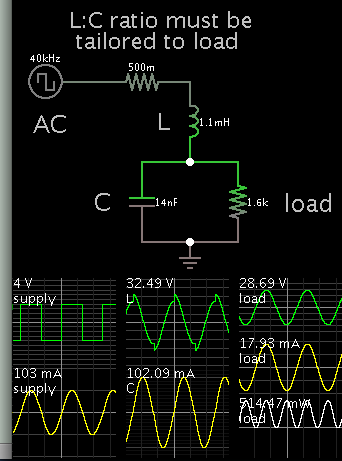
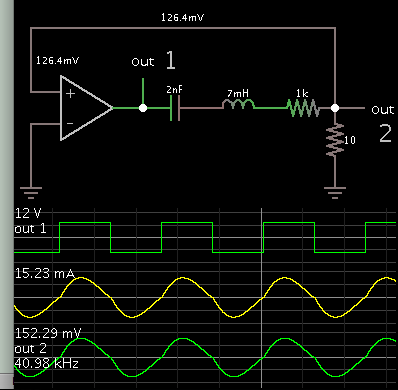
I want to generate a pulse that have frequency 40khz and amplitude 20VPP to MA40s4s ultrasonic sensor operate. I use raspberry to generate pulse 40khz-5Vpp then using a IC CD4049BE to boost it into 20vpp as in the below figure. I have encountered the problems is that when i not insert sensor into circuit is waveform is very good ( as the left figure) but when i insert sensor, waveform is noised as in figure (as the right figure). I have doubt about matching for ultrasonic so I using a vary resistor 500kohm replace R9 in the circuit to change output impedance but everything still not change. Please give me how to resolve this problem.

CD4096_schematic.png

e17wM.jpg
 

The CMOS logic gate familly has a quite low output current capacity, which also varies a lot with temperature. I would recommend you consider using TTL logic gates, instead; just to try.
 

Using a pair of NPN and PNP transistors as complementary voltage follower for each channel is a better idea.
 

With an input that is 20v p-p the peak current in the sensor is only 6.25mA which is fine for the "high output current" CD4049 paralleled buffers that will have a pretty darn high supply voltage (maybe 22V?).
Why operate the sensor and buffers at their absolute maximum voltages?

Your waveform is fine and will make no difference if it is cleaned up.
 
In case you care to experiment, this interesting LC arrangement boosts low voltage AC to a much higher amplitude. Thus you do not need a 20V peak supply. (That is, theoretically in simulation.) You can start with square waves and end up with a sinewave across the load, thanks to the narrow bandpass filter effect.

1467054600_1477723289.png


Values must be carefully adjusted.
LC resonance must match supply frequency.
LC ratio is crucial if you want maximum boost.
This may even work by applying pulsed DC, as from a 555 IC.

Notice that the 0.5 ohm resistor is not necessary. It represents some amount of parasitic resistance in the supply.
thanks BradtheRad, I am using raspberry pi to generate 40khz pulse, transducer can operate at 16vpp. How can I combine between your method with my circuit ? because in transducer have a capacitor 2.5nF, it can is cause of this problem?
 

Have to agree with Audioguru. The dual parallel 4049 bridge circuit is also given in the Murata application notes, it's a useful solution for most applications with separate transmitter and receiver. The transducer only transmits the fundamental wave, distortions of the square wave are completely irrelevant. What matters is the fundamental magnitude and, if you targeting maximal bandwidth, also the transmitter impedance.
 

thanks BradtheRad, I am using raspberry pi to generate 40khz pulse, transducer can operate at 16vpp. How can I combine between your method with my circuit ? because in transducer have a capacitor 2.5nF, it can is cause of this problem?

My simple LC circuit cannot be used, since there are several frequencies entering the picture:
a) LC resonant frequency
b) frequency of your driving oscillator
c) resonant frequency of the ultrasonic transducer.

I just tested my ultrasonic transducer. I find its resistance is too great for my ohmmeter to measure. It cannot be considered to be a resistive load. If it were resistive then it would be a passive component, easier to work with. Instead however it creates its own reactive behavior within a circuit. This makes it more difficult to work with.

I believe you need an oscillator which detects the transducer resonant frequency, and automatically drives it at that frequency.
 

Sample method to detect LC resonant frequency. Op amp changes state when a zero crossing occurs. Thus it automatically oscillates the LC at its resonant frequency.

1578838400_1477800742.png


The above schematic is only a concept. It could be the basis of a control section, to drive a half-bridge (see post #3), or a full H-bridge.
 

The capacitance specification of MA40S and similar transducers is for 1 kHz and doesn't describe the impedance around 40 kHz.

The actual transducer impedance can be expected to show series and parallel resonances, similar to the curve shown in this old thread about ultrasonic power transducers https://www.edaboard.com/threads/213634/

Calculating a series inductor based on the transducer capacitance specified in datasheet most likely doesn't result in a suitable matching.

I recently determined the real impedance of a Murata MA40E7 transducer in series resonance around 350 ohms.
 

Status
Not open for further replies.

Similar threads

Part and Inventory Search

Welcome to EDABoard.com

Sponsor

Back
Top