Continue to Site

Welcome to EDAboard.com

Welcome to our site! EDAboard.com is an international Electronics Discussion Forum focused on EDA software, circuits, schematics, books, theory, papers, asic, pld, 8051, DSP, Network, RF, Analog Design, PCB, Service Manuals... and a whole lot more! To participate you need to register. Registration is free. Click here to register now.

Vintage Elka Reverb III

Status
Not open for further replies.

waltom

Newbie level 4
Joined
Jul 5, 2016
Messages
5
Helped
0
Reputation
0
Reaction score
0
Trophy points
1
Activity points
50
Hi,

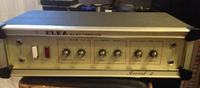
recently I bought the vintage Elka Reverb effect III. Unfortynately there's no documentation on the internet, no schematics, nothing...

I bought it without a pedal that activates the individual sections: REVERB / VIBRATO / FUZZ

By trying different combinations (by connecting the pins in the back socket) I managed to run VIBRATO, FUZZ and BYPASS. But I can not figure out what combination turns on REVERB.

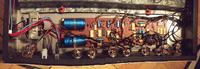
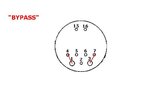
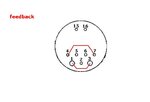
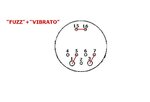
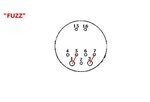
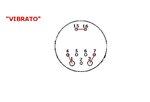
Below you can find photo of "guts" with the description where every PIN is connected on board. I send also photos of combinations of connections, which turns on bypass, vibrato, fuzz and some kind of un-controlled feedback.
Whether on the basis of this information could someone who is the subject of audio write what combination should TURN ON REVERB?

If nothing is connected to the socket, you can hear the reverb, but the signal is sooooo quiet.
With the combination "vibrato" "fuzz" "bypass" the signal is loud (normal) but there is no reverb.

PIN OUT is:
1 - two wires are soldered to this pin. First goes to the TIP of INPUT JACK, the other goes to the board
2 - grounding
3 - to the board,
4 - to the board,
5 - to the board,
6 - grounding
7 - goes to the TIP of OUTPUT JACK,
15 - to the board,
16 - to the board.


Thanks in advance for your help:)
Regards,
Tomek
 

Attachments

  • BYPASS.JPG
    BYPASS.JPG
    20 KB · Views: 213
  • FEEDBACK.JPG
    FEEDBACK.JPG
    20.4 KB · Views: 220
  • FUZZ VIBRATO.JPG
    FUZZ VIBRATO.JPG
    21.3 KB · Views: 201
  • FUZZ.JPG
    FUZZ.JPG
    19.4 KB · Views: 204
  • VIBRATO.JPG
    VIBRATO.JPG
    20.2 KB · Views: 212
Last edited by a moderator:

If nothing is connected to the socket, you can hear the reverb, but the signal is sooooo quiet.

This suggests the reverb is continually active. You just need to locate its output, and amplify it. Did you try probing various points? You might discover the reverb output.

Check a contact with a DC voltmeter before you send it to your amplifier. Or, attach a capacitor in series to your probe, so that you do not expose your amplifier to strong DC.

There is more than one way to generate reverb. Looking at your photo, it does not appear to be a spring unit or plate unit. Perhaps it is digital reverb? It is created in an IC such as the one on your board. What is the number printed on the IC?
 

I try to remember when Philips stopped to make capacitors. Is it 20 years? Or more? Looking at the metal sheet edge visible above the PCB, is it that even the reverb unit is homemade?

Why I'm mentioning this points? Despite of the "printed" front panel, the effect looks like a DIY singleton. And it's apparently aged. Besides any kind of defect, also non-functional design should be considered. You need to understand the circuit function (e.g. draw a complete schematic) to check for possible faults.
 

Hi BradtheRad,
thank you for reply!!! :)

Did you try probing various points?
Yup. I've tried all the possible combination of point to point, and combination of point to point + point to point. Maybe there're should be combination of 3pts to 3pts

Looking at your photo, it does not appear to be a spring unit or plate unit.
It is 100% spring reverb. It is hidden in metal housing. When you knock on the sides of the housing it does make loud spring noise.

What is the number printed on the IC?
It is: F U6A7739393 and below that number is 7144

Kind regards,
Tomasz
 

Hi FvM,
thanks for replying:)

is it that even the reverb unit is homemade?
No, it's not home made. I found exaclty the same model on Italian ebay-like auction site. This man who sells the effect has the pedal!!! I've asked him if he could send me photos of the interior of the pedal, and than I would make my own, but he didn't answer my question:/
Also I've contacted with company who bought the Italian GEM/LEM/ELKA. They replied that there were only less than 500 items made of this Reverb III in late 60' and no schematics remained :(

All the best,
Tomasz
 

Most likely the previous owner noticed the unit starting to go bad, so he stored it in the closet, lost the pedal, etc. Finally he sold it for a low price.

You need to find the input and output of the reverb. Build accessory circuits, as described in this recent thread:

https://www.edaboard.com/threads/349310/
 
  • Like
Reactions: waltom

    waltom

    Points: 2
    Helpful Answer Positive Rating
BradtheRad - I think that the situation might have looked just as you've described it :) Especially that I bought it for less than 40$ :)
The Vibrato and the Fuzz sounds great so that's quite interesting idea to build the independent circuit for the existing reverb! :)
Thanks for the link! At first glance it seems helpfull.

Kind regards,
Tomasz
 

A common observation is that capacitors can go bad after 50 years. You say the reverb is audible only if everything else is quiet. Suppose a capacitor which carries signal has developed high impedance? Then only tiny signal gets through.

For this reason many technicians have a policy to replace all capacitors on an old defective board, just to save time troubleshooting.

Perhaps the bottleneck is: (a) a faulty amplifier sends a weak signal to the spring reverb, or (b) a strong signal is reaching the springs, but the output is weakened by a faulty amplifier.

The plain and simple method to track down a signal is just by touching a wire to likely spots, and listening through an amplified speaker. However this is tricky because of the risk of ruining components in the path. Plain headphones can assist. However a strong signal (or power supply) can ruin your headphones. Consider touching spots with an input lead to an amplified speaker. But you don't want to ruin that either. Add a capacitor in series (say .1 to 1 uF). Check proper DC polarity with a voltmeter.

As an audio source, play a radio into the unit.
 

Thank you very much for those tips! I'll surely will try to make the connections as you've suggested! :)

I send some better pics.

BOARD.jpg

1.JPG

2.JPG

3.JPG

4.JPG
 

First check the power supply voltage (s), 12V?, 9 V? . .
The potentiometers are a weak point, spray them with switch cleaner and give them a work out. WD-40 will do at a pinch.
Try operating the reverb ones can you hear any crackle? If no then you have an open circuit in that part of the circuit. I would either get a 10 MF 50VW cap and bridge every cap in turn (polarity!) holding the leads on or inject an audio tone via a .1 MF cap each side of any electrolyic capacitors, you may find an open circuit cap this way, or at least a non functioning amplifier. Failing a audio generator try wiring a 10K to one of the mains trans former SECONDARIES, then your ,1 MF cap, you will hear a buzz as you go through the circuit.
Frank
 

The IC appears to be a house numbered device.
Most likely it is a quad opamp.

Quad opamps like the popular TL074 had Vcc+ on pin 4 and Vcc- on pin 11. With a multimeter, measure the voltage from those pins to ground (any shield may do).

However, your board may be older than that. In that case, most likely the opamp was a RC4136, very popular audio-grade opamp. In this instance Vcc+ is at pin 11 and Vcc- at pin 7.
 

Is the return transducer partially shorted out in the spring tank? Have you checked the DCR, and the signal output of the tank?
 

Status
Not open for further replies.

Similar threads

Part and Inventory Search

Welcome to EDABoard.com

Sponsor

Back
Top