Continue to Site

Welcome to EDAboard.com

Welcome to our site! EDAboard.com is an international Electronics Discussion Forum focused on EDA software, circuits, schematics, books, theory, papers, asic, pld, 8051, DSP, Network, RF, Analog Design, PCB, Service Manuals... and a whole lot more! To participate you need to register. Registration is free. Click here to register now.

wireless communication with PIC24f and MRF24WB0MA

Status
Not open for further replies.
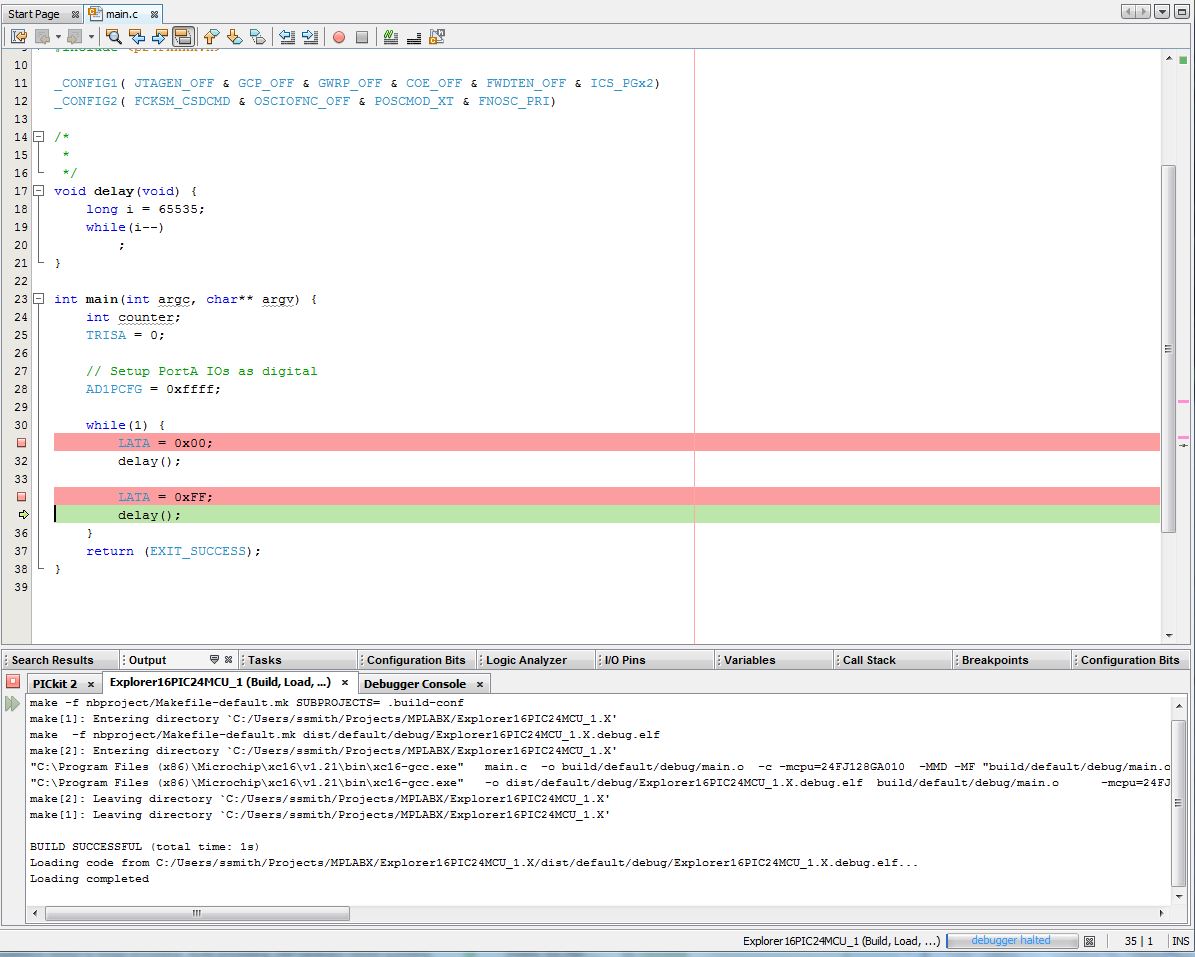
that is mean that I can directly test the communication module with my cmd without using a java code by running:
Code:
set wlan h localWiFi
set wlan p password...
and even view my parameter sending by RN171 just if my pc has a wireless communication?
 

you need to run a server program on the PC - this can be written in C, C++, Java, etc

the RN171 then joins the local WiFi network, sets up the IP address and port and sends data
e.g. this sets up the network SSID and password, joins the network, sets up the IP (192.168.1.11) and port (999) that the server is listening on, exits command mode and sends a message
Code:
set wlan host wifissid
AOK
<4.00>
set wlan pass password
AOK
<4.00>
join
Auto-Assoc horace1 chan=1 mode=WPA2 SCAN OK
<4.00>
Joining horace1 now..
Associated!
DHCP: Start
DHCP in 2136ms, lease=86400s
IF=UP
DHCP=ON
IP=192.168.1.17:888
NM=255.255.255.0
GW=192.168.1.1
set ip host 192.168.1.11
AOK
<4.00>
set ip remote 999
AOK
<4.00>
set ip local 888
AOK
<4.00>
exit
EXIT
hello UDP server

the server is waiting on UDP port 999 to receive data, e.g.
UDPserver.jpg
 
  • Like
Reactions: ings

    ings

    Points: 2
    Helpful Answer Positive Rating
so i can test my wirelles communication between pic24f and PC without using another RN171 with pc and using the local wireless cmmunication in pc and execute the commaand in pc and seeing what my server (PC) received like information
 

so i can test my wirelles communication between pic24f and PC without using another RN171 with pc and using the local wireless cmmunication in pc and execute the commaand in pc and seeing what my server (PC) received like information
yes, you don't need a second RN171
you can connect to your local Wireless network and run a server on a PC to receive data, e.g. the code the UDP server
Code:
// simple UDP server waiting for datagrams and extracting a string

import java.io.*;
import java.util.*;
import java.net.*;

public class UDPserver extends Thread
{
public static void main(String args[])
{
        int receivePort=999;                                                                                        // port to receive datagrams from
        InetAddress remoteIPaddress;                                    // IP address of remote host
        int remotePort;                                                 // port on remote host to send frames too
        byte[] buffer = new byte[65507];                                // array to put datagrams in
        DatagramPacket dp = new DatagramPacket(buffer, buffer.length);  // create packet for datagrams
        try
              {
              // open DatagramSocket to receive and a DatagramePacket to hold the datagrams
              DatagramSocket ds = new DatagramSocket(receivePort);
              // loop forever reading datagrams from the DatagramSocket
              while (true)
                {
                 ds.receive(dp);                                         // wait for next datagram
                 byte[] data = dp.getData();                             // get datagram contents
                 String s = new String(data, 0, dp.getLength());         // create a string from the data
                 System.out.println("\nFrom IP " + dp.getAddress() + " UDP string received " + s + "\n");
                }
              }
        catch (IOException se) {System.err.println("error " + se);}
        System.exit(1);                                                 // exit on failure
}
}
 
  • Like
Reactions: ings

    ings

    Points: 2
    Helpful Answer Positive Rating
ah ok thank you very much for your help and for all the time that you have given me to answer for all my questions :)
 

Hello,
please i have another questions about this project wifly_pass_thru_demo_exp16_p24 :
1. In the file console.c there are these functions:
a. putssconsole //send a null terminated string to the UART2 serial port
b. * getconsole // is to verify that no more data to be transmitted ??
2. the file switch.c for example for explorer16 board the switches already exist but in case what i must relaize my own card I must construct the switchs??
3. in wiflydrive.c : he is interested to initiaiser UART1 and it is the same function that it has already exist in ​​console.c ; just the difference is that with UART1; so can I known what is the difference between UART1 and UART2??
then getwifly,putWiFly, putsWiFly, getsnWiFly are never used in the project so what's the utility of these functions??
Thanks in advance
 

Hello,
please i have another questions about this project wifly_pass_thru_demo_exp16_p24 :
1. In the file console.c there are these functions:
a. putssconsole //send a null terminated string to the UART2 serial port
b. * getconsole // is to verify that no more data to be transmitted ??
in the lib subdirectory the .c files are general purpose functions that the project may make use of
Code:
char getConsole(void)   reads a single character from the serial 
char *getsnConsole(char *s, uint16_t len)  reads a string of characters
line
neither of these functions (and some others) are used in this project
in this pass-thru project characters received from UART2 are transmitted to UART1 in the interrupt service routiine
Code:
  U1TXREG = U2RXREG;        // console Rx --> wifly Tx
you will need to modify this for your project
2. the file switch.c for example for explorer16 board the switches already exist but in case what i must relaize my own card I must construct the switchs??
if your project has switches replace the explorer code 16 ones else remove the code
3. in wiflydrive.c : he is interested to initiaiser UART1 and it is the same function that it has already exist in ​​console.c ; just the difference is that with UART1; so can I known what is the difference between UART1 and UART2??
then getwifly,putWiFly, putsWiFly, getsnWiFly are never used in the project so what's the utility of these functions??
Thanks in advance
they are general functions available for use in end users projects
in this pass-thru project characters received from UART1 are transmitted to UART2 in the interrupt service routine
Code:
/*** Interrupt Service routine for UART1 RX ******************************/
void __attribute__ ((interrupt,no_auto_psv)) _U1RXInterrupt(void)
{
  IFS0bits.U1RXIF = 0;      // Clear the interrupt status of UART1 RX
  while(!U1STAbits.URXDA);

  while (U1STAbits.UTXBF);  // wait while Tx buffer full
  U2TXREG = U1RXREG;        // wifly Rx --> console Tx
}
you will need to modify this for your project

you use Microchips example project like templates - delete any code that is not applicable to your project and add extra code as required

at least you know you start with something that works (in most cases Microchip's project do) and you can adapt them as required.
Save starting from nothing!
 
Last edited:
  • Like
Reactions: ings

    ings

    Points: 2
    Helpful Answer Positive Rating
hello plz i have some question about of my hardware architecture, in my case i would like to send the temperaure value of the room to my pc so i choose this mateial :
Explorer16+RN171 developement kit+ the sensor and this condtionnement circuit of my sensor
Explorer16 : https://fr.farnell.com/microchip/dm240001/kit-picdem-pic24-dspic33-exploreur/dp/1146554
RN171 developement kit : https://fr.farnell.com/microchip/rn-171-ek/kit-d-eval-pour-embedded-wifi-conn/dp/2281722
but i think that i m tromped of the choise of R171 developpement kit because i need this one **broken link removed**
or i can test with the first one but this second is easy to connct with explorer 16
and plz if i need another circuit to my project tell me about this circuit.
2. the link between RN171 and pic24f(explorer16) is with the UART not SPI?
thanks in advance
 

the MICROCHIP - RN-171-EK is a stand alone kit which connects to a PC via USB
https://uk.farnell.com/microchip/rn...ifi-conn/dp/2281722?Ntt=MICROCHIP+-+RN-171-EK

I have not used one so cannot advise on ease of use

I have used an Explorer 16
https://fr.farnell.com/microchip/dm240001/kit-picdem-pic24-dspic33-exploreur/dp/1146554

with a MICROCHIP - RN-171-PICTAIL (connected via the UART)
**broken link removed**

works OK - I can connect to my WiFi and talk to remote TCP and UDP server

the Explorer 16 has an onboard temperature sensor, see section 2.2.4 of the user manual
https://ww1.microchip.com/downloads/en/DeviceDoc/50001589b.pdf
 
  • Like
Reactions: ings

    ings

    Points: 2
    Helpful Answer Positive Rating
and you have using a programmer to send your code to the explorere 16 board (icd3)
 

and you have using a programmer to send your code to the explorere 16 board (icd3)
yes, at the moment I used a Real ICE but in the past have used an ICD2 and an ICD3
I would assume a PICKIT3 would work but worth checking documentation
 
  • Like
Reactions: ings

    ings

    Points: 2
    Helpful Answer Positive Rating
i cant directly send my prrojec to explorer16 board if i select
new project ->select tool
and i select microship started kit like this :kit.png
or with explorer 16 it is not true because explor 16 not a started kit ??
 

the explorer 16 is not a starter kit with its own programmer
it needs an external programmer such as an ICD3

- - - Updated - - -

the explorer 16 is not a starter kit with its own programmer
it needs an external programmer such as an ICD3

the rn171 has on board analogue sensors, see section 4.9 of the WiFi command manual
http://ww1.microchip.com/downloads/en/DeviceDoc/50002230A.pdf

the RN-171 evel kit could be a possible solution
http://uk.farnell.com/microchip/rn-171-ek/eval-kit-for-embedded-wifi-conn/dp/2281722?Ntt=MICROCHIP+-+RN-171-EK

cheaper than an explorer 16 and rn171 pictal but not as flexible
 
  • Like
Reactions: ings

    ings

    Points: 2
    Helpful Answer Positive Rating
yes, at the moment I used a Real ICE but in the past have used an ICD2 and an ICD3
I would assume a PICKIT3 would work but worth checking documentation

just checked with a Pickit 3 - it programs the explorer 16 OK
it should also work with a Pickit 2
 
Last edited:
  • Like
Reactions: ings

    ings

    Points: 2
    Helpful Answer Positive Rating
I thought I should also mention the PIC18F4550 onboard the Explorer 16 can be programmed with PICkit 2 firmware, alleviating the need for and external programmer/debugger. I have test this modification and it seems to work fine for both programming and debugging.

Of course, you will still need an external programmer to initially program the PICkit 2 firmware into the onboard PIC18F4550.

**broken link removed**


BigDog
 

I thought I should also mention the PIC18F4550 onboard the Explorer 16 can be programmed with PICkit 2 firmware, alleviating the need for and external programmer/debugger. I have test this modification and it seems to work fine for both programming and debugging.

BigDog
I never managed to get the onboard PIC18 programmer to work on the Explorer 16 - talked to various people at Microchip and in the end was advised that it did not work - gave up and used an ICD2
this was 5 or 6 years ago so I assume the firmware has come out since then
 

I've loaded the PICkit firmware on several versions of the Explorer 16, I have six units, and I haven't had any issues they all seem to work fine.

Although, I still use a Real ICE or ICD3 when developing an app.


BigDog

- - - Updated - - -

Update: I realized it had been quite some time since I tested the PICkit 2 firmware, so I just did so on a Windows 7 platform running the latest MPLABX version and the XC16 compiler. I had no issues programming or debugging the Explorer 16 using the PICkit 2 firmware. Windows 7 recognized and loaded the PICkit 2 driver and MPLABX allowed the selection of PICkit 2 for both programming and debugging.
 

Update: I realized it had been quite some time since I tested the PICkit 2 firmware, so I just did so on a Windows 7 platform running the latest MPLABX version and the XC16 compiler. I had no issues programming or debugging the Explorer 16 using the PICkit 2 firmware. Windows 7 recognized and loaded the PICkit 2 driver and MPLABX allowed the selection of PICkit 2 for both programming and debugging.

loaded the firmware into an Explorer 16
PMLAB found the Pickit 2 driver and I loaded a program into a PIC24FJ128GA010 OK
seems a bit temperamental - it lost the PIC24 andI had to Programmer > Connect to get it back
Code:
Programming Target (08/11/2014  08:32:27)
PIC24FJ128GA010 found (Rev 0x3002)
Erasing Target
Programming Program Memory (0x0 - 0x10FF)
   (Using Programming Executive)
Verifying Program Memory (0x0 - 0x10FF)
   (Using Programming Executive)
Programming Configuration Memory
Verifying Configuration Memory
PICkit 2 Ready

Programming Target (08/11/2014  08:35:30)
PKWarn0003: Unexpected device ID:  Please verify that a PIC24FJ128GA010 is correctly installed in the application.  (Expected ID = 0x40D0000, ID Read = 0xFF800000)
Erasing Target
Programming Program Memory (0x0 - 0x10FF)
   PE Error: Using ICSP
Verifying Program Memory (0x0 - 0x10FF)
   PE Error: Using ICSP
PK2Error0027:  Failed verify (Address = 0x0 - Expected Value 0x40200 - Value Read 0xA600)
PICkit 2 Ready
 

Not sure what the issue is at your end.

Have you ensured the defaults are changed to use the PICkit2 driver? Otherwise, MPLABX will attempt to revert back to using either the Real ICE or ICD3 driver.

I also changed the PICkit2 settings to "3-State on 'Release on Reset'" all other settings are the default.

The following screen captures were done with the MPLABX Explorer16 Example Code.

Make & Program Device:


Debug Device:


I also test the PICkit2 firmware with two other versions of the Explorer16 board.


BigDog
 

tried with a different Explorer 16 board with a PIC24FJ256GB110 using MPLABX
pickit2.jpg
works fine, select Run > Run Rroject and it builds, loads and runs without any problems (assuming of course no errors in the code itself)

the PICkit 2 (and Pickit3) also have the advantage that one does not have to use the MPLAB driver switcher when switching bewteen MPLAB and MPLABX
 

Status
Not open for further replies.

Part and Inventory Search

Welcome to EDABoard.com

Sponsor

Back
Top