Continue to Site

Welcome to EDAboard.com

Welcome to our site! EDAboard.com is an international Electronics Discussion Forum focused on EDA software, circuits, schematics, books, theory, papers, asic, pld, 8051, DSP, Network, RF, Analog Design, PCB, Service Manuals... and a whole lot more! To participate you need to register. Registration is free. Click here to register now.

[Moved] Configuring Atmega32 Ports as output

Status
Not open for further replies.

ark5230

Advanced Member level 3
Joined
Jun 29, 2009
Messages
862
Helped
163
Reputation
324
Reaction score
140
Trophy points
1,323
Location
India
Activity points
6,187
I am using Atmega32 and Port C and Port D are being used as output.
It was not functioning as expected. I found from data sheet that these port pins (Not all of them) are preconfigured. It has to be set through Fuse bit may be including Calibration !!
I am attaching the code as well.
The question is that what fuse bits are to be set so that :
1. I can use Port B as input and C and D as output port
2. External crystal attached is used as actual frequecy not the internal.
Any advise will be of great help as I am not expert at AVR and C.

Code:
#include <util/delay.h>
#include <avr/io.h>
#include <util/delay_basic.h>

void Onems(uint8_t delay)
{
	//One ms delay times
	uint8_t i,j;
	for(i=0;i<delay;i++)
	{
		for(j=0;j<10;j++)
		{
		_delay_loop_1(32);
		}
	}
}

int main()
{

	DDRB=0B00000000;  // all bit and b4 as INPUT
	DDRC=0B11111111;  // all bit and b4 as OUTPUT
	DDRD=0B11111111;  // all bit and b4 as OUTPUT
	while(1)
	{
	PORTC=0b11111111; 
	PORTD=0b11111111; 
	Onems(250);
	PORTC=0b11111111; 
	PORTD=0b11111111;
	}
}
 

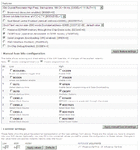
This fuse calculator can help you set the clock source correctly https://www.engbedded.com/fusecalc

PORTB and PORTD can be set directly in your code but in PORTC bits 2,3,4,5 are set as JTAG by default so to use them as I/O you have to disable the JTAGEN fuse

Alex
 
PORTB and PORTD can be set directly in your code but in PORTC bits 2,3,4,5 are set as JTAG by default so to use them as I/O you have to disable the JTAGEN fuse
Can you please guide how to disable JTAG in C, I am using AVR Studio.
Thanks for the appropriate and useful link.
I am trying to digest the content.
It speakes in terms of low and high frequency crystal. I am using external 8 MHz crystal with two 33 pf condensers.
 
Last edited:

Your capacitor value is high, the recommended values are 12-22pF

Use CKOPT=0
CKSEL3,2,1,0 = 1
JTAGEN=1;

You can only disable the JTAG fuse from the programmer, not your C code

- - - Updated - - -

By the way , delay.h has a few functions based on delay_basic.h so delay_basic.h is already included when you include delay.h, there is no need to include them both and there is no need to define your own delay.

There are two very delay functions in delay.h
Code:
_delay_ms();
_delay_us();

As long as the cpu frequency is defined (8000000 in your case ) these work correctly

https://www.nongnu.org/avr-libc/user-manual/group__util__delay.html

Code:
_delay_ms(250); // gives 250ms delay

Alex
 
Is there need to set the calibration part !
Screenshot1.png


Yes that delay part I found to be effective and very useful, I am going to use that as you suggested. I am using this funny delay because my mcu was running at 1 MHz internal clock by default whihc I noticed earlier but came to know more about it now from data sheet that by default internal clock is used which is to be configured as you have shown.

Are the follwoing settings OK !
Screenshot2.png

You and this forum taught me many things.
 
Last edited:

No the calibration is only used for internal RC

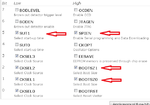
Checked means 0 and unchecked means 1.
If you want to set the clock to external crystal then you should use
CKOPT=0
CKSEL3,2,1,0 = 1
SUT1,0 = 1
JTAGEN=1;

1 means unchecked checkboxes

- - - Updated - - -

This is what I say

Snap1.gif
 
Thanks a log it is great help for me.
I learned a lot here, which othrwise would have been very difficult.
 

Status
Not open for further replies.

Similar threads

Part and Inventory Search

Welcome to EDABoard.com

Sponsor

Back
Top