Continue to Site

Welcome to EDAboard.com

Welcome to our site! EDAboard.com is an international Electronics Discussion Forum focused on EDA software, circuits, schematics, books, theory, papers, asic, pld, 8051, DSP, Network, RF, Analog Design, PCB, Service Manuals... and a whole lot more! To participate you need to register. Registration is free. Click here to register now.

Will My Current Source Work?

Status
Not open for further replies.

joshmnky

Newbie level 2
Joined
Jul 12, 2013
Messages
2
Helped
0
Reputation
0
Reaction score
0
Trophy points
1
Activity points
20
First off, I have no experience making circuits. I burned through a Sunday, morning to night, to try and understand power supplies enough to get this far.
My question is whether or not the circuit shown below will work. The purpose is to serve as a cheap programmable current source for electroforming, which will require 1-10 amps depending on how big the part is. This schematic shows the arduino acting as an ammeter with the help of a differentiating op amp. I have a relay before the load so I can switch the current direction intermittently (makes crystal structure finer and less porous).
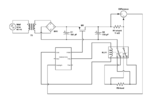
current-source-2.png

Any obvious flaws? Am I missing huge concepts? Easier ways of doing things?
 

Hello,

At a top level the circuit looks like a good start. There are some items that need attention, mainly related to grounds and voltages.

The MOSFET will be on (low Rds) when its gate to source is in the range of 2-3Vdc. In your circuit with just a glance it is difficult to say what Vs is on M1 since there is no ground return for this portion of the circuit.

If you attach the - pin of BR1 to ground we will have a reference to work from.
The Arduino can work off of 5to 5.5V (6 is absolute max) so you can count on the PWM switching from near 0 to near 5V. For this to work for the MOSFET you want to reposition M1 with the source connected to R1 which is then connected to ground. This way the gate (Vgs) will toggle from 0 to 5V assuring a hard off and a low Rds (and therefore minimum dissipation) when on. The drop across R1 will range from 1mv to 10 mv for 1A to 10A. This drop will raise Vsource of M1 by the 10mv. Given that you have a PWM of +5V and need +3V Vgs there is no harm done.

But (there is always a but) the ADC in the Arduino will only have 1mv to 10mv to work with. A larger value of R1 will increase the drop and provide more ADCs bit in the control loop. If R1 is .5V/10A = 50m and I^2 R is 5 watts. This is a fair trade. If you use the internal vref of 1.1V you will be using nearly 1/2 of the ADCs bit range. You may be able to use a small resistor, it comes down to the number of bits.

Notice in the suggested configuration R1 is connected to ground as is the Arduino. So the input to the analogin is a measure of voltage drop across R1. In your original schematic the analogin pin would have been undefined since there was not ground return. The line to analogin should have a cap else you will be measuring the current a specific time intervals over the PWM pulse. The cap will smooth the voltage closer to the average.

RLY1 is set since it is between the Ardino port (0-5V) and ground but finding a relay that can switch 10A with a coil limited to the 40ma drive of a I/O port. You may need a small MOSFET to drive the relay. If you go this way ground the source and connect the relay between the drain and +5 to +10V depending on the relay's needs. Note that once again the Ardiuno is driving the gate (Vgs) from 0V to +5 relative to its ground which is good. Be sure to place a diode (cathode to +V) across the relays coil to mitigate the voltage spike when the MOSFET suddenly turns off. The collapsing magnetic field would otherwise produce a damaging negative spike.

Questions?

Regards,

hms

- - - Updated - - -

I forgot to mention the output is from the drain of M1 and BR1 +. These two wires go to the relay contacts which are used to flip the polarity to the load. I would place a fuse in the line going to BR1.
 
It looks like school is back in session :-D You've really went above and beyond with the response, and it's a real boost for someone with such knowledge to say I'm on the right track. It's the start of a new weekend and you'd better believe I'm going to be all over this. Judging by how long it took me to read this I have quite a trek ahead of me in terms of understanding.

The positioning of the second mosfet to drive the relay is confusing me. You've mentioned BR1+, M1 drain, GND, and some +5 to +10V source. I think with the update you're saying to use the difference between BR1+ and M1 drain, but M1 drain varies. Would I just have to operate the current supply so that the difference stays within the relay's range? Please clarify.
 

Status
Not open for further replies.

Similar threads

Part and Inventory Search

Welcome to EDABoard.com

Sponsor

Back
Top