Continue to Site

Welcome to EDAboard.com

Welcome to our site! EDAboard.com is an international Electronics Discussion Forum focused on EDA software, circuits, schematics, books, theory, papers, asic, pld, 8051, DSP, Network, RF, Analog Design, PCB, Service Manuals... and a whole lot more! To participate you need to register. Registration is free. Click here to register now.

[SOLVED] SMPS Power Inverter with TL494,1404

Status
Not open for further replies.
Hi,
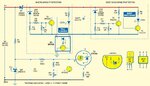
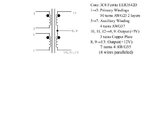
Here you go for one, though bit complicated but necessary:
**broken link removed**

And here is some software for designing the Ferrite trafo, may be helpful.

View attachment PIExpertSuiteSetup(2).exe
 
Thanks for your reply. very good information about Ferrite Core Transformer Design. what about 12 Volt Battery Charger Power Transistor and Diode and if there is any other complete Circuit Diagram of 12 Volt 10 Ampere Switch Mode Charger with Ferrite Core Transformer Turns Ratio and i also want to know about how i can identify that in which direction i have to start winding. i want complete information about attached file like gerber files with sizes of pcbs and power transistor and diode numbers and ferrite core transformer turns ratio and wire guage and also winding diagram from where i have to start and in which direction i have to start my winding.Actually i want to design a 12 Volt 10 Ampere Switch mode Battery Charger for 12 Volt 200 Ampere Battery which can charge Battery even Ac Input Voltage is low like Ac Input Voltage range is 100-250 V Ac. help me to design a such type of charger.
 

Attachments

  • 61_1322560942.gif
    61_1322560942.gif
    95.9 KB · Views: 458
Last edited:
Give me the model number of this inverter and I will try to get the Circuit Diagram for you. This is a Chinese origin inverter. Q1 and Q2 are special package transistors. I have one complete circuit of another inverter from the same category. I will try to locate the file on my PC and will upload here, if I get. :)
 
Dear the attached file is the 12 Volt and 20 Ampere Battery Charger and i have required the complete information to design this circuit like Ferrite Core Transformer Turns and how to wind this transformer means direction of windings. can u add me on skype my id is engrmunir1981 and you ar from PK so can u send me your mobile number it will be very helpful to me. i m from Karachi.
 
PCB by kg300 is in half bridge topology(2 transistors are in series),with TL494.
Its hard to get 10amp charge rate with 100v ac input.
Its better to search forward type battery charger,s schematic with UC3842 and single power mosfet like 7N90.
Also study schematic diagram of pc power supply,if you are willing to design a smps battery charger.
 
dear yes you are right. actually i studied the PC SMPS but i do not understand the Ferrite Core Transformer Design. do u have any complete 12 Volt /10 Ampere SMPS Circuit with detail information of Ferrite Core Transformer Design.
 
Munir
You can use this 3842 180watts forward converter. The design is very simple and efficient. All the details are provided including transformer windings and components value. I have made a 12volts 16amp p.supply with the help of this schematic using only 12volts winding and changing the value of variable resistor R18 from 1k to 3k and R19 from 2.2k to 8.2k for 12volts output connecting VR1 to 12volts as in diagram the tl431 is connected to +5volts. Transformer and high frequency output diodes were obtained from a damaged computer power supply. I used 21swg for primary and 18swg (6 wires parallel ) for secondary. Load and line regulation is great. The output was 12.3 with no load at 220volts input and when I put 17amp load on it the output was 12.25 and the input current was less than 1amp at 220volts. I then decreased input voltage to 140volts through variac and the output was still 12.25volts. I ran the p.supply with a load of 17 amps having input of 220volts for 2 hours. After 2 hours I checked the fet and output diodes ( mounted on normal heat sinks with a medium processor fan ). Fet was totally normal and output diodes were just Warm. P.supply is short circuit protected. You can use it for battery charging but remember you need 13.8-14.4volts for proper battery charging therefore use 8 turns instead of 7 for secondary winding. By adjusting VR1 you will get the required output.Anyone looking for a simple and high ampere p.supply can use it.
I hope this design meets your requirement. If you find it difficult to make then another very simple method is to convert a running computer p.supply into single 13.8-14.4volts 15-20amps. All you need is a good quality p-4 p.supply minimum 350watts using TL494 and LM339 ic only( you can not convert every computer p.supply )and make some modifications in the output stage for single 13.8-14.4volts. I have converted 3 supplies into single 14.4volts each capable of providing 20amps continuously without over heating. I used 2 of them for ups battery charging for 2 years and they worked fine without any problem. Here is the link ( http://www.qrp4u.de/docs/en/powersupply/ ).
 

Attachments

  • 3842 p.supply.pdf
    65.7 KB · Views: 1,584
Good idea.
Though we can increase output voltage with VR1 and adj pin of TL431.
But what is solution for charging current?

If someone urge to adjust battery charging current according to battery size.
 

Dear aamir
thanks for your reply and ckt i will assemble and then tell you.if any problem during designing then contact to you.
 

Pnbtr
If constant current charging is required according to battery size then one way is to use op-amps at the output of 3842 supply which will monitor the voltage difference across a resistance connected in series with battery and will keep that difference at constant point by changing the output voltage of supply through optocoupler thus maintaining the current at constant level independent of battery voltage. I have seen this technique in some chargers but haven't tried it yet. Another way is to use additional circuit with the above supply which will charge the battery at constant current. I have a schematic of constant current charger but didn't test it. I am attaching the schematic. If you make it then let me know about the performance.
Munir
I will try my best to help you but my reply may get late as I don't use internet regularly.
 

Attachments

  • constant-current-battery-charger-diagram.jpg
    constant-current-battery-charger-diagram.jpg
    235 KB · Views: 861
Dear Aamir
Thanks for your help. i will design it on after two days and then i will contact to you but only tell me one thing what is the core size of ferrite core transformer used in UC3842 schematic . tell me the core which is easily available in markeet or can i use PC Power Supply Transforemr core.I study the application note and the winding of transformer is as below and also see attached picture:
Core:3C8 Ferrite EER3542D
1 →3: Primary Windings
50 turns AWG23 2 layers
5 →7: Auxiliary Winding
4 turns AWG37
10, 11, 12 → 8, 9: Output (+5V)
3 turns Copper Plate
8, 9 →13: Output(+12V)
7 turns 4 AWG35
(4 wires paralleled)
But you tell in your post that you have used 21AWG in primary. so please
1- tell me that how many turns and is it single layer wire or with 2 layer wire.i mean how many turns you wind with 21AWG and what is the layer configuration.
2- for secondary you have used 18AWG wire with 6 wires parallel. what is the turns ratio.7 turns or 8 turns. i have required 14.4 volt for battery charging.
3- tell me the winding procedure.which winding is start first, then second and then third and so forth either primary or secondary.tell me the steps of winding the transformer.4- what about auxiliary winding. is it same as mention in attached diagram or different.in diagram there is only 4 turns of AWG37 with single layer. is it ok or not.
5- what about 5 volt winding. leave it or wind it.
6- Can i use PC Power Supply Ferrite Core Bobin and core for this winding or not.
Please Aamir Bhai send me the complete procedure for winding the transformer bcz i m new with ferrite core transformer. if you have pictures of your wind transforme with steps then it is very helpful for me.your help will be very greatful for me.i m waiting from your reply.
 

Attachments

  • Transformer Design.JPG
    Transformer Design.JPG
    16.7 KB · Views: 479
Last edited:
If constant current charging is required according to battery size then one way is to use op-amps at the output of 3842 supply which will monitor the voltage difference across a resistance connected in series with battery and will keep that difference at constant point by changing the output voltage of supply through optocoupler thus maintaining the current at constant level
Dear Aamir thanks,
As i understand that you are saying,i should use a current limiter resistance in series of battery bus bar.
And dropped voltage across both terminals of resistance,sensed with op-amp 358 and control charging current.
Its a good idea.
An additional revers polarity protection circuit, may also be preferable.
Can you upload photo of hardware assembled by you.
Because efficiency of smps depends upon parts placement(layout of pcb) and structure of main transformer(according to fair child note) provided by you.
 

Munir
I used 21swg because I already had that in stock. 23swg is ok and takes less space. Transformer was taken from damaged pc power supply. I will post the pics of transformer and complete supply soon. You need only 3 windings. Primary, secondary (14.4v) and auxiliary. All the windings are clockwise. Mark starting point of each winding as indicated by a dot in original schematic.
1- Start with primary winding which will be in 2 layers. Wind 25 turns of 23swg and wrap insulation paper/tape on 1st layer of primary which is important for protection and reliability. Don't cut the remaining wire.
2- On 1st layer of primary wind 8 turns of18swg (4 wires parallel) for 14.4v.Again use insulation.
3- Now wind the remaining 25 turns of primary upon secondary. Cut the remaining wire and use insulation paper/tape.
4- In the last use only 4 turns for auxiliary as it provides operating voltage for 3842. Use insulation on last winding and insert the core. Your transformer is ready.

Pnjbtr
I didn't have time for pcb designing so I made it on veroboard. I will post pics of complete p.supply soon.


Here are the pics.
 

Attachments

  • 5.jpg
    5.jpg
    102.5 KB · Views: 293
  • 4.jpg
    4.jpg
    157.1 KB · Views: 238
  • 3.jpg
    3.jpg
    105.8 KB · Views: 323
  • 2.jpg
    2.jpg
    430.3 KB · Views: 314
  • 1.jpg
    1.jpg
    348.2 KB · Views: 427
Last edited:
Dear Aamir well done.
Charger is ok.
Output short circuit protection is done with a 12v relay.
But we need enough volts in battery those can energize relay coil,to provide mains input to bridge rectifier.
I shall search a fet based reverse polarity and output short circuit protection schematic in my collection.
And upload soon.
Today i pull up a transformer from computer supply but that transformer have sticky adhesive liquid in it.
Can you describe how can we open it ?
 
Dear Aamir Bhai
Thanks for your reply. actually now a days i m busy when i have free time then i will assemble it and tell you. can i use any PC Power supply chopper transoformer.
Dear Pnjbtr
Did you complete this charger or not.if completed then u also send pictures.
 
I have Homage UPS which has developed fault of flickering every 12 seconds.Can any one provide schematic for Homage UPS.
 

Dear aamir,

Did you made the transformer by yourself? By the way, could you tell me why do you have 2 big capacitors in the input? Couldn't you use only one?

I notice that in power supplies from PC Desktop there are 2 capacitor too. Why?
 

Larger value capacitors have large ESR so Instead of one large capacitor, two or more lower value capacitors are used. which effectively reduce ESR being in parallel.
 

Question why is this circuit better than other?
Why should i invert the 12v into hv first then switch it to 230 v (and i cat see any filters for getting sine wave) why not switch 12v into up transformer ?
 

Question why is this circuit better than other?
Why should i invert the 12v into hv first then switch it to 230 v (and i cat see any filters for getting sine wave) why not switch 12v into up transformer ?

This circuit uses small size transformers, converting to HV first also improves regulation.
 

Status
Not open for further replies.

Similar threads

Part and Inventory Search

Welcome to EDABoard.com

Sponsor

Back
Top