Continue to Site

Welcome to EDAboard.com

Welcome to our site! EDAboard.com is an international Electronics Discussion Forum focused on EDA software, circuits, schematics, books, theory, papers, asic, pld, 8051, DSP, Network, RF, Analog Design, PCB, Service Manuals... and a whole lot more! To participate you need to register. Registration is free. Click here to register now.

can we use a 0 to 24 VDC power supply to control the clutch brake system ?

Status
Not open for further replies.
Pinch Roll : A component on a cradle uncoiler that assists uncoiling by pulling on the stock.

**broken link removed**

Nip Roll : one of a pair or set of rolls for squeezing materials (as in a wringer)

Nip rolls or pinch rolls are powered rolls that are used to press
two or more sheets together to form a laminated product.

Nip roller units can also be used as pullers for material being pulled off of rolls or being fed between operations.
Nip rolls are sometimes called laminating rolls, laminators, squeeze rolls, pinch rolls or even wringers.

Kak would you please design any circuit for me in this regard ???? I badly need this
 

Kak would you please design any circuit for me in this regard ???? I badly need this
 

can we use a 0 to 24 VDC power supply to control the clutch brake system ?

can we use a 0 to 24 VDC power supply to control the clutch brake system (magnetic) ?

i want to replace the tension controllers with power supply cards of 0 to 24 VDC (can vary with a pot.) ..... cause i want 0 to 24 VDC supply at the brake of a magnetic clutch brake system .......

THANx
The thread started with this issue !!
You may track other threads by dineshdeshmuk
Any one who is free may help him, he badly needs this.
 
As i wrote in my post #7 18.12.2011.

Do not count me in to this !

You don`t have any documents , any parameters , any system layout , .....nothing .
I don`t even know , what is your old failed device wiring to machine or even any data in schematic level .
And for new desingn all old device information for control signals and levels and control function are needed.

How can i do some improvements to your control system without exact knowledge about it ?
Need mass of documents.
And do it for free....No , thank you....

Cheapest way is repair the old system.
second way, find replacement device..
But still we need schematics of old device to replace it with new design or supply the equivalent device.

KAK
 
Last edited:
here are the images of that older circuit ..........

https://obrazki.elektroda.pl/28_1325708547.jpg
https://obrazki.elektroda.pl/65_1325708548.jpg
https://obrazki.elektroda.pl/29_1325708548.jpg
https://obrazki.elektroda.pl/73_1325708548.jpg
https://obrazki.elektroda.pl/41_1325708548.jpg
https://obrazki.elektroda.pl/70_1325709034.jpg
https://obrazki.elektroda.pl/89_1325709034.jpg
https://obrazki.elektroda.pl/55_1325709035.jpg

4 LM 317T connected in parallel to each other .......... mounted on the heat sink
from left first two connectors are of AC supply 24 V AC , next two are of pot (one for wiper + one side terminal & second for other side terminal) & next for DC output volts.
 
what's really wonderful & interesting ? do you wanna share with us
 

It is with reference to post 25 which is highly informative to me and too interesting. I have started working on it.

this circuit often gets warm up too hot and hence burnt out ...... how to change this circuit so that it works the same way but do not get burnt out ??
 

May be use of heat sink with higher radiating capability would help. Other alternative could be to use a higher current capability active component in place of existing one !!!

Raoof Khan
 
Do following.........
1. Change higher ampere rating diodes to rectifier bridge. ( Use 200V diodes minimum )
2. Add clamping diode to output 5...10A / 400V minimum
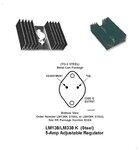
3. Change 317 regulators to LM338K Steel TO-3 regulators
https://www.ti.com/lit/ds/symlink/lm338.pdf
( Use 4 pcs of regulators ) (price about 7...8€ / pc )
4. Change heatsink , use at least 2 pcs and big ones, look picture.....

LM338K_RegIC_TO3.jpg

Ac voltage in card input should be 18...22Vac

If printed circuit had failed never, there is no need to change bridge diodes.
On the other hand 600V 35Amp fixed rectifier bridge is priced about 6...8 €.
 
Last edited:
thanks a lot for your precious & outstanding reply & for your most precious time ..........

would you provide any schematic so that i may able to construct the required circuitry ?

Cuz i don't know where to connect the clamping diode .......

Also, what are the dimensions of the heat sinks ? Would i have to use 4 different heat sinks for the 4 different LM338 K Steel To - 3 regulators ?

thank$$$
 

If printed circuit has never failed , there is no need to change other components.
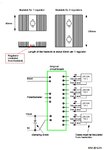
Add clamping diode to output 5...10A / 400V minimum.
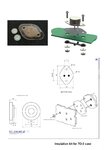
Insulate regulators from heatsinks.
Use 0.75...1.0mm² wires for regulator IC wirings.
You can still improve the distribution of currents between regulators
by adding series resistor 0.22ohm/ 5...7W to each regulator output (Vout) wire.

Brake_V_Control_.jpg

TO3_InsulationKit.jpg
 
Last edited:
How can i do some improvements to your control system without exact knowledge about it ?


i provided all the related knowledge ....... read all the posts & threads plz
 

Status
Not open for further replies.

Part and Inventory Search

Welcome to EDABoard.com

Sponsor

Back
Top