Continue to Site

Welcome to EDAboard.com

Welcome to our site! EDAboard.com is an international Electronics Discussion Forum focused on EDA software, circuits, schematics, books, theory, papers, asic, pld, 8051, DSP, Network, RF, Analog Design, PCB, Service Manuals... and a whole lot more! To participate you need to register. Registration is free. Click here to register now.

[SOLVED] Simple 2A +/-10VDC Dual Rail Virtual Ground Power Supply from 24VDC Plug Pack

Status
Not open for further replies.

designteam

Junior Member level 1
Joined
Oct 1, 2015
Messages
19
Helped
0
Reputation
0
Reaction score
0
Trophy points
1
Activity points
246
I am looking for a circuit design that will produce, from a 24VDC 2A regulated plug pack (SMPS wall wart), +/-10VDC rails with a virtual ground midway. Each rail needs to be capable of providing 1A continuous, or as close as practical.

I would prefer not to build a switching supply, use two separate linked supplies, or (for safety reasons) construct anything from scratch using 110/240VAC mains power. Hence I was considering the type of simple circuits illustrated on this webpage.

https://www.goldpt.com/virtual_ground_circuit.html

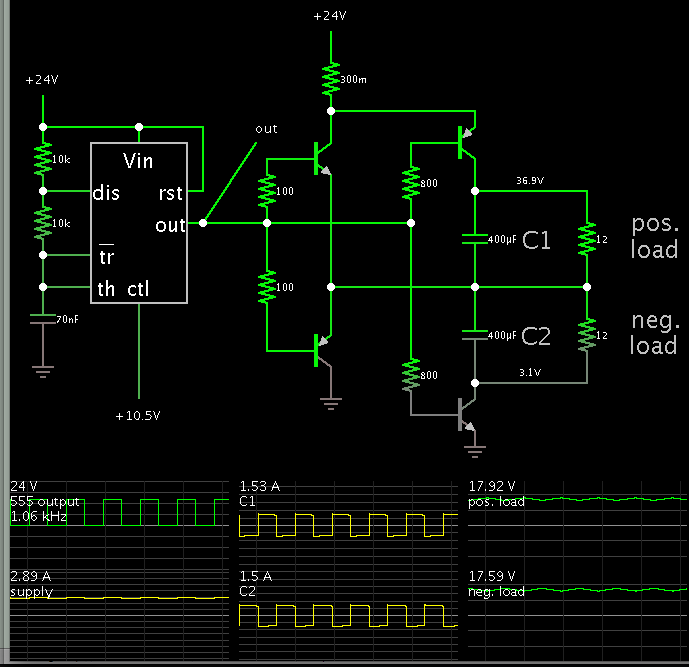
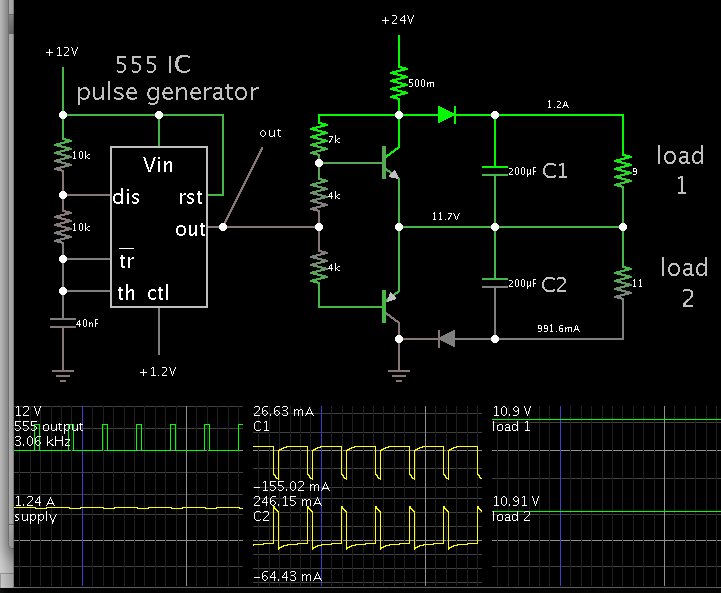
And also this transistor buffered option. But it seems a bit crude since the R3 and R4 would probably run hot.

transistor_buffered_vgnd.png

The circuit I would like to power by this means (a sub-audio amplifier) has been successfully operated using two 12V 1A switch mode plug packs connected in parallel with isolating diodes. However, the +/- rails collapse simultaneously as soon as a resistive load is applied to the amp's output.

I assume the current is insufficient, but there may be another cause of which I am unaware. Unfortunately, I do not have access to a lab quality dual tracking supply with which to investigate further.

Can anyone please describe how to build a power supply as specified above, and ideally refer me to a schematic? I am willing to sacrifice some stability for simplicity.

PS: I can post the amp circuit here if it would be of use.
 

This thread discusses a similar topic. Start with a single 24V supply, obtain +12 -12V split supply with virtual ground.

It has a possible solution: two stacked capacitors similar to your C1-C2. Each one is charged alternately by a half-bridge.

If you wish, add a single inductor in the center, to create a dual-purpose buck converter.

https://www.edaboard.com/threads/338441/
 

Thank you. That was an interesting thread. But it appears the OP's question was not resolved to the point of arriving at any particular design.

I am looking for a similar "simple" solution that does not require design of a switching power supply or the use of inductors. Perhaps an op amp in combination with the transistor buffered supply shown in the schematic above.

Or the fixed regulator approach shown in the web link above. I was hoping for an expert opinion on these since they are not a "standard" configuration. Which one, if any, would be most worth a try for the application I described?
 

Hi,

Al the linear solutions will dissipate a lot of power.
In either way a 1A gnd current will dissipate 12V x 1A = 12W. Either in resistors or transistors.

I'd avoid this.
My solution is a switched one.
A simple buck won't do, because it can source current, but not sink.

Therefore a solution with a 50% duty cycle switching half-bridge combined with a (damped) LC filter will work.
The lowest part count and good quality could be with a class D audio amplifier. There are many ICs around.
Because high volume, they will be low cost.

I recommend to use equal capacitors to both (24V ) supply rails.

Klaus
 

This simulation may resemble the concept mentioned in post #4. Two stacked capacitors are charged alternately from a full H-bridge.

The supply is 24V. The output is 18/18 V split supply, with virtual ground.


Notice the absence of an inductor.

The 555 will not endure 24V. I used it merely because it provides a simple way to adjust the pulse generator. You will need to design a suitable control circuit. You can shorten duty cycles in order to reduce the output voltage.
 

It looks like no one so far is that keen on the regulator-based circuits previously referred to here. https://www.goldpt.com/virtual_ground_circuit.html

I will go with Brad's switching circuit above and breadboard it.

There is still the issue of 16VDC being the maximum allowable supply voltage for an LM555. I have come up with two solutions:

1. Dropping 24VDC to 12VDC with a regulator is a bit steep. Instead, I could feed the switcher with 15VDC using this 2A plug pack from Jaycar. https://www.jaycar.com.au/Power-Pro...ut/Switchmode-Mains-Adaptor-15VDC-2A/p/MP3492

With a bit of luck, I will wind up with a 10Vpp swing from each amp, one powered between the positive rail and VGND and the other powered between the negative rail and VGND.

2. I could feed the 24VDC into an 18VDC regulator and add a 1N4007 diode or two in series to drop it a bit further. This would allow for the full 18VDC rails specified in Brad's schematic.

Before starting, just a few questions please with regard to Brad's circuit.

1. It appears that applying a voltage less than 2/3 Vcc is intended to shorten the charge cycle and increase the output frequency. Why is this necessary?
2. If it IS necessary, and assuming the 15VDC supply, can I feed 9VDC to the LM555 control pin via a 9VDC regulator? I could drop it a bit more with a series diode. Or would a voltage divider off the supply be preferable?
3. I would use a BC327/337 pair for the left-hand transistors, and a TIP41/42 pair for the right-hand ones. 10W ceramics for the 12R resistors. And increase the output caps to 2200uF. Does that sound OK?
4. The rail voltages in the simulation are slightly different. What would be the best way to provide an adjustment to make them equal?

BTW here is a page on running an LM555 from 24VDC. https://www.555-timer-circuits.com/555-on-24v.html

Thank you for any further input.
 

If you are powering an audio amp then the difference in current draw from the plus and minus voltages likely are close to being equal and the virtual ground circuit won't need to handle that much (difference) current.

Below is the LTspice simulation of a virtual ground circuit similar to the one you posted, with a 1A load.
For test purposes the negative load is stepped from 0.9A to 1.0A which gives an output voltage variation of a little over a 100mV, which should not be a problem for an audio amp.

Virtual Gnd.png
 

This morning I built the transistor buffered VGND supply shown in my first post. Everything looked good until I connected the amplifier circuit. The positive rail rose to 17VDC while the negative dropped to 7VDC. Only 34mA was being drawn from my lab power supply set at 24VDC, and both amps, one positively powered and one negatively powered, were connected to identical loads.

For clarification, here is the full circuit, which works as desired ... until loaded.

**broken link removed**

I then reconnected the two linked 12VDC 1A SMPS plug packs I had used in the beginning. In this case the rail voltages did not become unbalanced, but, as previously described, the rails collapsed under load. Adding a 47R series resistor on each output only helped marginally.

Crutshow's simulation above may not apply to my circuit, since there is a 10V offset between each amplifier output signal, which is the purpose of this design.

Unless someone can recognise the problem, I may try using the regulator-based circuits here, but I will first need to order in a few parts. https://www.goldpt.com/virtual_ground_circuit.html

If that fails, I will research another approach, and save up for a dual tracking supply.

- - - Updated - - -

For some reason my prior upload did not work. I have tried again.

elf_demod_coil_driver.jpg
 

There is still the issue of 16VDC being the maximum allowable supply voltage for an LM555.

As it turns out, a 555 can drive a half-bridge even if it puts out 12V. The NPN should be topmost.


Notice the loads are unequal. If you apply a controlling voltage at the 'ctl' pin, you can vary the duty cycle from the 555, and thus balance the output voltages.

There are similar configurations which put the PNP topmost, and add an NPN transistor where it can pull the PNP bias low to turn it on.

If you wish to use an op amp, many of them tolerate a 24V supply. You can find schematics where an op amp acts as the pulse generator. However it may not put out sufficient Amperes to drive transistors. In that case you might get good results by using mosfets.
 

Hi,

What about a LM4755?
It is able to run at 24V, it generates it's bias voltage as half supply voltage inside, can handle 2x2A.
If you connect each output with 4ohms resistor to a capacitor stack, then it's finished.
Leave the inputs open, they are connected internally. No need for a feedback circuit, it is connected internally. Just connect the RC Zobel circuits at the output.

Cheap, low part count, what else do you need?

If you don't like the idea to use an audio amp just for generating the half_supply_gnd, then...
Why not forget about the +/- supply and use stereo BTL amplifiers running off the single 24V.
If your power supply can handle the current, then you achieve up to 4 times the output audio power..
(Compared to a +/-12V system)

Klaus
 

I like Brad's revised LM555 switcher and will give that a try.

The LM4775 idea looks interesting as well. I happen to have a few 10W amp modules I bought as kits on the internet which are looking for work.

https://www.quasarelectronics.co.uk/kit-files/electronic-kit/3143.pdf

I can experiment with the charging frequency by feeding the amp's input with my function generator.

Another option is two 12VDC SLA batteries wired in series.

That should give me enough to do over the week. Thanks for all the responses.
 

Status
Not open for further replies.

Similar threads

Part and Inventory Search

Welcome to EDABoard.com

Sponsor

Back
Top