Continue to Site

Welcome to EDAboard.com

Welcome to our site! EDAboard.com is an international Electronics Discussion Forum focused on EDA software, circuits, schematics, books, theory, papers, asic, pld, 8051, DSP, Network, RF, Analog Design, PCB, Service Manuals... and a whole lot more! To participate you need to register. Registration is free. Click here to register now.

PICDEM FS-USB Programming the .hex factory firmware

Status
Not open for further replies.

AMSA84

Advanced Member level 2
Joined
Aug 24, 2010
Messages
577
Helped
8
Reputation
16
Reaction score
8
Trophy points
1,298
Location
Iberian Peninsula
Activity points
6,178
Hi guys,

I have this demonstration board and I want to program the PIC18F4550 that comes with it with the factory .hex firmware in order to have a fresh board ready to play around.

I have installed the software that came with the board and in the /microchip folder there are a bunch .hex files and I don't know which one to select.

Does anyone knows where can I find the .hex file? Or which one should I use?

I will be programming the device (using PICKit2) to get a fresh start to the board.

Update:

Basically I want to use this board to program my device (PIC18F4550, that comes with the board) using the same software that allow us to play with the board. This way I don't need to be carrying the PICKit2. For that the PIC18F4550 has the bootloader.

Well, from what I have answered in microchip forum together with what I have read around the web (I am doing this for the past 2 weeks, depending the free time I have) basically I can use the .hex that comes from the factory, in this case the .hex from microchip that has the bootloader, usb stack and the program to play around with the board.

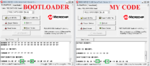
The bootloader block is protected and it is sometimes very difficult to corrupt it but it can happen.

In order to prevent that, an offset must be done so that my firmware/program/code does not corrupt the bootloader. Normally the offset is done from 0x800.

I have done all that I have read the board guide, pic datasheet, examples around the we, video tutorials, etc but I can't program my device using the PDFSUSB. I enter in bootload mode, the PDFSUSB detects the device I select the board in the dropdown menu I load the .hex with no configuration bits, with the configuration bits exactly the same as described in the board user guide and with the basic configuration bits that everyone uses. Nothing happened. The program didn't ran in the board. Regarding the different types of configuration bits that I have mentioned above, for them (except, I think, for the one that I configured exactly the same as described in the board) a message appeared saying some stuffs regarding the configuration bits. I tried every option (YES, NO and CANCEL) and nothing happened.
 
Last edited by a moderator:

So basically, your intended goal is to reinstall the factory bootloader on the FS-USB dev board, which will then allow you to download your application directly to the board using the USB bootloader, rather than use an external PICkit or ICD programmer/debugger.

Is this correct?


BigDog
 

Yes that's correct. I want to use the USB feature of the PIC18F4550 (which was the one I choose to start with, because of the demonstration board) along with the PICDEM FSUSB software to upload the .hex to program my device.

Regards.
 

I would recommend you download the latest Microchip MCHPFSUSB v2.2 USB framework
https://www.microchip.com/Developmenttools/ProductDetails.aspx?PartNO=DM163025

unzip and instal the software - the bootloaders are then in
C:\Microchip Solutions\USB Device - Bootloaders
if you look in the HID bootloader directory you will find firmware for the PIC18 (which you should be able to load using the Pickit 2) and PC software for Visual C++ the bootloader uses the USB HID protocol (as Windows comes with the HID bootloader driver you don't need to load any special USB driver)
 

Yes that's correct. I want to use the USB feature of the PIC18F4550 (which was the one I choose to start with, because of the demonstration board) along with the PICDEM FSUSB software to upload the .hex to program my device.

Alright.

The following procedure with the attached files will return the dev board back to factory state, please do not deviate from these instructions.

Note: Before we proceed, you should be aware there are now two different Microchip FS-USB dev boards and they differ in significant ways:

DM163025: The microcontroller for the PICDEM FS USB board DM163025 is the PIC18F4550, the superset (largest memory and pin count) device of the PIC18F2455/2550/4455/4550 family.

DM163025-1: The microcontroller for the PICDEM FS USB board DM163025-1 is the PIC18F45K50, the superset (largest memory and pin count) device of the PIC18(L)F2X/45K50 family.

Therefore, most of the documentation and reference designs/code now available are for DM163025-1, not the original DM163025. Therefore, when referencing any documentation or port existing code, ensure the documentation is in reference to the DM163025 and the code is written for the PIC18F4550. Otherwise, there maybe unintended issues arise, particularly for reference design code.

I. Before be begin, download all three ZIP files attached below:

FactoryDefaults.zip - MCHPUSB bootloader and Demo for the PDFSUSB Bootloader/Demo App

MCHPUSB27a.zip - The last revsion of MCHPUSB 2.7a which still largely supports the original DM163025 (PIC18F4550), before shifting support to the DM163025-1 (PIC18F45K50), it also contains the latest USB device class drivers for all demos and your custom apps. Unzip and install it in a directory like:

C:\Microchip\MCHPUSB2.7a

So that you may differentiate if from other revisions/releases.

HIDBootloaderDemo.zip - An alternative HID bootloader for the DM163025 and its associated demo for the PDFSUSB Bootloader/Demo App

Now let us begin:

1. First return all jumpers (J1 to J13), excluding the three ICD/ICSP jumpers, to factory default, which is closed. The FS-USB comes from the factory with PCB trace bridges across all jumper positions, therefore if you have broken any of these trace bridges, manually close with a jumper. The three unpopulated ICD/ICSP configuration jumpers (J14, J15, J16) are configured for legacy by default, if you have modified, by breaking trace bridges, this configuration return it to legacy configuration.

FS-USB Jumpers.JPG

2. Attached below are the required files to return the FS-USB dev board back to factory state in the ZIP file, FactoryDefaults.zip, unzip the files, connect an appropriate 9V, center post positive, power supply to the FS-USB dev board, do not attempt to power the FS-USB via the USB port during these programming steps.

Next, plug in your PICkit to your PCs USB port, then connect your PICkit, using an appropriate ICD adapter, to the ICD port on the FS-USB dev board.

Open the PICkit programming application of your choice, either PICkit app or the MPLABX IDE, then load the following HEX file, from the ZIP file above, in preparation to reinstall the bootloader:

USB Device - MCHPUSB - MCHPUSB Bootloader - C18 - PICDEM FSUSB.hex

Before programming the device, ensure you have configured ALL memory and configuration settings, to be fully erased and programmed, then program the device.

3. After the device with the bootloader, detach both the power supply and PICkit, then attach the FS-USB's USB port to a USB port on your PC. If your system attempts to load drivers, click the box to search subfolders to the correct directory, then click the appropriate place and indicate you will manually point the installation app to the correct directory and then browse to the installation directory of of the MCHPUSB2.7a. The driver installation app should then be able to find the latest driver and install it.

4. Now that the bootloader is installed, press and HOLD the S2 button and while continuing to hold it, press and release the S1 (Reset) button, then release the S2 button.

5. Now the FS-USB dev board should be in the bootloader, open the PDFSUSB Bootloader/Demo App, which should have been installed with the MCHPUSB2.7a, click the Bootloader Mode tab and then select the FS-USB dev board from the Select PICDEM FS USB drop down menu.

PDFUSB.JPG

Now click the Load Hex File button, browse and select the following file:

picdemfsusb.hex

From the FactoryDefaults folder, then click Program Device. You should then see an indication of a success message below.

PDFUSBProg.JPG

6. Now, press and release the S1 (Reset) button, the FS-USB dev board should then reenumerate as another USB device class, if it attempts to install a driver, simply follow the same steps in section 3 above. Once the FS-USB dev board as enumerated, click the Demo Mode tab of the PDFUSB app, then use the Select PICDEM FS USB Board drop down menu to select the FS-USB dev board and then click the Connect button:

PDFUSBDemo.JPG

Optional:

As Horace mentioned, there is an alternative HID bootloader which may have some advantages over the original MCHPUSB bootloader, I have included a ZIP with both the HID bootloader and the associated Demo for the same PDFUSB Demo app. However, if you install the HID bootloader, you will need to utilize the USB HID Bootloader app installed with MCHPUSB2.7a, rather than the PDFUSB Bootloader/Demo app.

Simply follow the above steps substituting the following HEX file for the bootloader:

USB Device - HID - HID Bootloader - C18 - PIC18F4550.hex

And the following HEX file for the associated Demo app:

USB Device - MCHPUSB - Generic Driver - C18 - PICDEM FSUSB.hex

The following is a screenshot of the USB HID Bootloader app:

HIDBootloaderApp.JPG

You can continue to use the PDFUSB Demo tab as before for the Demo app.


Hope the above helps in your endeavors,

BigDog

- - - Updated - - -

Update:

Apparently, when editing the above reply, the link to the MCHPUSB 2.7a ZIP file was lost, however now the forum software will not allow me to upload it once again.

I believe I found the correct Microchip MLA with the MCHPUSB 2.7a distribution, of course it contains the entire Microchip Libraries for Applications as well.

Microchip MLA v2010-08-04

Anyway, let me know if you have any problems with downloading it from the above link.


BigDog
 

Attachments

  • FactoryDefaults.zip
    17.5 KB · Views: 134
  • HIDBootloaderDemo.zip
    11.6 KB · Views: 129
  • Like
Reactions: AMSA84

    AMSA84

    Points: 2
    Helpful Answer Positive Rating
Hi BigDog, I thank you very much for your effort and dedication for trying to explain me how to put the board with factory default options. I have done everything as you explained and I was able to successfully put the board with its factory options.

That said, unfortunately I didn't managed at all do what I wanted to do, which is program the device through the USB cable without resorting to the PICKit2 each time I wanted to upload my firmware to the device. I was willing to make a factory reset to the board so that I could be sure that I haven't altered anything on the board, bootloader, etc and doing that, experiment, with clean conscience, upload my firmware.

After doing the factory reset as described by you in the previous post, I compiled (clean and build the simple program I did) and uploaded it to the device using the same procedure to upload the demo board .hex. I have launched the PIC into the bootload mode through S2 and S1, the PICDEM tool has detected normally the board, I selected it, erased the program that was inside the PIC ( the demo board .hex previously uploaded) and programmed my code. This is the code I have uploaded (very very very simple):

Code:
#include <xc.h>
void main (void)
{
 TRISD = 0x00; //set PortB.RB0 as output
 
 while (1) //infinite loop
 {
 LATDbits.LATD3 = 1;
 }
}

As it is. Very simple. No configuration bits programmed. This code was uploaded into the pic through the PICDEM tool. Before that a waning dialog box appeared with the three options:

YES - To use the settings contained in the .hex file;
NO - To use the board's default settings;
Cancel - To use the board's current settings;

in which I selected NO. After reseting the PIC (through S1 and later, in the second attempted using the execute button in the PICDEM tool) nothing happened. It was supposed to turn on LED D3. As a second attempt I selected CANCEL in that dialog box and had the same results. Nothing.

I was about to forget to tsay that I have done a code offset of 800. For this I right-clicked on the project name -> properties -> in the categories I selected the XC8 -> in option categories I selected Additional options -> then in the field codeoffset I just inserted 800 in that field.

What I am doing wrong? Do I need to #include any other file? Do I have to program directly in the code that offset? Do I have to insert USB related code?

Thank you again in advance.

Best regards.

EDIT: For curiosity I have done the same procedure for the HID Bootloader. I have uploaded the bootloader firmware through the PICKit2 programmer and I used the HIDBootLoader.exe to check if the device was detected and in fact it was. Moreover (I don't know if it is supposed to be done like this), I used this software to upload the demo firmware into the PIC. I did that successfully. At least it was what appeared on the dialog box.

Well, after that I tried to run the demo and exploring a little bit all the folders I ended up in this folder: C:\Microchip Solutions v2010-08-04\USB Device - HID - Custom Demos -> GenericHIDSimpleDemo.exe, which I don't know if it is the corresponding demo tool (equivalent to the PDFSUSB.exe software for the MCHPUSB Bootloader) to try the PICDEM FSUSB Demo Board. But I could not manage to connect to the PIC, don't know why. I tried the software by entering in the bootload mode by pressing S2 then S1 and then releasing S1 and just by pressing S1 (supposed reset button) and in both way the GenericHIDSimpleDemo.exe didn't allowed me to connect to the device.

After that I tried to upload my led program into the pic through the HIDBootLoader.exe software, but now with an offset code of 0x1000 but didn't work, that is, the LED didn't turn on after programming the device and pressing S1.

- - - Updated - - -

By the way, BigDog, where can I find the firmware of the picdemfsusb.hex?

Regards.
 
Last edited:

Important update:

If I use the code in the MCHPFSUSB\fw\Demo folder from the MCHPFSUSB_Setup.exe which I think it is the very first project in USB communication from microchip I can get what I want. I just change the code inside the main function and doing all the procedure that I described above I manage to program the PIC through USB using the PICDEM tool.

Don't know why...;

Actually the answer to the problems you've encounter is quite simple.

All bootloader occupy a specific portion of the device Flash (ROM) memory, in the case of the MCHPUSB bootloader, this is the range from 0x000 to 0x7FF, this ensures upon reset, either power up/startup or pressing the S1 (MCLR) button, the bootloader firmware is immediately ran. Also, typically bootloader, as is the case with the MCHPUSB bootloader, write protect the section/block of Flash (ROM) they inhabit, this prevents downloaded code from inadvertently writing over the bootloader.

Upon startup/reset, in the case of the PIC18F family,execution of code begins at Flash (ROM) address 0x000, the bootloader is executed which then checks the status of the S2 button (RB4 line), to determine if it should remain in bootloader mode or branch to Flash (ROM) address 0x800, which is the intend start location of either the demo app or your custom app.

Therefore, you must indicate to the compiler, to which you are using to developing code, that the compiled code must be relocated/offset from starting address 0x000 to 0x800. Of course, as the boot section/block of Flash (ROM) which contains the bootloader is write protected, if the HEX file containing your code does not indicate a starting address of 0x800 or higher, as was the case with you test app:

Code:
#include <xc.h>
void main (void)
{
 TRISD = 0x00; //set PortB.RB0 as output
 
 while (1) //infinite loop
 {
 LATDbits.LATD3 = 1;
 }
}

The code which overlaps the write protected boot section/block, inhabited by the MCHPUSB bootloader is not written.

The same is true of the HID bootloader, however I suspect it inhabits a slightly different range of Flash (ROM).

In any event, this explains, why when you use an existing "demo" project intended for a specific bootloader, either the MCHPUSB or the HID, and then alter it by replace much of the existing code with your app code and then compile it, you are then able to successfully download the code and execute it using the bootloader.

Most of the example demo use the C18 legacy compiler, it appears you are using the XC8 compiler is that true?

I'll try and find some examples of how-to setup/configure which ever compiler you would like to utilize to develop your code.

Hope the explanation above answers the issues you faced.

By the way, you can see the importance of write protecting the boot section/block inhabited by the bootloader, which is why I specifically indicated to ensure that the configuration registers be set for programming when downloading the bootloader HEX file. As you can guess, if the boot section/block is not write protected, by ensuring the proper configuration register settings contained in the HEX file are applied, any application HEX file not properly offset/relocated to, in the case of the MCHPUSB bootloader, Flash (ROM) address 0x800 would essentially write over the bootloader code.

BigDog
 

Hi BigDog, thank you for answering me again. I hope that this thread can help others.

Don't know where to start. I am sorry if this starts become a bit confused. I will try to comment and answer your comments.

All bootloader occupy a specific portion of the device Flash (ROM) memory, in the case of the MCHPUSB bootloader, this is the range from 0x000 to 0x7FF, this ensures upon reset, either power up/startup or pressing the S1 (MCLR) button, the bootloader firmware is immediately ran. Also, typically bootloader, as is the case with the MCHPUSB bootloader, write protect the section/block of Flash (ROM) they inhabit, this prevents downloaded code from inadvertently writing over the bootloader.

Yes, from what I have been reading I arrived to that conclusion. This is why I have mentioned above that, when I have compiled my code I had the caution to "In order to prevent that, an offset must be done so that my firmware/program/code does not corrupt the bootloader. Normally the offset is done from 0x800."

and what I have done was this:
"I was about to forget to say that I have done a code offset of 800. For this I right-clicked on the project name -> properties -> in the categories I selected the XC8 -> in option categories I selected Additional options -> then in the field codeoffset I just inserted 800 in that field."

Now, I ask, you mention "in the case of the MCHPUSB bootloader" (which corresponds to the bootloader from the very first version of the microchip USB implmentation that I referred above), but, what about the other bootloader that you have uploaded? It is not supposed to have the same "range from 0x000 to 0x7FF"? Do you know where to find the firmware of the factory default "USB Device - MCHPUSB - MCHPUSB Bootloader - C18 - PICDEM FSUSB.hex"?

It's this one: C:\Microchip Solutions v2010-08-04\USB Device - Bootloaders\Vendor Class - MCHPUSB Bootloader\Bootloader - Firmware for PIC18F4550 Family Devices?

At least, in the USB Precompiled Library Projects folder, there is no firmware that can be related to the file that you have posted "USB Device - MCHPUSB - MCHPUSB Bootloader - C18 - PICDEM FSUSB.hex". I found an .hex similar in the name to the one that you have posted, I don't know if it was there where you get it: C:\Microchip Solutions v2010-08-04\USB Precompiled Demos\PICDEM FSUSB\MCHPUSB Bootloadable.

Upon startup/reset, in the case of the PIC18F family,execution of code begins at Flash (ROM) address 0x000, the bootloader is executed which then checks the status of the S2 button (RB4 line), to determine if it should remain in bootloader mode or branch to Flash (ROM) address 0x800, which is the intend start location of either the demo app or your custom app.

Exactly. The bootloader is executed depending on the S2 button status. That is, the bootloader will check for the S2 and if it is pressed it will enter in the bootload mode if the reset is performed.

Therefore, you must indicate to the compiler, to which you are using to developing code, that the compiled code must be relocated/offset from starting address 0x000 to 0x800. Of course, as the boot section/block of Flash (ROM) which contains the bootloader is write protected, if the HEX file containing your code does not indicate a starting address of 0x800 or higher, as was the case with you test app:

You are right, but it was not supposed that the .hex file save the offset that is introduced in MPLAB X? "right-clicked on the project name -> properties -> in the categories I selected the XC8 -> in option categories I selected Additional options -> then in the field codeoffset I just inserted 800 in that field" Or this must be indicated/done in the code?

Well, I ask that because, while I was exploring that Microchip project, I decided to eliminate some blocks of code in the main file and I concluded that, at certain point, if I eliminate this piece of code:

Code:
/** V E C T O R  R E M A P P I N G *******************************************/

extern void _startup (void);        // See c018i.c in your C18 compiler dir
#pragma code _RESET_INTERRUPT_VECTOR = 0x000800
void _reset (void)
{
    _asm goto _startup _endasm
}

from all this:

Code:
/*********************************************************************
 *
 *                Microchip USB C18 Firmware Version 1.0
 *
 *********************************************************************

/** I N C L U D E S **********************************************************/
#include <p18cxxx.h>
//#include "system\typedefs.h"                        // Required
//#include "system\usb\usb.h"                         // Required
//#include "io_cfg.h"                                 // Required

//#include "system\usb\usb_compile_time_validation.h" // Optional
//#include "user\user.h"                              // Modifiable

//#include <portb.h>									// For interruptions
//#include "def_ports.h"								// Port definitions
//#include "def_interruptions.h"						// Interruption definitions

//void int_routine(void);

/** V E C T O R  R E M A P P I N G *******************************************/

extern void _startup (void);        // See c018i.c in your C18 compiler dir
#pragma code _RESET_INTERRUPT_VECTOR = 0x000800
void _reset (void)
{
    _asm goto _startup _endasm
}


/*#pragma code
#pragma code _LOW_INTERRUPT_VECTOR = 0x000818

void _low_ISR (void)
{
    ;
}*/


// HIGH PRIORITY INTERRUPTS VECTOR
/*#pragma code high_interrupt_vector = 0x808
void high_interrupt (void)
{
	_asm goto int_routine _endasm
}*/


//#pragma code
//#pragma interrupt int_routine


/*void int_routine (void)
{
	// Lights LED D3 and D4, which is connected to bit 2 and 3 of  port D (PD2 and PD3), 
	// only when both switches 2 and 3, connected bits 4 and 5 of port B (PB4 and PB5) are pressed.
	if(!PB4 && !PB5 ) {
		PD2 = 1;
		PD3 = 1;
	}
	else {
		PD2 = 0;
		PD3 = 0;
	}
	RBIF = 0; // Clear the interrupt flag for port B.
}*/


/******************************************************************************
 * Function:        void main(void)
 * Overview:        Main program entry point.
******************************************************************************/
void main(void)
{
  TRISDbits.RD2 = 0;
  while(1)
  {
      LATDbits.LATD2 = 1;
  }
} //end main

The code that I program into the device (the one that I insert inside the main function) does nothing. The LED doesn't turn ON.

Analyzing that piece of code I think that what it is doing is relocating (offseting) the starting address from 0x000 to 0x800.

Well, I ask, why doing this, the thing works? And using the code offset of the MPLAB X it does not work at all?

Most of the example demo use the C18 legacy compiler, it appears you are using the XC8 compiler is that true?

I am using, or I am willing to use the XC8 because it is the newest compiler and because I have been told and read around the web that XC8 is the way to go and that the C18 is obsolete. God knows why.

However, to open the MCHPUSB bootloader firmware, I have used the MPLAB X functionality "Import MPLAB Legacy Project" and I have chosen the C18 compiler, because I supposed that this firmware was written and compiled taking into account the C18 compiler (obviously).

This is another interesting thing, can there be any confusion from the point of view of the MCHPUSB bootloader to interpret a code compiled with XC8 compiler? Can the booloader feel some difficulty to understand that code offset made with the MPLAB X? Well the MCHPUSB was compiled with C18 and my code with XC8.

Thank you in advance for your effort and attention.

Best regards.

EDIT: I was thinking on another thing. In my project I don't have any linker file attached into the Projects -> Linker Files. From what I read if there is no linker file, MPLAB X will use the default linker filer. This might be influencing this code offset thing?

- - - Updated - - -

EDIT for the first paragraph in bold:

NOTE: But this was done separatly from the "MCHPUSB bootloader". This "MCHPUSB bootloader" is compiled with the C18 compiler and my code is compiled using the XC8. The code offset is done in the MPLAB X feature using the XC8 compiler.

Can this mean that the "MCHPUSB bootloader" must be written in XC8 so that he can understand the code offset implemented through the MPLAB X code offset feature?
 
Last edited:

The replies to this thread are getting quite long, therefore I will attempt to break down my replies to cover a single topic or two. Otherwise, it becomes quite difficult to ensure I'm adequately addressing the issues and questions you've presented.

Concerning your most recent comments:

EDIT: I was thinking on another thing. In my project I don't have any linker file attached into the Projects -> Linker Files. From what I read if there is no linker file, MPLAB X will use the default linker filer. This might be influencing this code offset thing?

Each compiler/IDE toolset has a unique way of handling code section offsets, as you indicated, XC8/MPLABX offers a linker offset value which can be set to the intended starting address of your code. While the C18 compiler I seem to remember requires a specific linker script to implement code section offsets.

I also forgot to mention, in the case of the PIC18F family of microcontrollers, two additional code section offsets are required, both the high priority and low priority interrupt vector address must be relocated from their normal addresses of 0x0008 and 0x0018 to 0x0808 and 0x0818, in the case of the MCHPUSB bootloader. Depending on the compiler this can be accomplished with either a linker script or #pragma preprocessor directives, in the case of the XC8/MPLABX toolset, I believe this is handled with #pragma preprocessor directives.

I also believe, in the case of XC8/MPLABX as the makefiles and linker scripts are automatically generated, most configuration issues can be best handled through the use of MPLABX project settings and


EDIT for the first paragraph in bold:

NOTE: But this was done separately from the "MCHPUSB bootloader". This "MCHPUSB bootloader" is compiled with the C18 compiler and my code is compiled using the XC8. The code offset is done in the MPLAB X feature using the XC8 compiler.

Can this mean that the "MCHPUSB bootloader" must be written in XC8 so that he can understand the code offset implemented through the MPLAB X code offset feature?

Concerning the use of XC8 vs C18 compilers to develop MCHPUSB based applications in conjunction with a bootloader, using a different compiler for developing your application has no bearing on the compiler used to originally compile the bootloader currently installed. The bootloader simply does NOT care where the code came from, it simply receives the firmware transmitted over the USB interface and then attempts to write it to Flash, which is why it is imperative that the source code, compiler and IDE be properly configured to offset both the starting address and any vector addresses which are relevant to the underlying microcontroller hardware. However, I mentioned before different bootloaders tend to inhabit different boot/code sections of Flash. Which is why, code compiled for the MCHPUSB bootloader will typically not function as expected if loaded with the HID bootloader and vice versa.

I'm currently formulating answers and suggestions for the other issues you presented in your last reply.

I will also attempt to upload the MCHPUSBv2.7a ZIP file as I believe it is the last version which fully supports the original FS-USB dev board.


BigDog
 

Ok BigDog I am looking forward. I will be wating for your formulated answers.

Thank you once again.

Regards.
 

EDIT:

Yes, I read too that the high priority and low priority interrupt vector address must be relocated from their normal addresses of 0x0008 and 0x0018 to 0x0808 and 0x0818. But from the point of view of the MPLAB X feature of offsetting the code and from what I have understood, when one tells the compiler to do the offset of the code, to start at 0x800 he automatically relocate the high priority and low priority interrupt vector address. So, theoretically one just would need to change the reset vector to 0x800.

Allow me to ask you this:

Depending on the compiler this can be accomplished with either a linker script or #pragma preprocessor directives, in the case of the XC8/MPLABX toolset, I believe this is handled with #pragma preprocessor directives.

the source code, compiler and IDE be properly configured to offset both the starting address and any vector addresses which are relevant to the underlying microcontroller hardware.

When you say that at bold, means that I should tell the MPLAB X to offset the code through the project setting, that is, the code offset feature, and at same time write in my program the #pragma preprocessor directives? I must do both?
 

When you say that at bold, means that I should tell the MPLAB X to offset the code through the project setting, that is, the code offset feature, and at same time write in my program the #pragma preprocessor directives? I must do both?

The following applies to only the HID bootloader, when compiling an application, using XC8, to be downloaded using that specific HID bootloader.

According to the Microchip documentation, they indicate you must not only offset the code, by 0x1000, you must also apply the following setting to the ROM range found under the linker settings and memory model, default,-0-FFF,-1006-1007,-1016-1017.

----------------------------------------------------------------------
NOTE FOR BUILDING APPLICATION FIRMWARE PROJECTS WITH THE XC8 COMPILER:
----------------------------------------------------------------------
When building the application project that is meant to be programmed by this
bootloader, you must use different XC8 linker settings as this project.
For application projects, two linker settings are required:

ROM ranges: default,-0-FFF,-1006-1007,-1016-1017
Codeoffset: 0x1000


When the above settings are implemented, the application firmware will no longer work
without the bootloader present. Therefore, it is recommended to add the bootloader
firmware output (from this bootloader project) .hex file as a "Loadable" into
the application firmware project. This will allow the "HEXMATE" tool to run
after building the application firmware project, which will merge the application
output .hex file contents with the bootloader output .hex file contents (which was
added as a loadable file).

However, in some cases you may encounter build errors during the hex merge operation.
This will occur if there are any overlapping regions in the bootloader firmware
.hex file, with the application firmware .hex file, when the contents of these
overlapping regions are not 100% exact matches to each other. Normally, only the
configuration bit settings will be overlapping between the two projects.

Therefore, to prevent build errors, the configuration bit settings between the
bootloader firmware project and the application firmware project must be set to
100% exactly identical values (or they must only be set in one of the projects,
to eliminate the overlapping region altogether).

However, I still am unable to properly compile your simply application, download the HEX file to the FS-USB and have it successfully execute.

Perhaps, you will have better luck.

I'm starting to suspect, the XC8 may still have some bugs and using the C18 maybe your only option.

I will make additional attempts tomorrow, however as of this point, I've not had any luck with compiling an application for the HID bootloader.

I did manage to recompile the HID bootloader using a licensed XC8 Pro compiler and it seemed to function as expected.


BigDog
 

Hi BigDog,

So what you suggest? Use Microchip C18 compiler?

Allow me to ask you another question. Imagine the simple program that I have written. As it is and without any code offset, after compiling the code, the program should start at the reset vector 0x0000, right?

Well, I tried to do an experience. I have imported the .hex file, already compiled (XC8) without code offset, to the MPLAB X and I took a look at the Program Memory. This is what I got:

1.png

Why is that the program does not start at 0x0000? I mean he does start at 0x0000 but it does a goto 7FF4. It is not supposed to fill the next lines with the rest of the code?

Moreover, after I do this experiment, I tried with the code offset. I configured the code offset in the MPLAB X and I did the same procedure as I mentioned above, to check the Program Memory and I got the same thing, that is, the program does start at the address 0x800 but it then jumps to the same 7FF4 address. Why?

One last question. I have configured the Configuration Bit in my program exactly the same as the configuration bits of the bootloader HEX file. The field configuration memory is the same or equivalent to the configuration bits in MPLAB X?
 

Attachments

  • 3.png
    3.png
    32.6 KB · Views: 135
Last edited:

So what you suggest? Use Microchip C18 compiler?

As I indicated in my previous reply, I suggest using the Microchip C18 Compiler with MPLABX IDE.

I have successfully compiled numerous demo applications with the C18 compiler, download the HEX file to the HID bootloader and ran them without any issues.

I have also attached a template, consisting of racing LEDs, which you can use as a basis for your applications.

I recommend downloading the HEX file, LoadableTestC18.hex, within the dist directory to the HID bootloader as a demo, before you alter the code.

Just follow the comments in main.c for proper location of user system initialization and application code.


BigDog
 

Attachments

  • LoadableTestC18.X.zip
    46.9 KB · Views: 93

Hello BigDog, thank you for the reply.

Well, I guess that there is no other way than do as you indicated. It is a shame that the microchip does not have their bootloader for XC8 compiler or doesn't explain how can we convert the C18 bootloader to XC8.

I will try your suggestions. I will give you a feedback when I am done.

Regards.
 

Status
Not open for further replies.

Similar threads

Part and Inventory Search

Welcome to EDABoard.com

Sponsor

Back
Top